
June 24, 2009
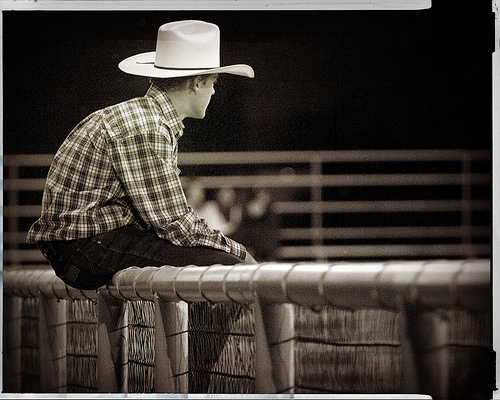
On the Fence

Canon 5D Mark II, Canon 70-200 f4L with 1.4x Extender – 1/80 second, f/5.6, ISO 6400
Canon 5D Mark II, Canon 70-200 f4L with 1.4x Extender – 1/80 second, f/5.6, ISO 6400
Canon 5D Mark II, Canon 70-200 f4L with 1.4x Extender – 1/80 second, f/5.6, ISO 6400
LeggNet’s Digital Capture
© Rich Legg, Inc. All rights reserved.
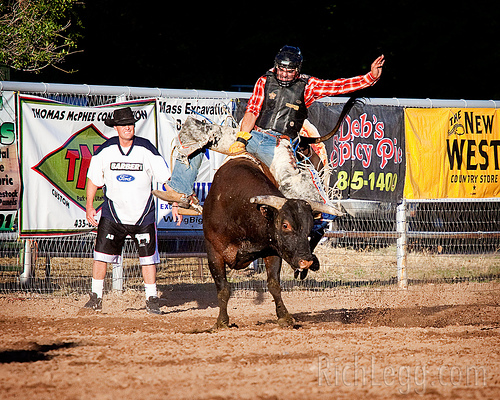
Canon 5D Mark II, Canon 70-200 f/4L with 1.4x Extender – 1/1600 second, f/5.6, ISO 400
In preparation for a photography clinic I will be teaching at a rodeo next month with Ann Torrence, I spent Friday night at the rodeo in Morgan, Utah. While the clinic we’re teaching isn’t specifically about Rodeo Photography, it is in the arena and will have horses & riders as subjects. With this in mind, I figured it would make sense to do a scouting trip to another event ahead of time to familiarize myself with the surroundings.

Here are a few things I learned:
– High ISO on the Canon 5D Mark II is a Godsend
– The longer the lens the better (especially on a fullframe body)
– The 5D Mark II’s focus points & speed are nearly inadequate for this type of work
– Be ready for the transition from daylight to dark
– Shooting with a monopod is a must
– Consider JPG to keep from filling the buffer too quickly
– Cowboys are genuinely nice people
– Rodeo’s are great fun at an affordable price
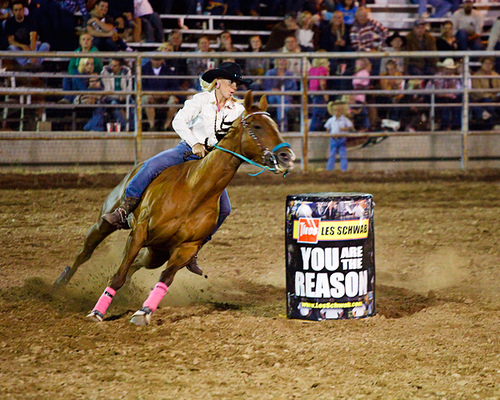
Canon 5D Mark II, Canon 70-200 f/4L – 1/80 second, f/5.0, ISO 6400
All in all, it was a great evening. If I were doing this type of work on a regular basis, I would definitely want a faster body. I think a Canon 50D with it’s faster frame-rate and 1.6x sensor would be a nice camera at an affordable price. Of course, budget permitting, it goes without saying that a body from the Canon 1D or Nikon D3 series would be the best choice.
LeggNet’s Digital Capture
© Rich Legg, Inc. All rights reserved.
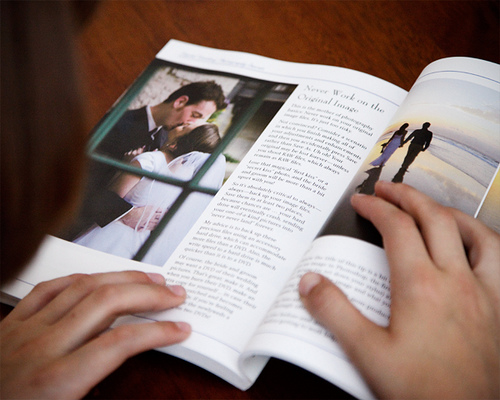
This past weekend I made an unplanned book purchase, but one that I was happy to make. The purchase began with a phone call from a fellow photographer. She was at Barnes & Noble and recognized one of my images on the back of a book. It’s always neat to find one of my stock photos “In the Wild” so I figured that I would stop by the store sometime and take a look at how it was used.
While headed to a Father’s Day lunch with my daughters the next day, we found ourselves next door to Barnes & Noble so we popped in to find the book. When I found the book I was pleasantly surprised. In addition to the single image on the back cover, there were six other uses of my work inside the book. That was great to find, but what really caught my attention was the quality of the book. Not only was the photography top-notch (heh heh), but the content was very good – good enough in fact that I coughed up the cash to add this book to my library.
The book is titled Digital Wedding Photography Secrets and is written by Rick Sammon. I have listened to Rick on the PhotoFocus podcast, but had never read one of his books.

The information presented in the book is very thorough and informative. Rick covers nearly every aspect of what it takes to photograph a wedding – from planning to shooting to processing. The information is presented in a way that it is usable to photographers regardless of skill level. After leafing through just a few chapters I knew this was a book I wanted to have on hand to use as a reference manual. As anyone who photographs weddings has probably experienced, there can be a fear of missing out a key detail in the craziness that can happen when shooting a wedding. A brush-up from a book such as this before heading out to photograph the event can be a valuable tool in ensuring that you don’t miss a thing.
The book can be found at Amazon.com for under $20. If you’re a photographer that shoots weddings or are thinking of heading in that direction in the future, I’d definitely recommend picking up a copy for your library.
…and once you have it, be sure to look for my images 🙂
LeggNet’s Digital Capture
© Rich Legg, Inc. All rights reserved.

Canon 5D Mark II, Canon 70-200 f/4L lens – 1/160 second, f/4, ISO 6400
LeggNet’s Digital Capture
© Rich Legg, Inc. All rights reserved.
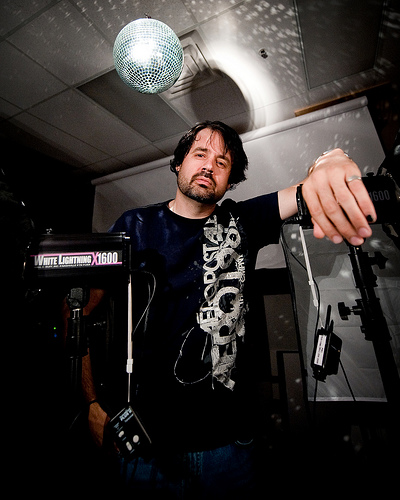
One of the great things about doing what I do is that I get to hang out with some awesome photographers. Scott Jarvie is one of those people.
Jarvie dropped by the studio earlier this week to take part in a planning meeting for the August photography clinic that we’ll be teaching when an impromptu photo session occurred. He was mesmerized by the mirror ball hanging in the studio (oh! Shiny!!) and wanted to take some shots with it in the background. I was the lucky model chosen to stand in. The tough/cool/trendy photographer look I’m sporting in the shot just cracks me up. But hey, gotta love how I got my White Lightnings in the shot. Thanks Jarvie!
Nikon D700, Nikon 14-24 f/2.8 lens – 1/125 second, f/2.8, ISO 1600
LeggNet’s Digital Capture
© Rich Legg, Inc. All rights reserved.

Canon 5D Mark II, Canon 24-105 f/4L lens – 1/80 second, f/9, ISO 100
LeggNet’s Digital Capture
© Rich Legg, Inc. All rights reserved.

While I get caught up on life after being gone for a week, I’m going to take the easy way out and share a quick image-in-use snapshot for today’s post. Enjoy your Tuesday!
Canon 5D Mark II, Canon 24-105 f/4L lens – 20 seconds, f/8, ISO 200

Today is a day for recuperation after a 26 hour marathon drive from Salt Lake City to Houston on Sunday/Monday. I made the trip as a co-driver to help a friend who is moving back here. After some rest today, I will continue on to College Station tomorrow to spend a few days with my son before flying home.
Today’s image is a quick oneI shot this morning while taking a walk around a nearby park. Even though I was tempted to try and capture some Stock Images on the outing, I mostly ended up taking touristy snaps.
Blog updates will most likely be sporadic this week, but next week things should get back to normal.
Canon 5D Mark II, Canon 24-105 f/L lens – 1/250 second, f/4, ISO 100
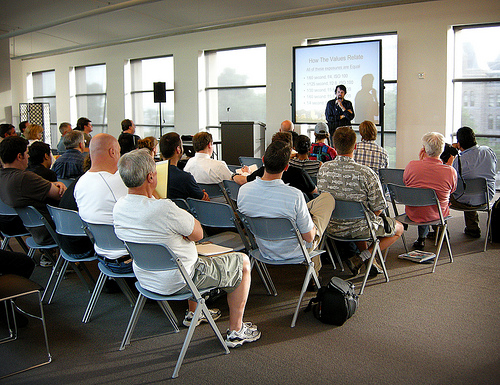
Photo by Nicole Young
I’m pleased to say that last night’s Basics of Exposure mini-clinic at the Salt Lake City library was a success. Over 60 photographers listened in on my 90 minute presentation about the subject. It is always great to meet new people that share my passion and last night was no exception.
I have made my Powerpoint presentation available for download for anyone who would like to recap the session. It, along with some of my other presentations, can be found at leggnet.com/presentation.

As a humorous aside, while a few of us were chatting in the library lobby after the class, Niki spotted one of my images in use – the same image that I had just used as a background for the slides in my presentation. Too funny!

The third session of my 2009 Photography Mini-Clinic series is being held tonight at the Salt Lake City library. So why did I post a picture of a water spigot? Since the subject of the class is the “Basics of Exposure”, one of the analogies I use to teach exposure is water moving through a pipe. If you want to learn more you’ll just have to come 🙂
The clinic is free to anyone who wants to attend. For all of the details, visit the announcement post by clicking here.
Canon 30D, Canon 24-105 f/4L lens – 1/1600 second, f/4, ISO 100

I’ve just completed the editing, keywording and uploading of images from my most recent stock photo shoot. The location for the session was a local dentist office with a goal of creating realistic images of dental professionals at work. To help me keep things real the both the owner of the dental office and one of the dental assistants were available during the shoot. Shannon, the dental assistant, also participated as one of the models and did an outstanding job as evidenced by the image above.

In this behind-the-scenes image of models Nate and Sarah portraying dentist and patient you can see Courtney (the office owner) watching the scene to ensure accuracy. It was great to have her help. She completely understood the importance of keeping the images realistic.
As always, big props go out to the people that made this shoot possible. Without great locations and models, I absolutely could not do what I do. Thanks to Courtney for access to the location; Shannon, Kati, Sarah, Saylor, Mark, Nate & Harry for modeling; Tori for assisting and lastly Huge Props to Jenn for introducing me to Courtney!
The set of images from this outing can be found in my iStock portfolio once they clear inspection by clicking here.
LeggNet’s Digital Capture
© Rich Legg, Inc. All rights reserved.

Yesterday afternoon I reached a milestone in my stock photography business – I uploaded the 5,000th image to my portfolio on iStockphoto.com. The 5K image was one from last week’s Dentist Office photoshoot of 3 year old Saylor being a great model in the dentist chair.
Here’s to the next 5,000 images.
Canon 5D Mark II, Canon 24-105 f/4L lens – 1/100 second, f/5.0, ISO 100
LeggNet’s Digital Capture
© Rich Legg, Inc. All rights reserved.
I was honored last week to be a guest on two separate podcasts. The first of these has been published and is available to download and/or listen to. The host of Adorama’s TechTock, Jack Howard, interviewed me about my stock photography business and my involvement in groups such as Photowalking Utah. If you’ve got a half hour of your life that you’re willing to give up to my ramblings, then click below to give it a listen. And since Jack puts together a pretty good photography show, why not considering subscribing to the podcast?
LeggNet’s Digital Capture
© Rich Legg, Inc. All rights reserved.
Note: Today’s post was originally posted by one of iStockphoto’s top contributors, Sean Locke, on his blog on 05.26.09. It is being reprinted here with his permission.
___
Making the rounds today through various forums, is this nugget of an editorial piece from ABC’s Good Morning America show: Make Money in May- Selling Stock Photos. Apparently, by snapping random things about your office, as detailed in the piece, you can make thousands of dollars to put your kids through school.
Advisory to anyone who has viewed this piece and has stars in their eyes: it is not as easy as turning your logo’d coffee cup away from your point and shoot camera.
Please note, I am a top contributor to the mentioned site, iStockphoto.com . So, I know what I am talking about, when I say to take this editorial news piece with a few grains of salt.
You are not going to make $10,000 from… (keep reading at Sean Locke Digital Imagery)
LeggNet’s Digital Capture
© Rich Legg, Inc. All rights reserved.

Canon 5D Mark II, Canon 24-105 f/4L lens – 1/30 second, f/4, ISO 800
LeggNet’s Digital Capture
© Rich Legg, Inc. All rights reserved.

Here’s a sample showing a fairly typical use of one of my stock images. This shot of Alyssa as a fast food worker came from a series I did last year in a local eatery.
While an image used in this context isn’t nearly as exciting as some of my higher-profile usages, it is this type of bread & butter sale that pays the bills.
LeggNet’s Digital Capture
© Rich Legg, Inc. All rights reserved.

Canon 5D Mark II, Canon 24-105 f/4L lens – 1/80 second, f/5.6, ISO 100
LeggNet’s Digital Capture
© Rich Legg, Inc. All rights reserved.

I’m pleased to announce that I will be leading one of the groups on this summer’s World Wide Photowalk. The goal of the event is to coordinate simultaneous photowalks throughout the world on July 18th. Scott Kelby came up with the idea last summer and had great participation. This year’s event will surely surpass that.
The group I’m leading will be taking an evening walk on the Jordan River Parkway in West Jordan, Utah. Unlike our normal Photowalking Utah outings, this one will require pre-registration and have a cap of 50 participants. Since the registration has already filled up nearly halfway in less than 24 hours, I would recommend grabbing a spot early if you would like to ‘officially’ participate. To save your space, visit the registration page at worldwidephotowalk.com/west-jordan-ut-usa.
For all the info on the event and to find one in your area (if you’re not in Northern Utah), drop by the website at www.worldwidephotowalk.com.
LeggNet’s Digital Capture
© Rich Legg, Inc. All rights reserved.
Canon 5D Mark II, Canon 24-105 f/4L lens – 1/30 second, f/4, ISO 800
LeggNet’s Digital Capture
© Rich Legg, Inc. All rights reserved.

Here’s a quick sample composite from last week’s photo shoot I did for a local chiropractic office. The doctors posed the model to demonstrate four stages of spinal degeneration.
Canon 5D Mark II, Canon 24-105 f/4L lens – 1/125 second, f/7.1, ISO 100
Update:
I was contacted by a nice chiropractor, Dr. Smith, that had previously created a poster similar to the above photograph showing the many stages of spinal degeneration. His was drawn up by an artist and shows in much more detail (both text and illustration) how our bodies can “de-evolve” over time.

While my image is not for sale, Dr. Smith sells his illustration in poster form for a very reasonable amount. To purchase this poster and/or to learn more about his products, visit his website at TotalActionTools.com.

It’s time again for one of my Photography Mini-Clinics at the Salt Lake City Library. These clinics are presented as an additional event of Photowalking Utah. On Thursday June 4th I will be hosting the session. The subject of this clinic is The Basics of Exposure. Understanding the relationship between shutter speed and aperture and how to use it to better one’s photography is a question I frequently get asked. In the session I will explain the basics of exposure and teach how to use the manual and semi-manual settings on a camera. As always, there will be plenty of time for Q&A as well.
Here are the details:
Date: Thursday June 4th
Time: 6:30 – 8:00 pm
Location: Salt Lake City Main Library – 210 E 400 South, Conf. room #4, 4th floor
Cost: Zero, zilch, nada – FREE!
These classes are open to anyone who has a desire to expand their photography knowledge. There will be info useful to photographers of any skill level.
For those who plan on attending, please head over to the Photowalking Utah Flickr Group to put down your RSVP.
LeggNet’s Digital Capture
© Rich Legg, Inc. All rights reserved.

Earlier this morning I sold the above shot as my 70,000th sale on iStockphoto. While 70,000 is a far cry from the nearly half million images my friend Sean has sold, it’s still a fairly large number. Onward to 100,000!
Canon 5D Mark II, Canon 24-105 f/4L lens – 1/160 second, f/8, ISO 100
LeggNet’s Digital Capture
© Rich Legg, Inc. All rights reserved.
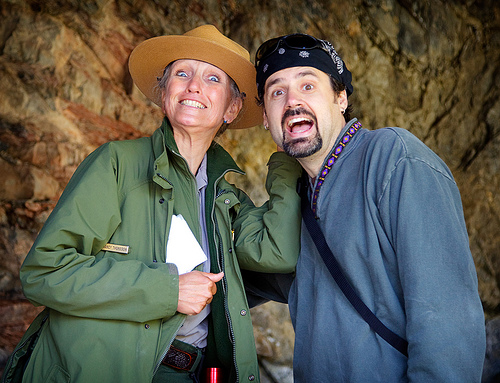
I spent this morning with two of my photographer friends, Ann Torrence and Jeremy Hall, on a Photowalking Utah scouting trip to the Timpanogos Cave National Monument. I have lived in Utah over twelve years yet this was my first trip to the cave. It was definitely a cool site to see and I recommend anyone in the area to spend a few hours checking it out.
But for Ann, Jeremy and me the highlight of the morning wasn’t as much the cave as the ultra cool ranger that guided us through it – Park Ranger Nancy. Nancy went out of her way while leading the group we were in (about a dozen or so visitors) to allow the three of us to get all the photographs we wanted. It would be very easy for someone in her position to be annoyed at our desire to take photos, but instead she made us feel like what we were doing was as important to her as it was to us.
Rich (me!), Park Ranger Nancy, Ann and Jeremy
Ann Torrence has spent a lot of time in National Parks over the past few years as she researched her Highway 89 project. She has met many a ranger and she was quick to point out to Jeremy and me that Park Ranger Nancy was by far the most photographer friendly ranger she has ever met.
So for all the photographers out there, I offer up a sincere THANK YOU to Nancy. You made our day!
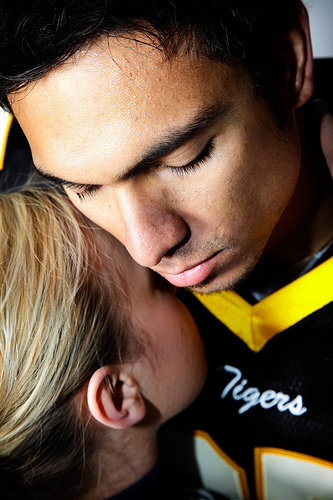
My daughter spent last weekend working on a project for her school. The task was to create a video and posters advertising herself for a position as a student body officer at her middle school. Her theme for the project was loosely based on the popular Twilight book series. My participation came into play when it was time to create images for her posters. She wanted a couple of studio shots with a look evoking that of the Twilight poster, and I did my best on short notice to create these.
We shot two images for the posters. The above shot is of the group of young women who played parts in her video. The second image was an individual of Elisabeth holding an apple as a reference to the book’s title shot.

Without getting into too many of the details on how I created the look for the images, I basically blended a couple of high pass filter layers into the original and then applied some aggressive over-sharpening using unsharp mask.

Last month I was approached by my good friend and fellow photographer Ann Torrence to take an outdoor portrait of her for her soon to be released book. She wanted a natural looking image to be used in the About the Author section of the book. We needed to take the picture before April 18th. The reason for the timing of the session was that Ann was preparing to embark on a Colorado River rafting expedition and would be cutting her hair extremely short the next day (and by extremely short, I mean BUZZ CUT short!) and wanted her portrait to portray her with her hair at a normal length.
After a bit of discussion, we opted for taking the image along Highway 89 (the subject of Ann’s book) in downtown Salt Lake City. I envisioned an image with her standing in the middle of the street with the background showing the highway (State Street in Salt Lake City) leading up to the capitol building. Ann’s idea was a picture of her along the highway with the Salt Lake City City-County building in the background. We shot both versions and had planned to let blog readers vote on which one would be used in the book.
Now for the Knucklehead part.
After our short streetside photo session, I re-packed my gear and we hopped into my car for the short ride back to Pictureline to drop Ann off (we left her car there). I then went about my normal routine for the rest of the day with my gear stowed in the trunk of my Saab – forgetting all about Ann’s images.
My standard routine after a shoot is to copy the images from the memory card to my redundant external harddrives. In this case, I got busy for the remainder of the day and did not do so (big mistake #1).
The next morning I had a portrait session scheduled in the studio with one of my models Kylee. When she arrived we chatted a bit about the images we were going to shoot while I finished prepping my gear. Without a bit of hesitation while we were talking I grabbed my 5DmkII and instinctively formatted the card (big mistake #2). Now had I remembered that Ann’s images on that card I could have pulled the card immediately and used another card (big mistake #3). Instead, I went on with the shoot not even remembering the Highway 89 outing from the day before.

Kylee’s portrait from the next morning session
Later that afternoon when copying the images from the day’s shoot I had what can best described as a Panic Moment. We’ve all had them. It is the moment that you realize that you’ve made a major blunder and suddenly the temperature in the room increases what feels like 20 degrees. It was at this moment that I remembered Ann’s pics were on the freshly formatted card I used for Kylee’s shoot. It was at near the same moment when I realized that Ann was also sporting a new Buzz cut in preparation for her trip and a re-shoot was out of the question for at least 3-4 months.
Trying not to overreact, I remembered that I had previously purchased software to rescue a corrupt memory card. The software is DataRescue’s PhotoRescue and I blogged about it back in 2007. Even though my memory card was not corrupted, I decided to give the software a run to see what it could find on the card. The good news was that it found and recovered about half of the images from the shoot. Even better, the ones it recovered were the pose/background shots that Ann preferred.
Disaster avoided!
Last week Ann telephoned to tell me about her trip. It was at this time that I came clean with her about our photoshoot and my knuckleaded move. I’m happy to say that I have never heard her laugh as hard as she did when she heard the story. Whew!
In light of this, we have instituted a new policy for the staff at Legacy One Photography (umm, that’s only me). Before any cards are formatted the photographer will take a moment and review the images on said card.
Now if anyone wants to make me feel better, take a moment and share one of your Knucklead stories in the comments. If I don’t see any I guess I will go on thinking I’m the only one who does these things 🙂
LeggNet’s Digital Capture
© Rich Legg, Inc. All rights reserved.

Canon 5D Mark II, Canon 24-105 f/4L lens – 1/100 second, f/10, ISO 100

As I wrote earlier in the week, I’m knee deep in image editing for the time being. Here’s another sample from last month’s Apartment Community stock shoot that I have been working on. I really liked shooting this particular model in the kitchen setting, mainly because of the similar tone of her hair color and the cabinets behind her. Not to mention her great smile.
Canon 5D Mark II, Canon 24-105 f/4L lens – 1/125 second, f/7.1, ISO 100
My good friend and fellow iStockphoto Diamond Level Contributor Nicole Young put together a really cool time lapse video during the SLC Minilypse event in Salt Lake City. Held on March 28-29, the outing featured four separate locations in the Salt Lake area for the participating photographers to shoot in. Be sure to watch for the snaking line of photographers near the end of the video.
To see a lightbox of images created during the event, click here.
LeggNet’s Digital Capture
© Rich Legg, Inc. All rights reserved.

I’ve been so busy the past week editing images from my backlog of photoshoots, that I haven’t been writing very much (if at all) here on the blog. I plan to get caught up on my processing work in the next week or so and get back into my regular routine of doing a bit of writing each week. In the meantime, check out this portrait of happy little Cash. He dropped by the studio with his family yesterday afternoon for some portraits.
Oh, and in case you’re wondering – that isn’t a regulation size football helmet 🙂
Canon 5D Mark II, Canon 24-105 f/4L lens – 1/100 second, f/9, ISO 100

Canon 5D Mark II, Canon 70-200 f/4L lens – 1/160 second, f/4.5, ISO 200

Canon 5D Mark II, Canon 24-105 f/4L lens – 1/80 second, f/5.6, ISO 100
LeggNet’s Digital Capture
© Rich Legg, Inc. All rights reserved.

Canon 5D Mark II, Canon 24-105 f/4L lens – 1/3 second, f/7.1, ISO 200

Canon 5D Mark II, Canon 24-105 f/4L lens – 1/160 second, f/5.6, ISO 100
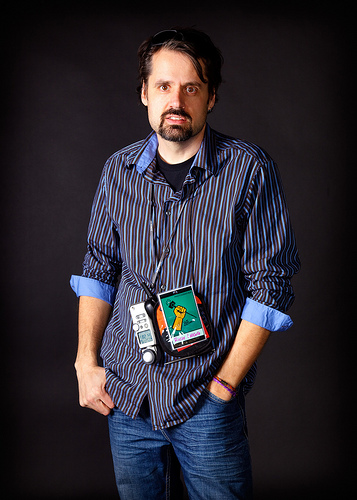
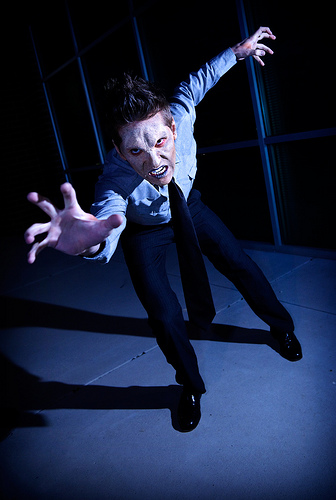
How’s this for vanity?
Here’s a shot of me that I forgot was taken. I’m editing images this week from last month’s iStock event in Salt Lake City and I came across this on one of the memory cards. I apparently stepped in as a “model” when we were setting up the lights and someone (Nicolesy?) took a pic of me with my camera.
Canon 5D Mark II, Canon 24-105 f/4L lens – 1/125 second, f/9, ISO 100

Canon 5D Mark II, Canon 24-105 f/4L lens – 1/160 second, f/8, ISO 100

What do you do when you’re at your daughter’s dance competition but find yourself on the wrong side of the dimly lit gymnasium? Get creative with some long shutter speed zoom-blurred shots of course.
Canon 5D Mark II, Canon 24-105 f/4L lens – 1/15 second, f/4, ISO 125

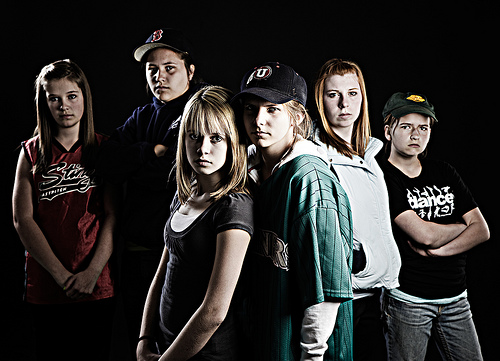
Anyone who has spent much time photographing children will probably agree with me when I say that there is a special place in heaven for photographers that specialize in taking pictures of children. Taking pictures of youngsters can be one of the most rewarding tasks, but it can also be one of the most frustrating.
Specializing in stock photography gives me the freedom to photograph a wide range of subjects, but one subject that seems to be frequently revisited is children. While I don’t count myself as an expert child photographer, I have learned a few things along the way that I thought I’d share in today’s post.
GET ON THEIR LEVEL
The feature image of cute little Saylor on the top of this page is a perfect example of this. While doing the studio portrait session she was acting a little bit shy and put her head down on the floor. When I saw this, I quickly got down adjacent to her to capture the scene. By putting my camera literally on the floor, I was able to create a viewpoint that few adults (grandparents etc.) in her life will ever see of her.
One thing I would have liked to do different on this shot was to have quickly dropped my lights to a lower position. The height of the lightstands eliminated any catchlights in her eyes. However, if I had taken the time to adjust the lights I could have missed the shot – which brings me to my next point:
BE READY
Kids, and especially babies, can change moods in what seems like a microsecond. The photographer can come into the shoot with a distinct plan on what and how they want to shoot and an upset child can quickly derail it.

This image of baby Chloe is an example of this. The plan for the session was to create newborn images for the birth announcement. Unfortunately, Chloe didn’t get the memo. She wanted no part of being anywhere but in mom or dad’s arms. During the shoot she became extremely unhappy being in front of the lights with mom. To help soothe her, dad took her into his arms and stepped just out of the frame. Seeing this tender scene I quickly spun a softbox around and took the picture. The spontaneous un-planned image became the final shot for the announcement.
EXAGGERATE
Similar to the first tip of getting on their level, I like to also exaggerate parts of a scene when photographing children. This might involve an extreme wide angle close-up shot, over-the-top laughing or like in this example shooting from a very high angle.

For this stock image, which is one of my top sellers, I stood on a step ladder to create the look. When looking at the image the viewer doesn’t get the impression that it was taken from nearly 9 feet up, just an exaggerated perception that these are little girls.
INVOLVE THINGS FROM EVERYDAY LIFE
In addition to the simple backgrounds that seem to typify my studio work, I like to do environmental portraits of children. For me this means shooting images of them involving things from their everyday life. Toys, pets, in their room, etc.

Here is an example of including a pet in the image. While having a rambunctious golden retriever in a portrait can be a challenge (note that he didn’t even look at me!), the inclusion adds another element to the image and can be especially meaningful to the family.
KEEP IT SHORT
Especially with babies, keep the session short. Don’t worry about capturing numerous shots, but try and get one or two keepers. I know that when I’ve tried to keep shooting to get “that one shot” after the child has become bored/tired/upset with the experience, it seems to do nothing more than frustrate me, the subject and the parents.

In a studio session of Chloe (a few months after her newborn pic above), this image of the happy little girl is literally one of only two shots she smiled in and it was taken right at the beginning of the shoot. Shortly after this was taken, she decided that she wanted no part of what we (her parents and I) had planned for her. We could have stopped after 5 exposures and already had our best for the day.
ELIMINATE DISTRACTIONS (PARENTS)
When photographing children it is a parent’s instinct to want to help the photographer make the child smile. This can be a frustrating thing for the photographer. Inevitably, the parent can help get a great expression but in it the child is looking off to the side and not at the camera. My recommendation is to graciously talk with mom and dad before shooting and explain that you can get better results if they are off to the side and out of the child’s sight.
These are just a few of the things that come to mind when I think about photographing children. I would love to learn what other photographers do to create great kid photos. If you’ve got something you’d like to add, please chime in with a comment or two.
Labels: tutorial

Anyone who has spent much time photographing children will probably agree with me when I say that there is a special place in heaven for photographers that specialize in taking pictures of children. Taking pictures of youngsters can be one of the most rewarding tasks, but it can also be one of the most frustrating.
Specializing in stock photography gives me the freedom to photograph a wide range of subjects, but one subject that seems to be frequently revisited is children. While I don’t count myself as an expert child photographer, I have learned a few things along the way that I thought I’d share in today’s post.
GET ON THEIR LEVEL
The feature image of cute little Saylor on the top of this page is a perfect example of this. While doing the studio portrait session she was acting a little bit shy and put her head down on the floor. When I saw this, I quickly got down adjacent to her to capture the scene. By putting my camera literally on the floor, I was able to create a viewpoint that few adults (grandparents etc.) in her life will ever see of her.
One thing I would have liked to do different on this shot was to have quickly dropped my lights to a lower position. The height of the lightstands eliminated any catchlights in her eyes. However, if I had taken the time to adjust the lights I could have missed the shot – which brings me to my next point:
BE READY
Kids, and especially babies, can change moods in what seems like a microsecond. The photographer can come into the shoot with a distinct plan on what and how they want to shoot and an upset child can quickly derail it.

This image of baby Chloe is an example of this. The plan for the session was to create newborn images for the birth announcement. Unfortunately, Chloe didn’t get the memo. She wanted no part of being anywhere but in mom or dad’s arms. During the shoot she became extremely unhappy being in front of the lights with mom. To help soothe her, dad took her into his arms and stepped just out of the frame. Seeing this tender scene I quickly spun a softbox around and took the picture. The spontaneous un-planned image became the final shot for the announcement.
EXAGGERATE
Similar to the first tip of getting on their level, I like to also exaggerate parts of a scene when photographing children. This might involve an extreme wide angle close-up shot, over-the-top laughing or like in this example shooting from a very high angle.

For this stock image, which is one of my top sellers, I stood on a step ladder to create the look. When looking at the image the viewer doesn’t get the impression that it was taken from nearly 9 feet up, just an exaggerated perception that these are little girls.
INVOLVE THINGS FROM EVERYDAY LIFE
In addition to the simple backgrounds that seem to typify my studio work, I like to do environmental portraits of children. For me this means shooting images of them involving things from their everyday life. Toys, pets, in their room, etc.

Here is an example of including a pet in the image. While having a rambunctious golden retriever in a portrait can be a challenge (note that he didn’t even look at me!), the inclusion adds another element to the image and can be especially meaningful to the family.
KEEP IT SHORT
Especially with babies, keep the session short. Don’t worry about capturing numerous shots, but try and get one or two keepers. I know that when I’ve tried to keep shooting to get “that one shot” after the child has become bored/tired/upset with the experience, it seems to do nothing more than frustrate me, the subject and the parents.

In a studio session of Chloe (a few months after her newborn pic above), this image of the happy little girl is literally one of only two shots she smiled in and it was taken right at the beginning of the shoot. Shortly after this was taken, she decided that she wanted no part of what we (her parents and I) had planned for her. We could have stopped after 5 exposures and already had our best for the day.
ELIMINATE DISTRACTIONS (PARENTS)
When photographing children it is a parent’s instinct to want to help the photographer make the child smile. This can be a frustrating thing for the photographer. Inevitably, the parent can help get a great expression but in it the child is looking off to the side and not at the camera. My recommendation is to graciously talk with mom and dad before shooting and explain that you can get better results if they are off to the side and out of the child’s sight.
These are just a few of the things that come to mind when I think about photographing children. I would love to learn what other photographers do to create great kid photos. If you’ve got something you’d like to add, please chime in with a comment or two.
LeggNet’s Digital Capture
© Rich Legg, Inc. All rights reserved.
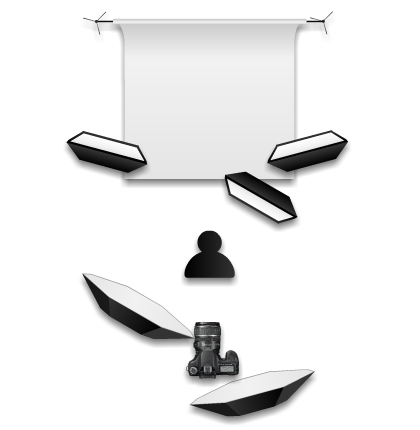
One of my favorite models, Kylee, needed a simple headshot for an application so she came by the studio on Saturday so I could shoot it. This gave me an opportunity to work in the studio environment for one of the first times with the two White Lighting monolights with large octaboxes that I recently added to my lighting setup.
By using the lighting setup diagrammed below, I was able to create a portrait isolated on a pure white background without the need for additional background adjustment or “cutting out” in Photoshop. The addition of the two octaboxes (36″ and 48″) to my existing three softbox inventory has greatly increased my versatility in the studio. Additionally, I really like the round(ish) catchlights from these lights compared to the rectangular shaped catchlights I get with my large softboxes.
Canon 5D Mark II, Canon 70-200 f/4L lens – 1/100 second, f/8, ISO 100
LeggNet’s Digital Capture
© Rich Legg, Inc. All rights reserved.
Image © Paul Rohde, Used with Permission
LeggNet’s Digital Capture
© Rich Legg, Inc. All rights reserved.

Here’s a quick sample from today’s stock photo shoot at a local apartment community. We had a great time even though the weather nixed a lot of our outdoor shooting plans. In spite of the crummy weather, we did manage to get some pool shots in during the 30 minutes or so that the sun decided to show up.
Thanks to everyone who helped out as models and assistants. I absolutely couldn’t do what I do without all your help.
Canon 5D Mark II, Canon 70-200 f/4L lens – 1/800 second, f/4, ISO 100
LeggNet’s Digital Capture
© Rich Legg, Inc. All rights reserved.

One of my quick-and-easy methods of shooting outdoor portraits is to position the subject with the sun at their back and then fill in their faces with an on camera flash. While this method of lighting is probably considered somewhat remedial for many experienced photographers, it is a technique that I get asked about on a fairly regular basis.
For this portrait of Bret and Jarica, I waited until the setting sun was just above a nearby building (the Federal Courthouse in downtown Salt Lake City) and the shade line was closing in on the bench they were sitting on. By waiting for the last few minutes of sunlight, the background was almost entirely in shade. I positioned the bench so that the sunlight would provide a rimlight around Bret and splash a small amount onto his face.
Once I had the subjects in position, I adjusted the flash compensation of my on-board flash (Canon 580EX II) to fill in the shade with a natural looking light. I accomplished this with a minus 1 f/stop setting relative to the natural light. The camera was set to A/V (aperture priority) setting with the lens wide open at f/4.
When I have an assistant with me I will frequently shoot a portrait like this with reflector light to fill in the faces. However, on an evening like this one where I was working alone, a strobe created fill light serves as a nice substitute.
Canon 5D Mark II, Canon 70-200 f/4L lens – 1/400 second, f/4, ISO 400
Labels: tutorial

One of my quick-and-easy methods of shooting outdoor portraits is to position the subject with the sun at their back and then fill in their faces with an on camera flash. While this method of lighting is probably considered somewhat remedial for many experienced photographers, it is a technique that I get asked about on a fairly regular basis.
For this portrait of Bret and Jarica, I waited until the setting sun was just above a nearby building (the Federal Courthouse in downtown Salt Lake City) and the shade line was closing in on the bench they were sitting on. By waiting for the last few minutes of sunlight, the background was almost entirely in shade. I positioned the bench so that the sunlight would provide a rimlight around Bret and splash a small amount onto his face.
Once I had the subjects in position, I adjusted the flash compensation of my on-board flash (Canon 580EX II) to fill in the shade with a natural looking light. I accomplished this with a minus 1 f/stop setting relative to the natural light. The camera was set to A/V (aperture priority) setting with the lens wide open at f/4.
When I have an assistant with me I will frequently shoot a portrait like this with reflector light to fill in the faces. However, on an evening like this one where I was working alone, a strobe created fill light serves as a nice substitute.
Canon 5D Mark II, Canon 70-200 f/4L lens – 1/400 second, f/4, ISO 400
LeggNet’s Digital Capture
© Rich Legg, Inc. All rights reserved.

Image Credit: Bryan Jones
The next Photowalking Utah event is quickly approaching. The outing will be a visit to the Utah Museum of Natural History. This will be the first ever Sunday event for Photowalking Utah due to scheduling and availability of the museum. Here are some details from Bryan Jones’ announcement at PhotowalkingUtah.com:
The University of Utah Museum of Natural History provides a number of opportunities for photographing unusual objects including dinosaurs, rare collections and artifacts from around the world. In addition the building itself provides for some architectural photographic opportunities that will not be available long as the museum is building a modern, new building up by Red Butte Gardens. There are a number of points to our visit:
1) There will be an admission based on a Group Reservation Price of $4.50 per person unless you are a U of U student/faculty/etc in which case the price will be free.
2) There will also be a “Toadally Frogs” in the Special Exhibit Gallery. Use a low light lens without flash to photograph some of these frogs in their display case. If you have a macro lens, bring ’em.
3) Bring your tripod as we have been given special permission to use them for this visit.
4) UMNH allows for photography for private (non-professional, non-commercial) use of our exhibit areas and collections that are on exhibit. Flash photography is permitted in the permanent exhibits with the exception of exhibits containing life organisms, currently “Bugs Alive!”. The “Toadally Frogs” exhibit is limited to non-flash photography only, due to the sensitive nature of the live frogs.
5) UMNH has given us rights to post these photos on the Flickr and personal websites, however, they are not to be used for professional purposes. All photographs taken of exhibits and collections of objects in the Utah Museum of Natural History must be credited “From the Utah Museum of Natural History Collection” or “Property UMNH Collection”. They are looking for possible photographs to document the museum and the exhibits for their own website, so this will facilitate them finding images and asking photographers for rights to use them.
Date: Sunday April 19, 2009
Time: Noon – 3:00 pm
Location: 11390 E. Presidents Circle Salt Lake City, Utah 84112
As always, these events are open to photographers of all skill levels and type of camera used. For more information, visit the official announcement at photowalkingutah.com or the Flickr group announcement.
Labels: photowalking
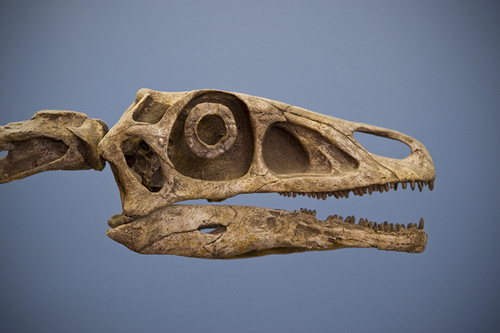
Image Credit: Bryan Jones
The next Photowalking Utah event is quickly approaching. The outing will be a visit to the Utah Museum of Natural History. This will be the first ever Sunday event for Photowalking Utah due to scheduling and availability of the museum. Here are some details from Bryan Jones’ announcement at PhotowalkingUtah.com:
The University of Utah Museum of Natural History provides a number of opportunities for photographing unusual objects including dinosaurs, rare collections and artifacts from around the world. In addition the building itself provides for some architectural photographic opportunities that will not be available long as the museum is building a modern, new building up by Red Butte Gardens. There are a number of points to our visit:
1) There will be an admission based on a Group Reservation Price of $4.50 per person unless you are a U of U student/faculty/etc in which case the price will be free.
2) There will also be a “Toadally Frogs” in the Special Exhibit Gallery. Use a low light lens without flash to photograph some of these frogs in their display case. If you have a macro lens, bring ’em.
3) Bring your tripod as we have been given special permission to use them for this visit.
4) UMNH allows for photography for private (non-professional, non-commercial) use of our exhibit areas and collections that are on exhibit. Flash photography is permitted in the permanent exhibits with the exception of exhibits containing life organisms, currently “Bugs Alive!”. The “Toadally Frogs” exhibit is limited to non-flash photography only, due to the sensitive nature of the live frogs.
5) UMNH has given us rights to post these photos on the Flickr and personal websites, however, they are not to be used for professional purposes. All photographs taken of exhibits and collections of objects in the Utah Museum of Natural History must be credited “From the Utah Museum of Natural History Collection” or “Property UMNH Collection”. They are looking for possible photographs to document the museum and the exhibits for their own website, so this will facilitate them finding images and asking photographers for rights to use them.
Date: Sunday April 19, 2009
Time: Noon – 3:00 pm
Location: 11390 E. Presidents Circle Salt Lake City, Utah 84112
As always, these events are open to photographers of all skill levels and type of camera used. For more information, visit the official announcement at photowalkingutah.com or the Flickr group announcement.
LeggNet’s Digital Capture
© Rich Legg, Inc. All rights reserved.
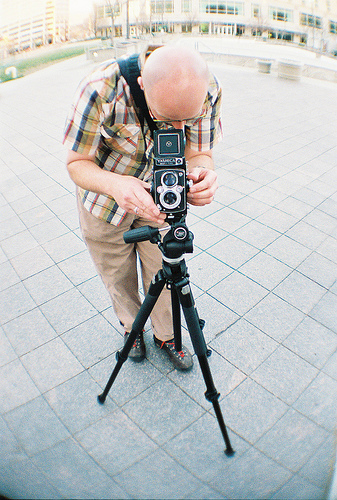
Last month a few of us from Photowalking Utah put together a Film Shooter’s Photowalk in Salt Lake City. The evening outing was both reminiscent and frustrating for me as a photographer. Since I have a long history shooting film it was nice to remember how it used to be. On the other hand though, it was frustrating to shoot within the limits of film – namely the lack of instant preview, fixed ISO and limited exposure count.
I came away from the evening with a simple realization: I’m okay with never shooting film again.
It is not only the three reasons I listed above that made me come to this conclusion. The advances in camera equipment and lenses with things such as viewfinder information, metering settings, weather sealing, etc. have made today’s cameras a joy to use compared to their film counterparts of yesterday.
Today’s image is one of my captures from the photowalk. The shot of Mike Calanan and his Yashica TLR was taken with a Mamiya 1000DTL. The fisheye effect was added with a magnification filter put onto the standard 50mm lens.
Mamiya 1000 DTL, Mamiya 50mm f/1.8 lens – Exposure Not Recorded
LeggNet’s Digital Capture
© Rich Legg, Inc. All rights reserved.

Canon 5D Mark II, Canon 70-200 f/4L lens – 1/200 second, f/4, ISO 400

Canon 5D Mark II, Canon 70-200 f/4L lens – 1/200 second, f/4, ISO 400
LeggNet’s Digital Capture
© Rich Legg, Inc. All rights reserved.
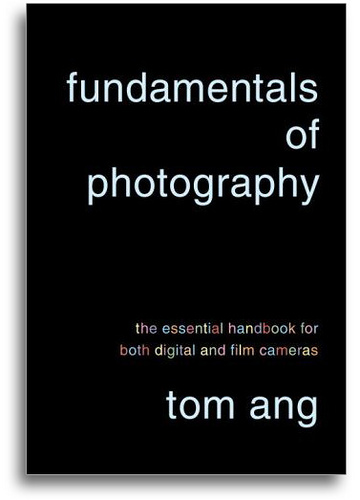
Today’s guest post was written by Utah photographer and Photowalking Utah member Rhett Olson. Rhett’s photography can be seen at www.rhettolsonphotography.com.
I started photography about ten years ago while writing a book, 100 Hikes in Utah. My co-author did most of the photography during our hiking and I would watch and ask questions. He would explain how using a high f-stop and long shutter speed in the slot canyons would give him enough light and keep all the walls in focus. I soon purchased a Pentax K1000 with a 50mm lens, a load of tri-X, and had a friend show me how to develop my negatives in my sink.
Because I didn’t always have access to my photography friends to ask questions, most of my learning going forward (outside of experimentation) was done on photo.net. There, I read a little about everything. Lighting, posing, processing, printing, gear, it was all there.
When I picked up Fundamentals of Photography, it felt like the print version of my learning on the Internet, but conveniently compiled in one location. Even the book’s jacket says it’s “everything you need to know; from the most practical advice, to the most sophisticated nuances.”
Ang defines photography, then breaks down the process from manipulating the light, capturing it, then processing the image and outputting it. Each color-coded chapter is broken into logical sections that cover everything from demosaiking and in-camera processing, to controlling image tonality and color theory.
The discussion photography in the realm of both traditional film and digital make the book relevant to any photographer. Ang details the types and sizes of film (35mm, medium format, and large format) and the advantages of each. Developing, enlarging, and printing is covered as well. He also outlines a hybrid method of using both film and digital; capturing the image on film, then scanning to a digital file for processing and output.
The book itself is a sturdy paperback, built like a field guide. It contains loads of colorful images, charts, and graphs. The use of sample images to illustrate points help in the understanding of each subject.
One example of this is on page 90 where a portrait of a woman is created with multiple lighting setups. Each image is shown next to a diagram of lighting setup and a written description. This format allows the reader to quickly see changes from each lighting setup to the next.
The first reference section on page 324 is another example where Ang uses pictures and diagrams to instruct. There, he outlines the process of diagnosing processing and printing defects. The associated chart shows an image, then lists the image’s defect, it’s diagnosis, and how the defect can be corrected.
In summary, I think Fundamentals of Photography is a great reference book for photographers. It covers a breadth of topics and allows readers to easily zero in on a subject they are interested in, or are experimenting with, and learn more.
Fundamentals of Photography is available at Amazon.com.

Today’s guest post was written by Utah photographer and Photowalking Utah member Rhett Olson. Rhett’s photography can be seen at www.rhettolsonphotography.com.
I started photography about ten years ago while writing a book, 100 Hikes in Utah. My co-author did most of the photography during our hiking and I would watch and ask questions. He would explain how using a high f-stop and long shutter speed in the slot canyons would give him enough light and keep all the walls in focus. I soon purchased a Pentax K1000 with a 50mm lens, a load of tri-X, and had a friend show me how to develop my negatives in my sink.
Because I didn’t always have access to my photography friends to ask questions, most of my learning going forward (outside of experimentation) was done on photo.net. There, I read a little about everything. Lighting, posing, processing, printing, gear, it was all there.When I picked up Fundamentals of Photography, it felt like the print version of my learning on the Internet, but conveniently compiled in one location. Even the book’s jacket says it’s “everything you need to know; from the most practical advice, to the most sophisticated nuances.” Ang defines photography, then breaks down the process from manipulating the light, capturing it, then processing the image and outputting it. Each color-coded chapter is broken into logical sections that cover everything from demosaiking and in-camera processing, to controlling image tonality and color theory.The discussion photography in the realm of both traditional film and digital make the book relevant to any photographer. Ang details the types and sizes of film (35mm, medium format, and large format) and the advantages of each. Developing, enlarging, and printing is covered as well. He also outlines a hybrid method of using both film and digital; capturing the image on film, then scanning to a digital file for processing and output.The book itself is a sturdy paperback, built like a field guide. It contains loads of colorful images, charts, and graphs. The use of sample images to illustrate points help in the understanding of each subject.One example of this is on page 90 where a portrait of a woman is created with multiple lighting setups. Each image is shown next to a diagram of lighting setup and a written description. This format allows the reader to quickly see changes from each lighting setup to the next.The first reference section on page 324 is another example where Ang uses pictures and diagrams to instruct. There, he outlines the process of diagnosing processing and printing defects. The associated chart shows an image, then lists the image’s defect, it’s diagnosis, and how the defect can be corrected.In summary, I think Fundamentals of Photography is a great reference book for photographers. It covers a breadth of topics and allows readers to easily zero in on a subject they are interested in, or are experimenting with, and learn more.
Fundamentals of Photography is available at Amazon.com.
LeggNet’s Digital Capture
© Rich Legg, Inc. All rights reserved.

Canon 5D Mark II, Canon 70-200 f/4L lens – 1/320 second, f/4, ISO 400

Canon 5D Mark II, Canon 70-200 f/4L lens – 1/320 second, f/4, ISO 400
LeggNet’s Digital Capture
© Rich Legg, Inc. All rights reserved.

Canon 5D Mark II, Canon 70-200 f/4L lens – 1/50 second, f/4, ISO 800
LeggNet’s Digital Capture
© Rich Legg, Inc. All rights reserved.


Unless otherwise noted, all photographs and text copyright 2005-2024 © Rich Legg, Inc. All rights reserved.
Reproduction or redistribution in any form without prior written permission is strictly prohibited.


