

May 31, 2007
Frosted Panes
]]> 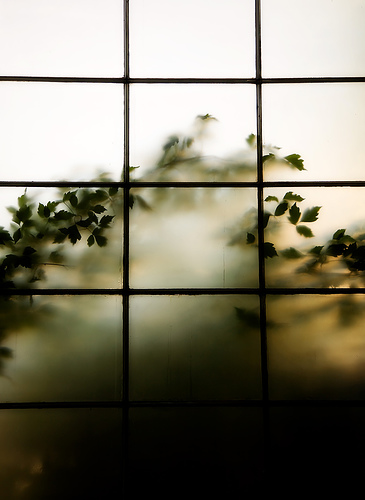
Canon 5D, Canon 24-105 f/4L IS lens – 1/400 second, f/4, ISO 160
LeggNet’s Digital Capture
© Rich Legg, Inc. All rights reserved.
May 30, 2007
What do you shoot?
]]> 
In the photography world, we all have our biases in regards to what manufacturer of camera equipment we prefer. Anyone who has spent any amount of time reading this blog knows that I am a big proponent of Canon gear. However, it wasn’t always this way.
In my film shooting days of the eighties and early nineties, I was a large fan of Nikon. My primary cameras were the FE and FM2 models. I loved the sturdiness of these cameras plus they were “just right” in the size department. I shot literally thousands of photos between these two bodies and never had any type of failure. These were great cameras.
When I decided to make the move to digital SLRs a few years back, I did a bit of research. I knew that I would be “marrying” a manufacturer and wanted to make the right decision. It was a close call between Nikon and Canon, but Canon ultimately won. The deciding factor for me was the selection of bodies and the room to grow. This was a hard decision for me, since I had always been such a “Nikon Guy”.
Here it is a couple of years later and I am still pleased that I went with Canon. However, if I had gone with Nikon I am sure I would be nearly as happy. Nikon’s lack of a full-frame sensor is the only thing I think that would be holding me back.
Today, most of the photographers I know shoot either Nikon or Canon except for the occasional Olympus. The Canon Rebel line (especially the XTi) is very popular as is the Nikon D80. These are all great cameras.
Today’s capture is a shot I did of my main camera, the Canon 5D, for the masthead at the top of the blog. I took this using my backup 30D with a simple one light studio setup.
What brand/model did you choose? And why?
Canon 30D, Canon 18-55 f/3.5-5.6 – 1/60 second, f/8, ISO 100
Labels: camera, photography
May 29, 2007
Diggin’ the Visitors
]]> 
It’s been a busy couple days for my photostream over on Flickr. The set of photos I took Saturday detailing the 337 Project was one of the top stories Sunday on the popular news website Digg.com. The Digg story resulted in over 70,000 visitors clicking through to the photo set in just a 24 hour period. Of those visitors, over 2,000 clicked on through to this site.
This serves as another reminder of the power of the new media. One guy with a camera and a website (me!) is able to document an event and share it with the world in a very short period of time. As for the 337 Project, it was extremely creative and I’m glad so many people got to see a small piece of it through my camera lens and the power of the Internet.
May 28, 2007
Memorial Day
May 27, 2007
The 337 Project
]]> 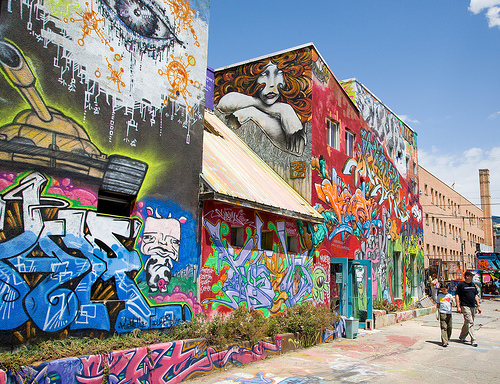
I went in to Salt Lake City yesterday to check out the 337 Project. This fairly large scale work involved 144 artists adding their artistic interpretation to a soon-to-be-demolished building. Literally each of the building’s 42 rooms and every exterior surface has been given a unique style and feel by the creations of the participating artists.
It was exciting to see the effort that these dedicated artisans put into a project that is actually very temporary. After the completion of the public showing, the building will be razed to make way for a new condominium/office building.

It you are in Northern Utah and want to check it out, today (Sunday) is the final day. There is no cost to enter, though if it is like yesterday there will probably be a slight wait (around 30 minutes for me). The building is located at 337 S. 400 East. There is plenty of free on-street parking.
For more info, visit the project’s website at www.337project.org. You can view my complete photoset from yesterday by clicking here.
Photo 1: Canon 5D, Canon 24-105 f/4L IS lens – 1/400 second, f/6.3, ISO 100
Photo 2: Canon 5D, Canon 24-105 f/4L IS lens – 1/15 second, f/4, ISO 160
May 26, 2007
Red, White, Blue and Green
]]> 
If you’re in the US, enjoy your three-day-weekend!
Canon 30D, Canon 24-105 f/4L IS lens – 1/500 second, f/4, ISO 100
Labels: holiday
May 25, 2007
How Slow Can You Shoot Handheld?
]]> 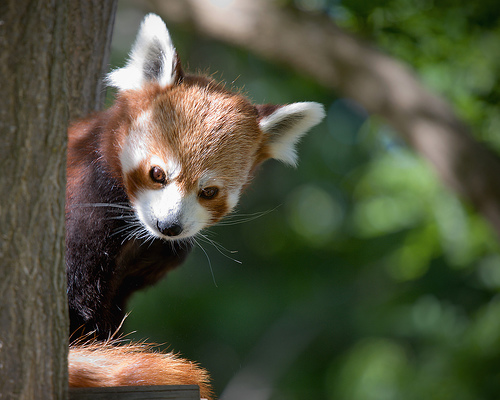
One of the quickest ways to ruin a good shot is to use too slow of a shutter speed in relation to your lens’ focal length. A fast shutter speed is not only useful in capturing action shots, but it also will eliminate camera shake blur in your photo. We all love a long lens, but with that length comes the potential for blurry shots. When you are using a telephoto lens, every little bit of movement of the camera gets magnified many times over in the viewfinder.
Back in my 35mm film SLR days, I used the simple rule of placing “1/” over my lens’ focal length to determine my slowest shutter speed to safely shoot handheld. For example, if I was using a 200mm lens, the slowest I would set my shutter speed to is 1/200 second. But now that we are in the digital age with cameras that have “crop factors” of 1.5 or 1.6, we have to amend this rule a bit. If you are shooting with one of these cameras, simply take your lens’ focal length and multiply it by 1.5 and then convert it to a shutter speed. So now that 200mm lens needs a shutter speed of 1/300 of a second or faster to safely shoot handheld.
Over time, many photographers develop a steady hold and can amend their handheld shutter speeds to allow for less shake of the camera. I find now that I can safely handhold a shot at one to two f/ stops longer of a shutter speed than this equation recommends. Today’s image of a Red Panda taken at Utah’s Hogle Zoo is an example. I handheld this shot with a shutter speed of 1/50 second and a focal length of 280mm. While the image is not as “tack sharp” as I would like, it is definitely usable.
Like most rules in photography, this one is not set in stone. Feel free to experiment with combinations of shutter speed and lens length. I believe that it is better to have a slightly blurry photo (due to camera shake) than to not have taken one at all.
Canon 5D, Canon 70-200 f/4L lens with 1.4x extender – 1/50 second, f/5.6, ISO 160
Labels: animal, photography, tutorial
May 24, 2007
LIttle Pink Houses
]]> 
Oh, but ain’t that America, for you and me
Ain’t that America, we’re somethin’ to see, baby
Ain’t that America, the home of the free
Little pink houses for you and me
. . . John Mellencamp, 1983 . . .
Canon 5D, Canon 24-105 f/4L IS lens – 1/100 second, f/10, ISO 100
Labels: buildings, salt lake city
May 21, 2007
On Streets We Call The Zoo
]]> 
I spent Saturday morning on a sixth grade field trip to Salt Lake City’s Hogle Zoo. While it’s always great to have the opportunity to photograph interesting subjects, seeing the animals in captivity was a somber experience for me. Many of them appeared to be bored and depressed. The orangutan featured in today’s capture is one example of this. He seemed to be very uninterested with the whole zoo scene, spending his time motionlessly staring at nothing in particular.
Canon 5D, Canon 70-200 f/4L lens with 1.4x extender – 1/50 second, f/5.6, ISO 160
Labels: animal
May 20, 2007
DANGER
]]> 
dan · ger [deyn-jer]
–noun
1. liability or exposure to harm or injury; risk; peril.
2. an instance or cause of peril; menace.
3. Obsolete. power; jurisdiction; domain.
Canon 5D, Canon 70-200 f/4L lens – 1/1250, f/4, ISO 160
LeggNet’s Digital Capture
© Rich Legg, Inc. All rights reserved.
May 19, 2007
Sign, Sign, Everywhere a Sign
]]> 
And the sign said anybody caught trespassin’ would be shot on sight
So I jumped on the fence and yelled at the house,
“Hey! What gives you the right?”
“To put up a fence to keep me out or to keep mother nature in”
“If God was here he’d tell you to your face, Man, you’re some kinda sinner”
. . . Les Emmerson, AD 1970 . . .
Canon 5D, Canon 70-200 f/4L lens – 1/1600 second, f/4, ISO 100
May 18, 2007
An Uninvited Guest
]]> 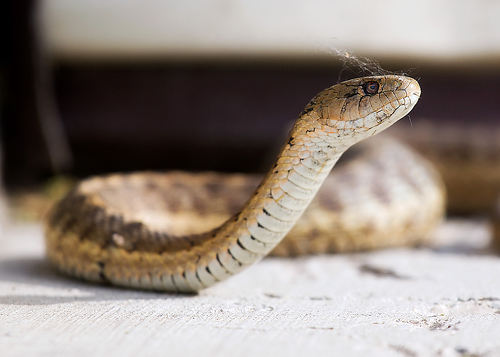
Last night as Michelle was exiting our front door she came across an uninvited guest on the front steps. The visitor was an approximately 20″ snake. Michelle rapidly re-entered the house and announced her discovery.
The girls and I quickly investigated. The snake was fairly docile and didn’t seem to care much about the attention. After an impromptu photo session, I safely escorted the visitor away from our home and into the field directly behind the house.
I am no snake expert (nor do I want to become one), but I did a bit of Googling and this appears to my untrained eye to be a Desert Nightsnake. If any of you snake-wranglers out there know for sure, feel free to chime in and either correct or support my analysis.
Canon 30D, Canon 70-200 f/4L lens – 1/125 second, f/5.6, ISO 160
Labels: animal
May 16, 2007
Cathedral
]]> 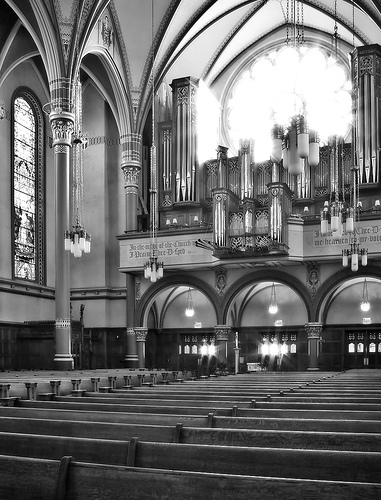
Canon 30D, Canon 24-105 f/4L IS lens – 20 seconds, f/20, ISO 100
Labels: buildings, salt lake city
May 15, 2007
With a Nod to Thomas Hawk
]]> 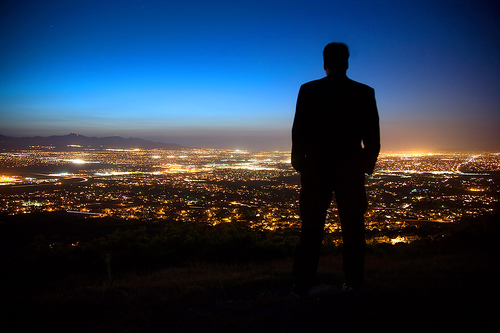
One of the people that inspired me to begin my blog is a tech blogger out of San Francisco named Thomas Hawk. Thomas is an extremely active photographer on both Flickr and Zooomr and pens a very popular blog at thomashawk.com. If you haven’t seen his work, I strongly encourage you to drop by his blog or his photostream and check it out.
It was after reading Thomas’ blog in 2005 that I became involved in Flickr and ultimately started LeggNet’s Digital Capture. Since that time I have followed his writing and photography on a daily basis.
Today’s capture is inspired by Thomas’ numerous self portraits taken in this style, including one last week that cost him a lens (but thankfully not his 5D). I took this above Draper Utah overlooking the Salt Lake Valley just after sunset. The best part was how peaceful it was as I sat waiting for the right light.
Links to Thomas Hawk’s Work:
Blog: thomashawk.com
Flickr Photos: flickr.com/photos/thomashawk
Zooomr Photos: beta.zooomr.com/photos/thomashawk
Canon 5D, Canon 24-105 f/4L IS lens – 10 seconds, f/4, ISO 160
May 14, 2007
Old Country Mill
]]> 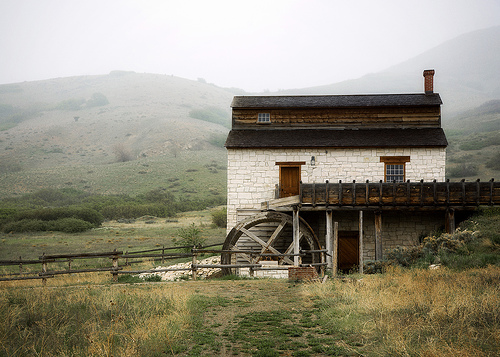
Old Country Mill, taken at This Is The Place Heritage Park on a rainy Saturday in Salt Lake City, Utah.
Canon 5D, Canon 24-105 f/4L IS lens – 1/125 second, f/5.6, ISO 50
Labels: buildings, salt lake city
May 13, 2007
Mother’s Day
]]> 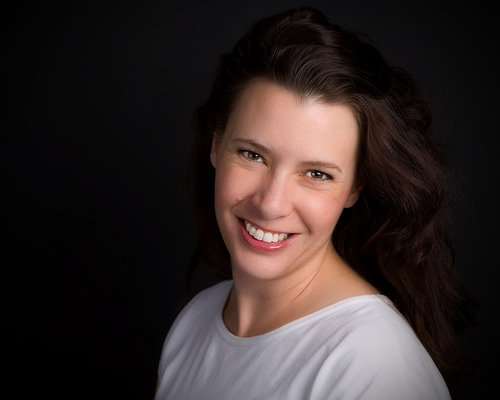
This Sunday is Mother’s Day in the United States. In honor of the holiday, today’s image is a portrait of the mother of my children – my lovely wife Michelle.
The set-up on this portrait is my standard simple arrangement:
I have a small softbox to the right of the camera for the main light. The fill light is provided by a medium white umbrella placed camera left and set at a power level one f-stop below the main light. A black paper roll provides the dark unlit background.
Canon 5D, Canon 24-105 f/4L IS lens – f/10, 1/60 second, ISO 100
Labels: portrait
May 12, 2007
New West Images
]]> 
For the better part of the past year I have participated in a Flickr group created by the New West Network, an online web magazine featuring information relating to the Rocky Mountain region. On several occasions the magazine has featured one of my photos on their main page. Through the participation in the group I have gotten to know their photo editor Chris Lombardi.
Chris recently started a new feature of the magazine called New West Images, a blog about western photography and photobloggers. I was honored this past week when Chris invited me to cross post some of my photographic tutorials from this site onto the blog. The first of these tutorials, one on the Rule of Thirds, was posted this past Thursday (view it here).
Please take a moment and check out the site. If you like it, go ahead and bookmark it or add it to your RSS reader. The folks at New West are great supporters of the internet photography community and deserve the support.
Links
New West Images: www.newwest.net/index.php/gallery
New West Images RSS feed: www.newwest.net/index.php/gallery/rss/
New West Flickr Group: flickr.com/groups/newwest
New West Network: www.newwest.net
May 11, 2007
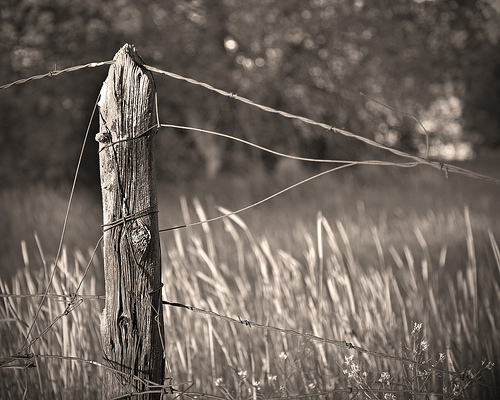
Want Greater Photographic Flexibility? – Shoot RAW
]]> 
One of the choices that face digital photographers is the format in which to save their images. Most advanced digital cameras offer several choices of format to choose from. A typical selection would be something like this:
– Small .JPG
– Medium .JPG
– Large .JPG
– RAW
Today I am going to talk a bit about the last selection on the list – RAW. A RAW image is essentially the unprocessed capture taken directly from the camera’s sensor. When the camera captures an image in the JPG format, the on-camera software processes the file before saving it. This processing includes such things as contrast, color saturation, sharpening, etc. The RAW image has had very little, if any, processing applied. Hence, the name RAW. It is essentially a digital negative, ready to be developed.
“Why would you not want the camera to improve the pictures you’ve taken?” I’ve been asked. The simple answer is that many photographers (myself included) prefer not to have the camera make the image enhancements. Instead, they opt to do it themselves on the computer. Also, the RAW format allows for much greater latitude in adjustment that can be applied.
For an example of this adjustment latitude, I walked into the field behind my home and purposely made a capture that was +2 f/stops overexposed. I set my camera to record both a JPG and a RAW image simultaneously. This would allow me the opportunity to edit two identical exposures, one RAW and one JPG, and compare the results.
Here is the unedited (other than a small crop) JPG, straight from the camera:

As you can see, the image is pretty much blown out with a very bland look to it. The highlights are completely washed out. If you were to look at the histogram (more on this in another post) of the photo, it would look like a ski ramp.
For my first go at salvaging this overexposed image, I used the JPG version. I used Photoshop’s BRIGHTNESS/CONTRAST tool along with the magical SHADOW/HIGHLIGHT tool to attempt to bring the levels into shape. I also worked on the color with a SATURATION layer and did a bit of sharpening. Here is the result I achieved with the JPG:
The result is not too bad. It could be used in a pinch, though it is not an image I would be pleased with.
I then took the RAW version of the capture and began editing it. The first thing I did was to open it with Photoshop’s Adobe Camera RAW tool. This nifty interface allowed me to fine-tune the image’s color and exposure before opening it in Photoshop proper. Once in Photoshop, I adjusted the Curves, Saturation & Levels using adjustment layers. After a brief period of editing this is the result I achieved:

I feel that this image looks much better than the edited JPG version. Other than the section on the top/left of the wooden post, there is very little “blown out” area within the shot. This edited photo is much more pleasing. Also, it took much less effort in editing to achieve this.
Finally, still not being satisfied with the capture, I went a bit further. To complete the editing, I converted the image to black & white and added a sepia tint to it along with a bit of vignetting. The final result is the capture at the top of the page.
For me, making the switch to RAW was a no-brainer. Once I got over the initial learning curve of the extra steps required in editing, I fell in love with the greater control I received in editing. Today, if I shoot in JPG I simply don’t feel comfortable. I would much rather have the control and latitude offered by Shooting RAW.
Looking for more information on the RAW file format? Here is a link to the entry on Wikipedia: RAW image format – Wikipedia
Canon 5D, Canon 24-105 f/4L IS lens – 1/25 second, f/4, ISO 320
Labels: photography, photoshop, tutorial
May 10, 2007
Want Greater Photographic Flexibility? – Shoot RAW
]]> 
One of the choices that face digital photographers is the format in which to save their images. Most advanced digital cameras offer several choices of format to choose from. A typical selection would be something like this:
– Small .JPG
– Medium .JPG
– Large .JPG
– RAW
Today I am going to talk a bit about the last selection on the list – RAW. A RAW image is essentially the unprocessed capture taken directly from the camera’s sensor. When the camera captures an image in the JPG format, the on-camera software processes the file before saving it. This processing includes such things as contrast, color saturation, sharpening, etc. The RAW image has had very little, if any, processing applied. Hence, the name RAW. It is essentially a digital negative, ready to be developed.
“Why would you not want the camera to improve the pictures you’ve taken?” I’ve been asked. The simple answer is that many photographers (myself included) prefer not to have the camera make the image enhancements. Instead, they opt to do it themselves on the computer. Also, the RAW format allows for much greater latitude in adjustment that can be applied.
For an example of this adjustment latitude, I walked into the field behind my home and purposely made a capture that was +2 f/stops overexposed. I set my camera to record both a JPG and a RAW image simultaneously. This would allow me the opportunity to edit two identical exposures, one RAW and one JPG, and compare the results.
Here is the unedited (other than a small crop) JPG, straight from the camera:
As you can see, the image is pretty much blown out with a very bland look to it. The highlights are completely washed out. If you were to look at the histogram (more on this in another post) of the photo, it would look like a ski ramp.
For my first go at salvaging this overexposed image, I used the JPG version. I used Photoshop’s BRIGHTNESS/CONTRAST tool along with the magical SHADOW/HIGHLIGHT tool to attempt to bring the levels into shape. I also worked on the color with a SATURATION layer and did a bit of sharpening. Here is the result I achieved with the JPG:

The result is not too bad. It could be used in a pinch, though it is not an image I would be pleased with.
I then took the RAW version of the capture and began editing it. The first thing I did was to open it with Photoshop’s Adobe Camera RAW tool. This nifty interface allowed me to fine-tune the image’s color and exposure before opening it in Photoshop proper. Once in Photoshop, I adjusted the Curves, Saturation & Levels using adjustment layers. After a brief period of editing this is the result I achieved:
I feel that this image looks much better than the edited JPG version. Other than the section on the top/left of the wooden post, there is very little “blown out” area within the shot. This edited photo is much more pleasing. Also, it took much less effort in editing to achieve this.
Finally, still not being satisfied with the capture, I went a bit further. To complete the editing, I converted the image to black & white and added a sepia tint to it along with a bit of vignetting. The final result is the capture at the top of the page.
For me, making the switch to RAW was a no-brainer. Once I got over the initial learning curve of the extra steps required in editing, I fell in love with the greater control I received in editing. Today, if I shoot in JPG I simply don’t feel comfortable. I would much rather have the control and latitude offered by Shooting RAW.
Looking for more information on the RAW file format? Here is a link to the entry on Wikipedia: RAW image format – Wikipedia
Canon 5D, Canon 24-105 f/4L IS lens – 1/25 second, f/4, ISO 320
LeggNet’s Digital Capture
© Rich Legg, Inc. All rights reserved.
May 9, 2007
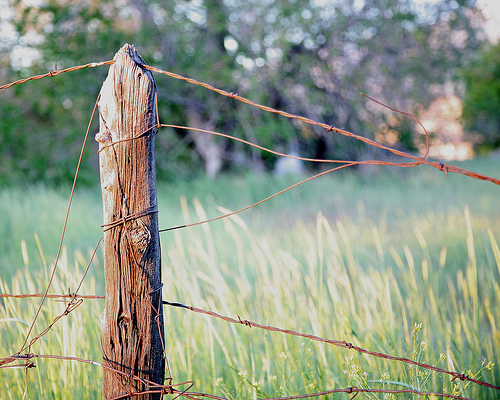
Give Me The Key!
]]> 
Sometimes a simple photo has the ability to tell a story. This is what I sought to do with today’s capture. For the photograph, I visualized someone receiving the key to a new house (I do work in real estate after all).
To set up the photo I hung the keyring from the ceiling with a piece of white thread in front of a white paper backdrop. I lit the key and hand with a small softbox placed to the right of the camera. I then placed a second strobe (un-diffused) behind the subject aimed at the backdrop. To create the near-absolute white, I set the backdrop light to 2 f/stops over the exposure of the hand and key.
In post-processing, I used the clone tool (in Photoshop) to remove the thread and make the key appear to be either floating or falling. I then did a bit of color manipulation to change the hue of the keyring to red and increase the saturation.
I am pleased with the final result. I’ve now got a shot I can use in my real estate advertising and add to my growing Stock Photography portfolio.
Canon 5D, Canon 70-200 f/4L lens – 1/125 second, f/11, ISO 50
May 8, 2007
On the Ranch
]]>
On the Ranch, photographed in Central Utah.
Canon 5D, Canon 70-200 f/4L lens with 1.4x extender – 1/320 second, f/5.6, ISO 50
May 8, 2007
Give Me The Key!
]]> 
Sometimes a simple photo has the ability to tell a story. This is what I sought to do with today’s capture. For the photograph, I visualized someone receiving the key to a new house (I do work in real estate after all).
To set up the photo I hung the keyring from the ceiling with a piece of white thread in front of a white paper backdrop. I lit the key and hand with a small softbox placed to the right of the camera. I then placed a second strobe (un-diffused) behind the subject aimed at the backdrop. To create the near-absolute white, I set the backdrop light to 2 f/stops over the exposure of the hand and key.
In post-processing, I used the clone tool (in Photoshop) to remove the thread and make the key appear to be either floating or falling. I then did a bit of color manipulation to change the hue of the keyring to red and increase the saturation.
I am pleased with the final result. I’ve now got a shot I can use in my real estate advertising and add to my growing Stock Photography portfolio.
Canon 5D, Canon 70-200 f/4L lens – 1/125 second, f/11, ISO 50
LeggNet’s Digital Capture
© Rich Legg, Inc. All rights reserved.
May 7, 2007
Through the Viewfinder Photography
]]> 
A commenter on one of my photos on Flickr suggested that I should apply a TTV Layer to this capture of an old mill I took in Salt Lake City. I read the comment and then had to admit that I didn’t know what TTV photography was. A quick trip to Google and I discovered that TTV stands for “Through the Viewfinder”. Here is a definition found on a Flickr group dedicated to the art:
“Through the Viewfinder photography is defined as taking a picture of any subject through the viewfinder of any camera with another camera.”
The technique intrigued me. But since I didn’t have the option of re-taking the photo of the mill through an old camera’s viewfinder, I sought to re-create the effect in Photoshop. After a bit more searching via Flickr, I found another group – this one dedicated to images that can be used as layers to create this technique.
Once I had the viewfinder image, the rest was fairly simple. I used Photoshop’s MOVE tool to drag the viewfinder image onto my original photo. I then adjusted the new viewfinder layer’s blending mode to MULTIPLY. This allowed the layer with the mill photo to appear as though it is being seen through the viewfinder layer.
I am not too sure of the usefulness of this type of image, but I do think it adds a nostalgic quality to the photograph.
May 5, 2007
A Roll of the Dice
May 4, 2007
Rocky Creek in Black & White
]]> 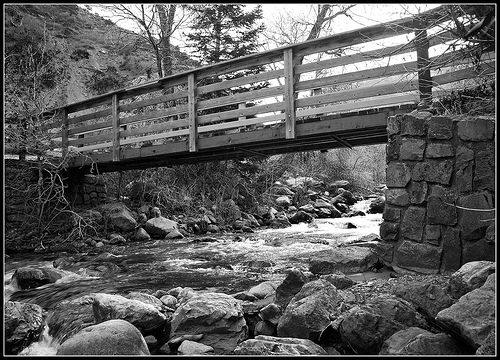
One of the great things about living where I do is the abundance of beautiful scenery so close by. Today’s capture is an example of this. I shot this photo on a brief detour I took the other day up one of the nearby canyons. In a short 15 minute break from my daily schedule, I was standing on the edge of a mountain creek photographing this rustic bridge.
To capture the rocks along with the bridge expanse I shot from a low angle with my widest lens at 24mm (the 5D’s full frame sensor means I get a ‘true’ 24mm). I then processed it in high-contrast black & white to further accentuate the detail and sharpness of the rocks and the bricks supporting the bridge.
Canon 5D, Canon 24-105 f/4L IS lens – 1/30 second, f/8, ISO 50
May 3, 2007
After the Storm
]]> 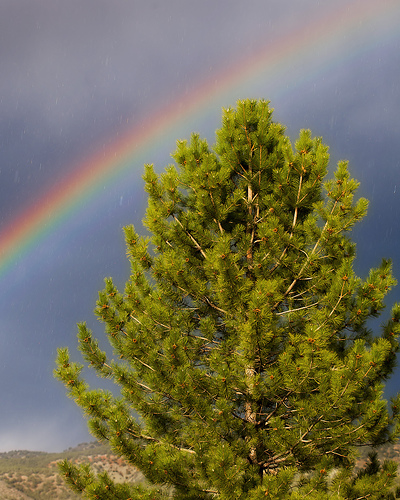
I captured this rainbow in central Utah last month. We had just driven through a fairly large storm and this was the scene that greeted us upon clearing the downpour.
Canon 5D, Canon 70-200 f/4L lens – 1/200 second, f/5.6, ISO 50
May 2, 2007
There’s No Place Like Home
]]> 
No Place Like Home, photographed in Riverton Utah.
Canon 5D, Canon 24-105 f/4L IS lens – 1/1600 second, f/4, ISO 50
May 1, 2007
A Suitable Model
]]> 
Yesterday afternoon UPS dropped off a new backdrop to the house. When I got home and found it waiting, I was anxious to give it a try. Usually I have a daughter or two around to assist me by sitting in as a model, but this time it was just me and the two dogs.
My first thought was to use the smarter of the pair, our Border Collie Ziggy. As it turned out though, this intelligence told him that sitting on a chair in front of a camera was not worth a nibble of cheese. That left me with Holly, the Shorthaired Pointer. She was more than willing to plant her furry backside on a chair and allow me to take a few shots in hope of receiving a piece of cheese.
The lighting on this image is very simple. I placed a small softbox just to the right of the camera. Fill lighting was provided by the light reflecting off of white blinds to the camera’s left. I set the light’s power level low enough so that I could shoot wide open at f/4 to minimize the depth of field. I also shot at the lens’ full reach of 105mm to further accentuate the shallow focus. In processing, I opted to go with a sepia tone effect because I felt it worked well in creating a uniform tone to the image (here’s the color version).
At the end of our short photo shoot, Holly was extremely happy for two reasons. The first was being allowed to get off of the chair. And secondly, she finally got the cheese she had been intently watching.
Canon 5D, Canon 24-105 f/4L IS lens – 1/30 second, f/4, ISO 50


