Posing Pumpkin

]]>

Michelle and I shot a wedding on Saturday night. It wasn’t a traditional ceremony, but instead a renewing of vows celebrating the couple’s 10 years of marriage. This means that it included not only the (already married) bride and groom, but their five children as well.

This shot of me was made by Michelle as I was posing the youngest daughter for her portrait. While I was showing how I wanted her to hold the flowers, I asked her name. Her response: “Pumpkin”. It was definitely an “awwww…” moment. She gave me a nice smile for the rest of the evening whenever I called her Pumpkin.

Canon 30D, Canon 50 f/1.8 lens – 1/30 second, f/1.8, ISO 200

Labels: , ,

A Suitable Model

]]>

Yesterday afternoon UPS dropped off a new backdrop to the house. When I got home and found it waiting, I was anxious to give it a try. Usually I have a daughter or two around to assist me by sitting in as a model, but this time it was just me and the two dogs.

My first thought was to use the smarter of the pair, our Border Collie Ziggy. As it turned out though, this intelligence told him that sitting on a chair in front of a camera was not worth a nibble of cheese. That left me with Holly, the Shorthaired Pointer. She was more than willing to plant her furry backside on a chair and allow me to take a few shots in hope of receiving a piece of cheese.

The lighting on this image is very simple. I placed a small softbox just to the right of the camera. Fill lighting was provided by the light reflecting off of white blinds to the camera’s left. I set the light’s power level low enough so that I could shoot wide open at f/4 to minimize the depth of field. I also shot at the lens’ full reach of 105mm to further accentuate the shallow focus. In processing, I opted to go with a sepia tone effect because I felt it worked well in creating a uniform tone to the image (here’s the color version).

At the end of our short photo shoot, Holly was extremely happy for two reasons. The first was being allowed to get off of the chair. And secondly, she finally got the cheese she had been intently watching.

Canon 5D, Canon 24-105 f/4L IS lens – 1/30 second, f/4, ISO 50


LeggNet’s Digital Capture
© Rich Legg, Inc. All rights reserved.


Night On The Overpass – Take 2

]]>

Here’s another capture from the nighttime shooting I did last week. I was particularly attracted to this composition by the many lines created by the fencing leading to a common vanishing point. Another feature I really like is how the curve of the chain-link fencing follows the vignette on the top of the photo.

Setting the exposure was a bit of a guessing game based upon experience. After some spot metering with the camera’s meter and some quick math, I arrived at a shutter time of 280 seconds (6 minutes, 40 seconds) at f/11. This preserved most of the details and allowed the city-lit sky in the background to come through.

I was honored to have this image featured Thursday on the front page of the New West Network website. It’s always cool when they opt to use one of my shots.

To really see the details, click here for a larger version of this capture on a black background.

Canon 5D, Canon 24-105 f/4L IS lens – 280 seconds, f/11, ISO 50

Labels: ,

Happy Friday from Mr. Citrus…

]]>

…even though he doesn’t look too happy. This is the result of an odd moment of fruit arrangement. I guess you had to be there 🙂

Canon 5D, Canon 24-105 f/4L IS lens – 1/60 second, f/16, ISO 100

Night on the Overpass

]]>

I have been shooting quite a bit of stock photos lately for addition to my iStock portfolio. While this is mostly an enjoyable exercise, it can get a bit stale after awhile. I mean, there are just so many different angles you can shoot a credit card reader from before it gets a little mundane.

Feeling the need to spend some time outdoors being creative, I headed to a local pedestrian overpass this past Monday night with my gear. There is something therapeutic about sitting in the dark waiting for a time exposure to be captured. The sensation of being alone while literally hundreds of people pass directly below is pretty cool.

This image is one of the captures I made that night. What made this shot a bit more challenging was that the tripod had to be extended to its maximum height of over 7 feet to overcome the safety fence. This forced me to guesstimate the alignment of the shot since I couldn’t look through the viewfinder. Note to self: “Next time bring something to stand on”.

Overall, I give this shot a solid “B”. But the feeling of hanging out in the dark on an overpass earns an “A+”.

Canon 5D, Canon 24-105 f/4L IS lens – 399 seconds, f/16, ISO 50

Labels: ,

I’m Still Photoshopping My Photos

]]>

Adobe, the creator of the highly popular image editing software Photoshop (the program I use for editing my captures), has recently stated that the name Photoshop is not to be used as a verb. In fact, they have a whole section on their website detailing the company’s policy on this.

Here is a snippet from Adobe.com:

The Photoshop trademark must never be used as a common verb or as a noun. The Photoshop trademark should always be capitalized and should never be used in possessive form, or as a slang term. It should be used as an adjective to describe the product, and should never be used in abbreviated form. The following examples illustrate these rules:

Trademarks are not verbs.

CORRECT: The image was enhanced using Adobe® Photoshop® software.

INCORRECT: The image was photoshopped.

I think it is a bit late to enforce this policy on a large scale. The word photoshop has become synonymous in the photography community and increasingly in mainstream speech with the word edit. Just this past weekend I overheard the following exchange:

person #1: “Check out this picture of a giant dog.”
person #2: “I already saw that. The dog’s not really that big, it’s photoshopped.”

To further illustrate my belief that it is too late for Adobe to prevail in this area, one only has to go as far as Dictionary.com. A quick search on the popular site for the definition of “photoshop” yielded this result:

“…to edit an image using a computer program,” 1992…”

What I suspect is really going on here is that Adobe is required to have a policy in effect to protect their trademark. Without this effort, they run the risk of losing the claim to ownership of the name Photoshop. Google had a similar problem last year since their name was increasingly being used as a generic term for search (i.e. “just google for the answer”).

I can understand why companies like Adobe and Google don’t want their trademarked names to go the way of Xerox & Kleenex and become generic terms. But in the photography community I think it is too late.

As for me, I will continue photoshopping my photos. What about you?

Labels:

Barrel of Fun

]]>

Canon 5D, Canon 24-105 f/4L IS lens – 1/800 second, f/4, ISO 50

Making a Photo ‘Stock Ready’

]]>

One of the things that can be time consuming to a photographer that is venturing into the world of Stock Photography is the required genericness of their work. What I mean by this is that most stock photo agencies will not accept photos that have identifiable logos, artwork, names, etc. in them. The photos need to be generic.

Take today’s capture for example. I shot this picture of my daughter exhibiting her best snotty adolescent face with a bass guitar in her lap. In order to add this image to my iStock Portfolio and offer it for sale I needed to remove the stickers from the guitar since they are someone else’s trademarked artwork. To accomplish the removal I used the Clone Tool in Photoshop. Here is the modified image:

Seriousness

Sometimes removing logos is quick & easy and sometimes it is difficult & tedious. For example, last month I created a stock image of a cowboy revolver and holster in a rustic setting. When composing the shot I was careful to not show logos and names – or so I thought. When it came time to edit the photograph I realized that the manufacturer’s name was visible on nearly all of the ammunition in the gunbelt. I then had to painstakingly remove the writing on the numerous rounds of ammo.

The easiest way to remove the infringing name/logo is to simply not have it in the shot in the first place. The more stock work I shoot, the more I attempt to save editing time by avoiding the inclusion of trademarked info. While it is frequently unavoidable, many times a few seconds of rearranging when shooting can save vast amounts of time editing.

Labels: ,

Walking to the Deep End

]]>

Canon 5D, Canon 24-105 f/4L IS lens – 1/60 second, f/4.5, ISO 50

Potter’s Hands Revisited

]]>

I shoot a lot of photos. Of all the shots I take, I probably only process about 5-10% of the images. This is due to a few reasons.

The first is time. While it only takes a fraction of a second to capture the scene, it takes a bit longer to do the post-processing. Since I shoot in RAW mode (more on this in an upcoming post), any image I want to use requires some times spent in front of the computer editing.

The second reason is duplication. Shooting digital photos is cheap. Unlike the film days, taking multiple shots doesn’t cost any more than taking a single photo (other than wear and tear on the camera shutter). When I find an interesting subject, I often will take 5-10 photos of it from various angles at different exposures. Because of this I have a lot of different versions (in my archives) of photos that I have already edited and displayed.

Today’s capture is one of these shots. I have been re-visiting my archives recently looking for photos from the past that I could process. I originally edited a black & white version of this shot with a tighter crop. This time I left it in color and opted to show more of the pottery wheel.

On rainy days, it’s nice to have a backlog of shots to wade through. You never know what you’ll find.

Canon 30D, Canon 24-105 f/4L IS lens – 1/320 second, f/6.3, ISO 160

With Springtime Come the Tulips

]]>

When creating this capture of a tulip, I sought to avoid the typical style of flower shot that is so common this time of year – Pretty. My goal was to communicate a different feeling by including the dirty gloved hands, the plant’s root ball and the gardener’s body.

I originally shot this with the lens wide open at f/4 but the resulting image’s depth of field was too shallow causing the gardener to be overly blurred. By stopping the lens down a few stops to f/9, the desired result was achieved. The body and arms, while still being out of focus, are not too blurry.

Canon 5D, Canon 24-105 f/4L IS lens – 1/200 second, f/9, ISO 50

Labels:

Pins and Needles

]]>

Pins and Needles, taken in Lake Havasu City Arizona.

Canon 5D, Canon 70-200 f/4L lens with 1.4x extender – 1/125 second, f/5.6, ISO 50

Labels:

Reader Question: Getting Rid of ‘Creepy Eyes’

]]>

Frequent blog reader Michelle from the What’s Up Michelle blog dropped me an email yesterday with a question. I asker her if she’d mind if I answered publicly and she gave me the go ahead.

“The camera I use is a Canon A540, digital. When I take photos of my dogs, I get the eye shine. How can I take some candid photos in normal lighting / every day setting, without getting the glowing eyes, which is kinda creepy.”

Great question, Michelle. Camera’s such as yours are designed to do much of the thinking for the photographer. This makes it easy for the novice shooter to simply aim the camera and press the shutter release without having to worry about the various settings. That’s why these type of camera’s are commonly referred to as “Point and Shoot”.

One of the settings that the camera does automatically is the decision of when to use flash. I have noticed with many point-and-shoot models that they use the flash on nearly all shots. Since this flash is located very close to the camera’s lens, its light bounces off the back of your dog’s retinas to create the “creepy” look. Many advanced photographers avoid this “creepiness” by either bouncing their flash off of the ceiling or moving it away from the camera. Unfortunately, neither of these solutions is available for you. A solution I would use is to avoid using the flash for these types of shots and to manually adjust the camera’s settings.

To illustrate this, I borrowed my daughter’s Canon A530 which is very similar to your camera. I then called over Holly, our always willing German Shorthaired Pointer, to serve as a model (it did cost me a piece of cheese).

In the shot on the left I used the camera on the fully automatic setting. Notice how it not only created the “Creepy” eyes, but the flash also overexposed the end of Holly’s nose and created a large shadow. This did not make for a very flattering photograph.

In the other shot (on the right), I put the camera in manual mode, adjusted the aperture to its widest setting to allow in maximum light and disabled the flash. Note how much more even the lighting is on Holly and how her eyes look normal. I feel that this capture looks much more natural and pleasing.

Keep in mind that this method worked in part because I had a good amount of natural light in the room. If the room had been darker it would have been more difficult to get a good result without the flash. For some more information and tips on photographing without a flash, you might refer to a post a did a few weeks back on low light shooting (here’s a link).

I hope this answered your question, Michelle. If any other readers have suggestions as well, I’m sure they’ll chime in.

Labels: , ,

Reader Question: Getting Rid of ‘Creepy Eyes’

]]>

Frequent blog reader Michelle from the What’s Up Michelle blog dropped me an email yesterday with a question. I asker her if she’d mind if I answered publicly and she gave me the go ahead.

“The camera I use is a Canon A540, digital. When I take photos of my dogs, I get the eye shine. How can I take some candid photos in normal lighting / every day setting, without getting the glowing eyes, which is kinda creepy.”

Great question, Michelle. Camera’s such as yours are designed to do much of the thinking for the photographer. This makes it easy for the novice shooter to simply aim the camera and press the shutter release without having to worry about the various settings. That’s why these type of camera’s are commonly referred to as “Point and Shoot”.

One of the settings that the camera does automatically is the decision of when to use flash. I have noticed with many point-and-shoot models that they use the flash on nearly all shots. Since this flash is located very close to the camera’s lens, its light bounces off the back of your dog’s retinas to create the “creepy” look. Many advanced photographers avoid this “creepiness” by either bouncing their flash off of the ceiling or moving it away from the camera. Unfortunately, neither of these solutions is available for you. A solution I would use is to avoid using the flash for these types of shots and to manually adjust the camera’s settings.

To illustrate this, I borrowed my daughter’s Canon A530 which is very similar to your camera. I then called over Holly, our always willing German Shorthaired Pointer, to serve as a model (it did cost me a piece of cheese).

In the shot on the left I used the camera on the fully automatic setting. Notice how it not only created the “Creepy” eyes, but the flash also overexposed the end of Holly’s nose and created a large shadow. This did not make for a very flattering photograph.

In the other shot (on the right), I put the camera in manual mode, adjusted the aperture to its widest setting to allow in maximum light and disabled the flash. Note how much more even the lighting is on Holly and how her eyes look normal. I feel that this capture looks much more natural and pleasing.

Keep in mind that this method worked in part because I had a good amount of natural light in the room. If the room had been darker it would have been more difficult to get a good result without the flash. For some more information and tips on photographing without a flash, you might refer to a post a did a few weeks back on low light shooting (here’s a link).

I hope this answered your question, Michelle. If any other readers have suggestions as well, I’m sure they’ll chime in.


LeggNet’s Digital Capture
© Rich Legg, Inc. All rights reserved.


Leading Lines with Shafer & Sons

]]>

Yesterday I wrote about the use of Leading Lines in composing a photograph. Today’s capture is another example of this technique. The many lines created by the piano’s keyboard, some subtle and some not, combine to draw the viewer’s focus to a dark vanishing point in the upper right.

Canon 5D, Canon 24-105 f/4L IS lens – 1/60 second, F/18, ISO 50


LeggNet’s Digital Capture
© Rich Legg, Inc. All rights reserved.


Photography Tip: Use Leading Lines to enhance the shot

]]>

Here’s a quick tip for making your photos more appealing: Leading Lines.

A leading line is a feature within a photograph, either natural or man made, that creates a line from the bottom of the shot moving upward toward the subject. The addition of this to draw the viewers eye into a photograph is a great tool.

When composing a shot, take a moment and see if there is anything that can be used as a leading line. Items like paths, long shadows, natural features and such work very well. The line should begin at or near the bottom of the shot and work its way toward the top – preferably near the main subject. Diagonal lines are sharp and dynamic while curved lines are smooth and graceful.

Today’s featured capture is an example of a smooth and flowing leading line. I captured this winding mountain road just outside of Idyllwild California. While the double yellow line does not lead to a particular ‘subject’, it does create depth to the photo.

In another example of this technique (below), I used the natural feature of a patch of turquoise ice as a leading line. The brightly colored strip draws the viewer’s focus into the lake and ultimately to the snow covered mountains.

Frozen Lakeshore

I find that the use of leading lines improves my shots. Give it a try and see how it works for you.

Road: Canon 30D, Canon 24-105 f/4L IS lens – 1/500 second, f/10, ISO 100
Ice: Canon 30D, Canon 24-105 f/4L IS lens – 1/80 second, f/16, ISO 100

Labels: ,

Photography Tip: Use Leading Lines to enhance the shot

]]>

Here’s a quick tip for making your photos more appealing: Leading Lines.

A leading line is a feature within a photograph, either natural or man made, that creates a line from the bottom of the shot moving upward toward the subject. The addition of this to draw the viewers eye into a photograph is a great tool.

When composing a shot, take a moment and see if there is anything that can be used as a leading line. Items like paths, long shadows, natural features and such work very well. The line should begin at or near the bottom of the shot and work its way toward the top – preferably near the main subject. Diagonal lines are sharp and dynamic while curved lines are smooth and graceful.

Today’s featured capture is an example of a smooth and flowing leading line. I captured this winding mountain road just outside of Idyllwild California. While the double yellow line does not lead to a particular ‘subject’, it does create depth to the photo.

In another example of this technique (below), I used the natural feature of a patch of turquoise ice as a leading line. The brightly colored strip draws the viewer’s focus into the lake and ultimately to the snow covered mountains.

Frozen Lakeshore

I find that the use of leading lines improves my shots. Give it a try and see how it works for you.

Road: Canon 30D, Canon 24-105 f/4L IS lens – 1/500 second, f/10, ISO 100
Ice: Canon 30D, Canon 24-105 f/4L IS lens – 1/80 second, f/16, ISO 100


LeggNet’s Digital Capture
© Rich Legg, Inc. All rights reserved.


Quittin’ Time

]]>

Quittin’ Time, captured at dusk in Lake Havasu City, Arizona. The smooth appearance of the lake’s water was captured with a relatively long shutter speed of 30 seconds.

Canon 5D, Canon 24-105 f/4L lens – 30 seconds, f/16, ISO 50


LeggNet’s Digital Capture
© Rich Legg, Inc. All rights reserved.


A Dollar Saved is a Dollar Earned

]]>

“A PENNY DOLLAR SAVED IS A PENNY DOLLAR EARNED”

– Benjamin Franklin
(adjusted for inflation)

Canon 5D, Canon 24-105 f/4L IS lens – 1/50 second, f/8, ISO 50

Labels:

True Friendship

]]>

Today’s capture epitomizes true friendship to me. This wonderful group of people spend the majority of their winter months living near each other in Arizona. They go bowling, eat barbecue, watch movies, do yard work and much more while enjoying each other’s company. If one couple needs help, the other two are quick to lend a hand. We can all count ourselves as truly fortunate if we have friendships such as this.

Pictured (left to right): Fran, Gene, Chic, David, Mom & Dad

Canon 5D, Canon 24-105 f/4L IS lens – 1/30 second, f/4, ISO 100


LeggNet’s Digital Capture
© Rich Legg, Inc. All rights reserved.


Saltair, Utah

]]>

Saltair, photographed on the southern shore of Utah’s Great Salt Lake.

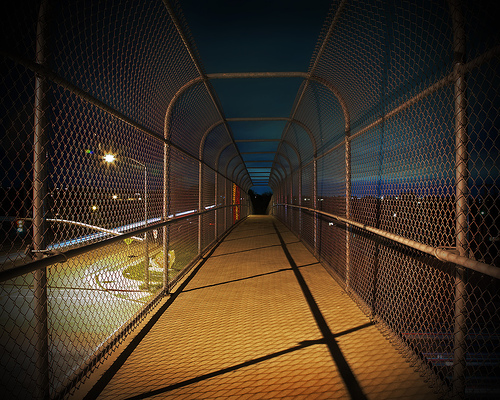
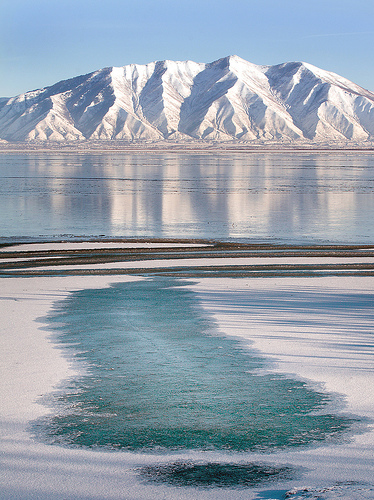
Canon 5D, Canon 24-105 f/4L IS lens – 1/125 second, f/11, ISO 50

For those readers that have a few minutes to spare, why not fill your brain with some useless facts? Here’s the history of Saltair, Wikipedia style:
__________

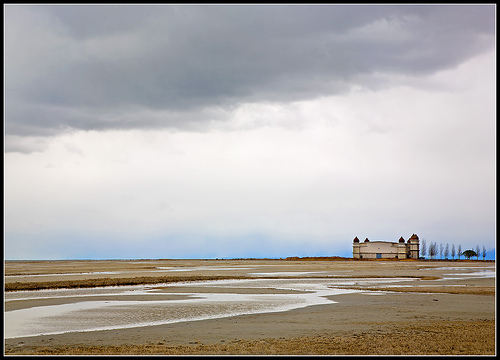
Saltair or “The SaltAir” is the name which has been given to several resorts located on the southern shore of the Great Salt Lake in Utah, United States, about fifteen miles from Salt Lake City.

The first Saltair, completed in 1893, was jointly owned by a corporation associated with The Church of Jesus Christ of Latter-day Saints (commonly called Mormons) and the Salt Lake and Los Angeles Railroad Company (which originally served the site). Saltair was not the first resort built on the shores of the Great Salt Lake, but was the most successful ever built. It rested on over two thousand posts and pilings, many of which remain and are still visible over one hundred and ten years later.

Saltair was a family place, intended to provide a safe and wholesome atmosphere with the open supervision of Church leaders. While some of the other resorts in the area were seen as “spiritually bleak,” a young couple could visit Saltair without worrying about the gossip in the early days when Mormonism was more culturally conservative than it is today. Train schedules from Saltair to stations near home were well known, and so long as the boy got the girl home at a reasonable time after the train arrived, parents weren’t worried — in part because, from the moment of arriving at the station before the outing until they left the station coming home, they were usually never out of sight of trusted members of the Church. More than once, a couple on the way home found themselves in the same car as their parents, who themselves had been dancing at Saltair.

Intended from the beginning as the Western counterpart to Coney Island, Saltair was one of the first amusement parks, and for a time was the most popular family destination west of New York. Some criticism was pointed at the Church over the sale of coffee, tea or alcohol (all of which are prohibited by Mormon doctrine), as well as Saltair’s being open on Sunday.

The first Saltair pavilion and a few other buildings were destroyed by fire in 1925. A new pavilion was built and the resort was expanded at the same location by new investors (again, mostly prominent Mormons), but several factors prevented the second Saltair from achieving the success of its ancestor. The advent of motion pictures and radio, the Great Depression, and the interruption of the “go to Saltair” routine kept people closer to home. With a huge new dance floor — the world’s largest at the time — Saltair became more known as a dance palace, the amusement park becoming secondary to the great travelling bands of the day, such as Glenn Miller. Though Saltair showed motion pictures, there were other theaters more convenient to town.

In addition, the first Saltair had benefitted from its location on the road from Salt Lake City to the Tooele Valley (where it again rests today) and to Skull Valley, which in the late 1800s was home to Iosepa, a large community of Polynesian Mormons. Being near a major intersection, Saltair also served as the first (or last) major facility on the road, making it a popular resting area for those travelling by horseback or wagon. When Saltair was rebuilt, however, this traffic was all but gone. Part of the reason was due to the advent of automobiles, bus and train service to the Tooele Valley, but the other cause was the abandonment of Iosepa, as Polynesians went to homes in the Salt Lake Valley or the community forming around the new LDS Temple in Laie, on Oahu in the Hawaiian Islands.

Saltair thus had to survive solely against strong competition, and in a dwindling market. Disaster struck in 1931, in the form of a fire which caused over $100,000 in damage, then again in 1933 as the resort was left high and dry when lake waters receded (forcing the construction of a miniature railway to carry swimmers between the resort and the water). Saltair was forced to close during the Second World War, which forced the rationing of fuel and other resources while it took many of the resort’s paying customers — and vital employees — out of Utah. Reopening after the war, the resort found the same situation that it had faced in the 1930’s. There were so many other entertainment options, closer to home, and the public was no longer in the habit of going “all the way out there.” The final nail in Saltair’s coffin was television, and the resort closed in 1958 and remains closed for the most part except for performances and special occasions.

Key scenes of the horror cult film released in 1962, Carnival of Souls, were shot in Saltair. A 1960s photo of Saltair was also featured on the cover of the bootleg Beach Boys album, Unsurpassed Masters, Vol. 19.

Attempts over the next decade to breath new life into the resort finally ended in November of 1970, when a fire was set in the center of the wooden dance floor, again destroying Saltair.

Close proximity to Interstate Highway 80, plus new population expansion into the Tooele Valley and the western Salt Lake Valley, prompted the construction of a new Saltair in 1981. The new pavilion was constructed out of a salvaged Air Force aircraft hangar. Once again the lake was a problem, this time flooding the new resort only months after it opened. The waters again receded after several years, and again new investors restored and repaired and planned, only to discover that the waters continued to move away from the site, again leaving it high and dry.

Concerts and other events have been held at the newest facility, but by the end of the 1990s, Saltair was little more than a memory, too small to compete with larger venues which are closer to the public. While there is occasionally activity now and then, through most of the early twenty-first century, the third Saltair was all but abandoned. In 2005 several investors from the music industry pooled together to purchase the building and are now holding regular concerts there. Bands like Dave Matthews Band, The Black Crowes, and other notable hip-hop music and rock music acts have all performed there recently.

Other relics of the age of the Great Salt Lake resorts are nearby, and can be seen from the highway. The most noticeable of these is the skeleton of an old rail car, which sits beside the ruins of an old powerhouse which once fed lights and roller coasters. Rows of pilings snake outward toward the lake, all that remains of the railway trestle and pier which once led to the earlier Saltair resort. The surviving buildings of Lake Park, one of Saltair’s neighbors, were moved to a new site thirty miles away, where the Lagoon Amusement Park has grown around them.

Occasionally used as a backdrop for movies or television shows, Saltair awaits a new life where it stays as music venue currently and is one more of Salt Lake City’s great historical tales.

(reproduced with permission)

Labels:

Sunset over Lake Havasu

]]>

I captured this sunset view of Arizona’s Lake Havasu from my parent’s backyard on Saturday evening. In composing the shot, I opted to add the silhouetted flower and to shoot with a shallow depth of field to add depth to the image.

Out of curiosity, what do you think of the placement of the flower’s stem centered against the setting sun? Does it work as it is or should I have placed the stem off to either side?

Canon 5D, Canon 24-105 f/4L IS lens – 1/250 second, f/4, ISO 50

The Morning After

]]>

Canon 5D, Canon 24-105 f/4L IS lens – 1/60 second, f/16, ISO 50

The Empty Tomb

]]>

“But when they looked up, they saw that the stone, which was very large, had been rolled away.”

Mark 16:4 (NIV)

Canon 5D, Canon 24-105 f/4L IS lens – 1/15 second, f/4, ISO 160

Labels: ,

Behind Closed Doors

]]>

While visiting the famed London Bridge in Lake Havasu City yesterday I came across this mysterious looking door located beneath the bridge. While it is probably nothing more than a storage space or maybe a utility access point, it does evoke a feeling of darkness and intrigue. Iron bars on a steel door locked from the outside can have that effect.

Canon 5D, Canon 24-105 f/4L IS lens – 1/30 second, f/4, ISO 50

The Empty Tomb

]]>

“But when they looked up, they saw that the stone, which was very large, had been rolled away.”

Mark 16:4 (NIV)

Canon 5D, Canon 24-105 f/4L IS lens – 1/15 second, f/4, ISO 160


LeggNet’s Digital Capture
© Rich Legg, Inc. All rights reserved.


Cactus Bloom on a Good Friday

]]>

It’s time again for the family’s annual Spring Break trek to my parents’ home in Lake Havasu City Arizona. Hanging out in the sun with the family near the water makes for a nice reprieve from the last several months of Utah winter.

Today’s image is of a Tricocereus cactus in my folks’ yard. This particular cactus blooms only once a year and for the second year in a row it happened on the day after our arrival. The beautiful flowers will be gone within a day (or so I’m told) and made for a nice springtime capture.

Canon 5D, Canon 24-105 f/4L IS lens – 1/60 second, f/4, ISO 50
Fill lighting: Canon 430EX strobe (with a Lightsphere) set at -1 stop

Mamiya / Sekor – 50mm f/1.8 lens

]]>

Quality construction throughout.

That’s how I describe the feeling that comes to mind when I handle my 35+ year old Mamiya/Sekor 50mm f/1.8 lens. For such a small lens, it is relatively heavy. It feels as though there is very little (if any) plastic used in the build. The focus ring is precisely smooth as is the aperture adjustment. The glass looks like it just came from the factory – flawless.

I carry this lens in my kit for sentimental reasons (it used to belong to my late brother) and because I enjoy using it from time to time. I have an adaptor that allows it to be used on my Canon digital SLRs. The use of a manual focus and manual aperture lens reminds me of my photography of yesteryear. I’ve got to say though, it does look quite odd having this 20th century lens attached to a 21st century camera.

The shot was made looking straight down on the lens as it set on a blank CD-ROM against a black background. I used a single softbox to light the scene. I stopped the subject lens down to f/22 in hope to capture the aperture blades in the image, but the depth of field was too shallow at f/4 for them to come into sharp focus.

Canon 5D, Canon 24-105 f/4L lens – 1/30 second, f/4, ISO 50

Labels: ,

Angled Sail

]]>

Canon 30D, Canon 24-105 f/4L lens – 1/320 second, f/8, ISO 100

Labels:

Mamiya / Sekor – 50mm f/1.8 lens

]]>

Quality construction throughout.

That’s how I describe the feeling that comes to mind when I handle my 35+ year old Mamiya/Sekor 50mm f/1.8 lens. For such a small lens, it is relatively heavy. It feels as though there is very little (if any) plastic used in the build. The focus ring is precisely smooth as is the aperture adjustment. The glass looks like it just came from the factory – flawless.

I carry this lens in my kit for sentimental reasons (it used to belong to my late brother) and because I enjoy using it from time to time. I have an adaptor that allows it to be used on my Canon digital SLRs. The use of a manual focus and manual aperture lens reminds me of my photography of yesteryear. I’ve got to say though, it does look quite odd having this 20th century lens attached to a 21st century camera.

The shot was made looking straight down on the lens as it set on a blank CD-ROM against a black background. I used a single softbox to light the scene. I stopped the subject lens down to f/22 in hope to capture the aperture blades in the image, but the depth of field was too shallow at f/4 for them to come into sharp focus.

Canon 5D, Canon 24-105 f/4L lens – 1/30 second, f/4, ISO 50


LeggNet’s Digital Capture
© Rich Legg, Inc. All rights reserved.


Smoking Glock

]]>

Featured today is another capture from a recent stock photography shooting session. Since a previous image I have of a smoking handgun sells fairly well on iStockphoto, I decided to add a few more similar shots to my portfolio.

The pistol in this capture is a 9mm Glock with the magazine removed and no ammunition anywhere close by (safety first!). To create the smoking effect I held the gun’s open magazine well (in the grip) over two burning incense sticks and let the smoke flow up and out of the gun. The majority of the smoke exited through the barrel, but some of it came out of other openings. This helped to create the illusion of the gun having just been fired.

For lighting, I placed a softbox up and to the right of the subject. I used an umbrella diffused light set to half power to the left to add fill. This was obviously shot against a black background. The lighting worked well to accentuate the gun’s features along with the smoke. Very little post-processing was required.

Canon 5D, Canon 24-105 f/4L lens – 1/60 second, f/8, ISO 50

Labels: , , ,

Monday Morning

]]>

Canon 5D, Canon 24-105 f/4L IS lens – 1/60 second, f/16, ISO 50

Labels:

The Rule of Thirds – Simplified

]]>

One of the first things to get emphasized to novice photographers by those who claim to be more knowledgeable is to “Follow the rule of thirds”. While this is sound advice, the phrase can be confusing. Let’s take a few moments and simplify this “Rule” so that we all can use it when making captures regardless of our experience.

Simply put, the Rule of Thirds is a tool to use when composing a photograph. The way I like to instruct it is this: Place four evenly spaced imaginary lines on your image, 2 horizontal and 2 vertical. I have even further simplified it to some (mainly children) by suggesting that they imagine a “tic-tac-toe” board over the photo. Once you can picture the lines, place your subject very near a line and, if possible, arrange the main focal point of the subject where two of the lines intersect. In doing so, you increase the odds that you will create a photo that is visually appealing to how the human mind interprets the image.

For today’s image (above) I took one of my favorite hawk photos and added yellow lines to help illustrate the process. When composing the photo I placed the bird on the right most vertical line. The main focal point of the bird is the eyes and beak, but I found that if I placed them on an intersection the photo was a bit bottom heavy. Instead, I placed the bird’s body where the two nearest lines meet. Doing so creates a pleasing composition since the birds head is close enough to an intersection to take advantage of the rule. Had I taken the same photo and composed it differently by placing the bird in the center of the image, the result would not be as pleasing.

Since I’m on the subject of image composition, the image above demonstrates another “Rule” that can be followed to make a shot more pleasing. In most situations it is desired to have the subject looking toward the center of the image. If the bird were looking to the right rather than the left, the photo would not be as pleasing to the viewer’s eye. In fact, to many people it would just “feel uncomfortable”. The same can be said for motion. If the photo is of a subject in motion, compose it so it is moving toward the image’s center.

Lastly, remember the old phrase “Rules are made to be broken”. There are plenty of times when a more pleasing image can be created by breaking the Rule of Thirds rather than following it. Try using this rule as a guideline and see if your work improves.

Canon 30D, Canon 70-200 f/4L lens – 1/500 second, f/4, ISO 100

Labels: