
April 10th, 2008
I Dream In Color (guest post by Jeremy Hall)
]]> 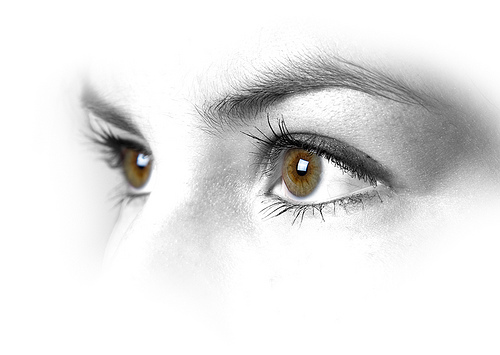
Today’s image was created by Jeremy Hall. Jeremy is a friend of mine that I met through Photowalking Utah. I saw this image on Jeremy’s Flickr photostream and asked him to write about how he created it.
By Jeremy Hall
I have some great friends and co-workers that step in as my models when I have ideas for new shoots. Good people. Kattie is a beautiful girl working in our customer service department that has very photogenic eyes and an appreciation for taking good photos. I have had in my mind some ideas for taking a series of photos of just eyes or tightly composed face shots, and she was willing to be my first victim.
After taking a series of shots, angles and lighting adjustments I went to work in Lightroom seeing what I had to work with. Lately I have been spending a lot of time trying to learn new development techniques in Photoshop, so when I take photos I tend to view them as a canvas ready to be brought to life. This is not to say I don’t try to get a perfect image out of the camera without processing, but the processing has been my interest of late. There is so much to learn and evolve in photography that I love!
One thing I especially enjoy about photography is the willingness of most other photogs to share their knowledge. Sure, there are some “secret sauce” business things that tend to stay protected; but when it comes to creating beautiful art, most are willing to help along those of us earlier in the learning process. With that in mind, I am always happy to share what I know to help others learn like I am.
Here are some notes of what I did with this image:
1. Shot normally with single soft box and model facing light at slight angle
2. Slightly underexposed in Lightroom to maintain shadow detail.
3. Photoshop channel mix layer for high key b&w conversion with selective mask to avoid eyes. For the b&w I just play with the sliders until I achieve the look I am going for that best enhances the photo.
4. Same eye selection (control/cmd click the previous adjustment layer thumbnail to reselect) for saturation and curves
5. Several dodge & burn layers for enhanced high key and knocking out aspect of background and face I didn’t want.
That’s really it. I did a crop based on how I wanted to display the image and some additional selective sharpening once the image was downsized. My preferred technique for a final sharpening is to create a duplicate of the background layer, apply the sharpening that best fits the important areas of the image, then apply a layer mask to hide all of the sharpening and then paint back on with a soft brush where I want the sharpening applied.
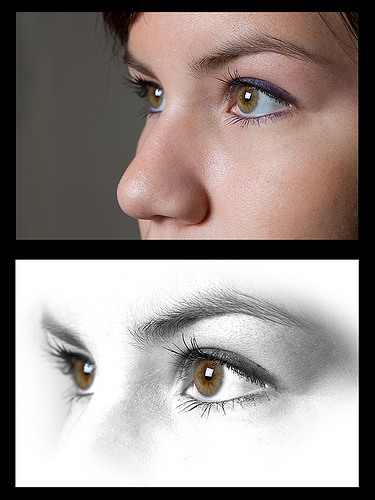
For comparison I have created this before and after image.
Thanks for the invite on the guest post, and I always appreciate visitors and comments over on my site at www.whatsgottastay.com and on my Flickr stream!


