June 2, 2010

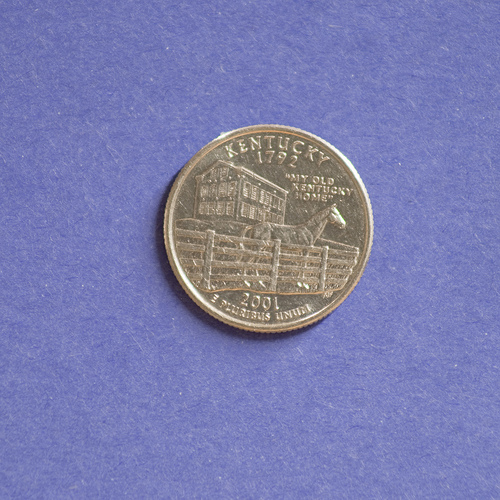
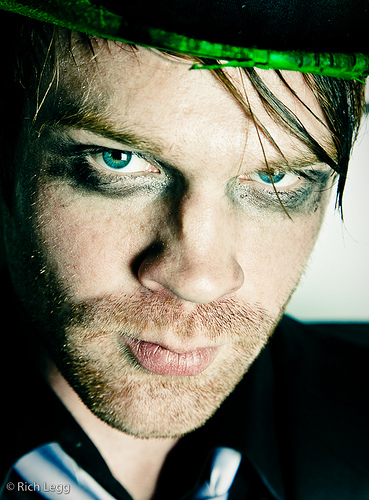
I’ve recently been on a film shooting kick. It all began a couple weeks ago when one of the models that I work with called and said that she had an “old film camera” and asked if I wanted it. Of course I jumped at the offer and soon had a Pentax K1000 in great condition in my hands. I carried the camera around for a few days to work through the roll of 36 exposures taking pictures “just for fun”. Here are a few things I learned during that experience:
- I’ve got a really bad habit of “Immediate Chimping” that I need to break
- When I’ve got a small number of available shots, I take more time to compose
- Getting the light correct before shooting is a skill I’ve let slack
- Film requires much less image editing
- Auto-focus is a very nice thing
Today’s image is a quick shot I took of my friend Dave. This is un-retouched and taken directly from the CD I received from the lab. Wow Dave, what beautiful eyes you have (I know, AWKWARD!) 🙂
I’m going to spend some more time shooting film in the coming weeks. I recently picked up a Nikon FE from eBay to use. This is the model that was my main camera body (along with an FM2) during my high school yearbook/newspaper days. I would eventually like to have a replacement for every camera that I have used during the 80’s, but since the list is long (see below) that will be waiting for awhile until there is room in the budget.
My list of film cameras between 1980-1990:
- Petri (model unknown)
- Pentax MX
- Pentax ME Super
- Nikon FE
- Nikon FM2
- Mamiya 645
If you’ve got access to a film camera, I’d recommend putting a roll of film through it and taking note of how the experience differs from digital. You might be surprised at the results.
Pentax K1000, Pentax 50mm f/2.0 lens – 1/30 second, f/2.0, ISO 100
June 2nd, 2010 12:00 am | Comments Off on Shooting with Film for Fun
June 1, 2010

Canon 5D Mark II, Canon 70-200 f/4L lens – 1/640 second, f/4, ISO 400
June 1st, 2010 12:00 am | Comments Off on Flare
May 30, 2010

Canon 5D Mark II, Canon 70-200 f/4L lens – 1/100 second, f/5.6, ISO 200
May 30th, 2010 12:00 am | Comments Off on Tru
May 28, 2010

Have a great holiday weekend!
Canon 5D Mark II, Canon 70-200 f/4L lens – 1/1250 second, f/4, ISO 100
May 28th, 2010 12:00 am | Comments Off on Memorial Day Weekend
May 26, 2010

Canon 5D Mark II, Canon 70-200 f/4L lens – 1/200 second, f/9, ISO 100
May 26th, 2010 12:00 am | Comments Off on The Man
May 21, 2010

Canon 5D Mark II, Canon 24-105 f/4L lens – 1/80 second, f/4, ISO 100
May 21st, 2010 12:00 am | Comments Off on Looking Up
May 20, 2010

I’m flattered to say that iStockphoto is currently featuring one of my images as this week’s Free Photo of the Week. By giving away thousands of copies (12,000+ as of right now) of a picture, my stock photo portfolio receives some great exposure. Thanks iStock!
If you’d like to get your free copy, head on over to iStockphoto.com and download it.
May 20th, 2010 12:00 am | Comments Off on iStockphoto: Free Photo of the Week
May 19, 2010

Canon 5D Mark II, Canon 70-200 f/4L lens – 1/125 second, f/4, ISO 100
May 19th, 2010 12:00 am | Comments Off on Invisible Sun
May 17, 2010

Canon 5D Mark II, Canon 70-200 f/4L lens – 1/1250 second, f/4, ISO 100
May 17th, 2010 12:00 am | Comments Off on Vision
May 16, 2010

Canon 5D Mark II, Canon 70-200 f/4L lens – 1/800 second, f/4, ISO 400
May 16th, 2010 12:00 am | Comments Off on Beautiful Day
May 12, 2010

Canon 5D Mark II, Canon 70-200 f/4L lens – 1/1250 second, f/4, ISO 100
May 12th, 2010 12:00 am | Comments Off on Free
May 9, 2010
“All I am, or can be, I owe to my angel mother.” – Abraham Lincoln
May 9th, 2010 12:00 am | Comments Off on Mother
May 7, 2010

Canon 5D Mark II, Canon 70-200 f/4L lens – 1/320 second, f/4, ISO 100
May 7th, 2010 12:00 am | Comments Off on The Graduate
May 3, 2010
May 3rd, 2010 12:00 am | Comments Off on Image in Use: The Clymb
April 30, 2010

Canon 5D Mark II, Canon 24-105 f/4L lens – 1/100 second, f/8, ISO 100
April 30th, 2010 12:00 am | Comments Off on The Thief
April 29, 2010

The new studio buildout continues. Yesterday the drywall crew completed their work and now we are waiting for the painting to begin. We are nearing the home stretch and soon I will be taking over with the work I am doing on it before moving in.
April 29th, 2010 12:00 am | Comments Off on Building Studio 2.0 – Day 8
April 26, 2010

Since the last three days of construction on the new studio have mainly consisted of the drywall mud drying, I thought today I would share the last photo taken in my old studio. With the help of a few friends, we emptied it out today and put everything in a temporary storage space. If all goes as planned, the construction on the new studio will be complete by this time next week and I can move the gear in.
April 26th, 2010 12:00 am | Comments Off on Building Studio 2.0 – Day 6
April 23, 2010

Day three is in full swing. The sheetrock on the new walls is up and the taping is underway. If we stay on schedule it’ll be ready for paint on Monday. Have a great weekend!
April 23rd, 2010 12:00 am | Comments Off on Building Studio 2.0 – Day 3
April 22, 2010

…and the work continues. Today the walls are being raised to the ceiling. For a size reference, that is a 12′ ladder. Pretty cool, eh?
April 22nd, 2010 12:00 am | Comments Off on Building Studio 2.0 – Day 2
April 21, 2010

Following on the heels of yesterday’s “Workstation 2.0” post, I thought I’d show what’s going on at the studio. We are in the process of doing the buildout of a new location that is nearly double the size of the current studio. The crew has been spending today tearing down the walls to make it into one large shooting room. Next comes the drop ceiling removal, drywall work, fresh white paint and putting in flooring. When all goes as planned (fingers crossed), we will be all moved in and back shooting by the end of next week.
April 21st, 2010 12:00 am | Comments Off on Building Studio 2.0 – Day 1
April 20, 2010

After 3 1/2 years I’ve taken the plunge and upgraded my former 20″ iMac workstation to a new 27″ iMac. Wow, what a difference the Intel Core i5 processor and and 8 gigs of RAM make when living in Photoshop and Lightroom compared to the previous Mac. Considering how much time I spend looking at my production machine, I’m really liking the increase in screen real estate. …and look how small my 19″ 2nd screen seems now compared to the main monitor.
April 20th, 2010 12:00 am | Comments Off on Workstation 2.0
April 19, 2010
April 19th, 2010 12:00 am | Comments Off on Behind the Scenes – Credit Card Photo Shoot
April 16, 2010

Canon 5D Mark II, Canon 24-105 f/4L lens – 1/160 second, f/9, ISO 100
April 16th, 2010 12:00 am | Comments Off on Bunny Girl
April 15, 2010
Note from Rich: Today’s post is written by my good friend Harley Pebley. He can be found on Twitter at @hpebley3 and on the web at hookedonlight.com.
By Harley Pebley
My good friend Rich Legg got a Canon EF 100mm f2.8L Macro IS USM lens from BorrowLenses a couple weeks ago. When he finished some portraiture work with it, he loaned it to me for a couple days to play around with it. I have three lenses in my bag: the two kit lenses that came with my XTi and the $80 Canon 1.8 50mm prime. I must say, I could get spoiled really fast with a $1000 piece of glass.
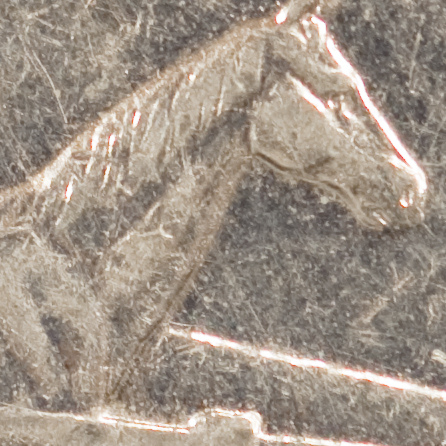
Due to schedule, I wasn’t able to spend as much time shooting with this lens as I would have liked, but I did get about 30 minutes to make a couple comparison images with the only change being the lens. The setup was a quarter on a table with a single strobe off to the side and the camera on a tripod shooting straight down, with the front of the lens about 12-18 inches from the table top. I was rushed enough I forgot to even take a setup shot. All these images are pretty much out of the camera with very minimal post-processing. The post-processing that was done was done exactly the same for all the images.
This image was taken with the rented lens.
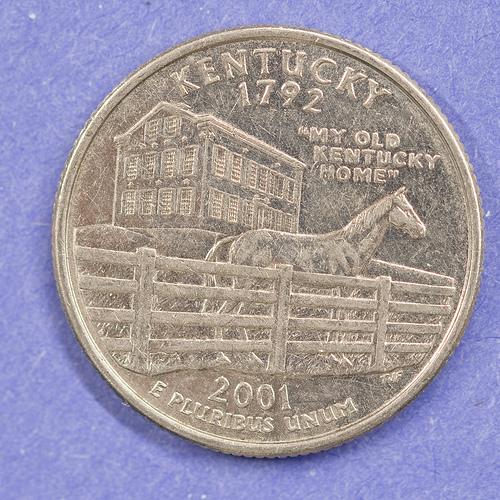
And this image was taken with my 75-300 kit lens set close to 100mm. I didn’t have time to dial it in to be exactly the same size, but I think it’s close enough for a basic comparison. The setup was too close for this lens, so I screwed my +1 and +4 diopters on it to allow it to focus.

For side by side comparison here’s a section of the coin at 100% crop from both of the images above. The first one was taken with the L glass and the second one was with my kit lens. Notice the huge differences in sharpness and chromatic aberration.
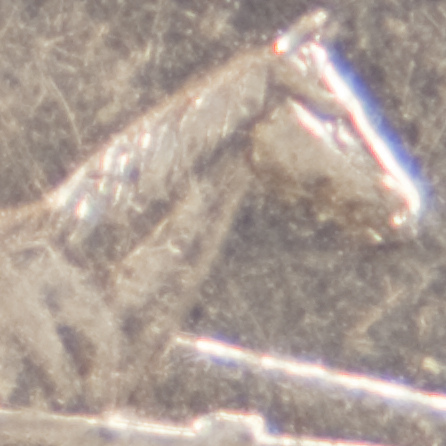
Thinking the diopters might be contributing to the problems, I changed the setup to move the camera further from the subject so it could focus. I had to move the camera about 4 feet away and then zoomed in to the maximum of 300mm. Even with the extra zoom, the subject was significantly smaller than previously. This image is the same crop as the first two. You can see the subject covers about 1/4 of the surface area compared to the others, making the detail much harder to see. The CA is still there but the sharpness is a bit better.
And finally, for comparison, here’s a 100% crop, the same dimensions as the previous crops, from this last image.

As the images above show, there is a marked difference in quality between the two lenses. There’s also a marked difference in price. The kit lens (which isn’t available any more) and diopter set cost approximately $200. On the other hand, the f/2.8 macro lens retails for about $1000. The cost differential between these two solutions makes the services of a rental place like BorrowLenses highly attractive. The rental price for this lens is between $36 and $199, depending on the length of time. For an occasional need or to try out a particular model prior to purchase, this can be a very cost effective way of getting the high quality without the high price tag.
April 15th, 2010 12:00 am | Comments Off on Canon 100mm f/2.8L Macro Lens Mini-Review
April 14, 2010

Canon 5D Mark II, Canon 24-105 f/4L lens – 1/125 second, f/5.6, ISO 100
April 14th, 2010 12:00 am | Comments Off on Happy Patient
April 13, 2010
April 13th, 2010 12:00 am | Comments Off on Image in Use: LIVESTRONG.COM
April 12, 2010

Just what the stock photo world needs, more medical images right? Well maybe not but here’s another sample from the shoot I did last month in a new medical facility. Much like last year’s dentist office shoot, in an effort to keep things looking “real” I had both a doctor and a labor/delivery nurse work with me in setting up the models during the session. The small details in accuracy that a professional (in the industry I’m photographing) provides goes a long way toward the success of the resulting images.
Canon 5D Mark II, Canon 24-105 f/4L lens – 1/125 second, f/4, ISO 100
April 12th, 2010 12:00 am | Comments Off on I Need Professional Help
April 9, 2010

Canon 5D Mark II, Canon 24-105 f/4L lens – 1/30 second, f/4, ISO 3200
April 9th, 2010 12:00 am | Comments Off on Jack in the Band
April 7, 2010

Canon 5D, Canon 24-105 f/4L lens – 1/160 second, f/8, ISO 100
April 7th, 2010 12:00 am | Comments Off on What the….?
April 2, 2010

Canon Powershot G10 (IR) – 1/15 second, f/3.5, ISO 200
April 2nd, 2010 12:00 am | Comments Off on A Good Friday in Havasu
March 31, 2010

Photowalking Utah has teamed up with the Utah Chapter of the National MS Society for a unique photowalk on April 24th, 2010 in Salt Lake City. The group has been asked to capture images of the WALK 2010 event and its 4,000+ participants. This is a great way for us as photographers to help ‘give back’ to a great cause through our photography. Here are the details:
- Date: April 24, 2010
- Time: 8:30 am – complete (before noon)
- Where: Meet in front of the Apple Store at the Gateway (10 South Rio Grande Street, Salt Lake City)
The Photowalking Utah crew will meet up near the starting point of the walk. After some info and instructions on the day, we will fan out and take photos of the event. For anyone who has ever wanted to try out ‘photojournalistic’ type of shooting, this will be a great place to do so. After the event participating photographers will be asked to share any of their images that they would like with the local MS Chapter for it to use. It’s worth noting that photos taken at this event in years past have been picked up by national publications.
As always, these events are free of charge and open to anyone regardless of your photographic skill or what kind of camera you have. For more information and/or to let us know you’re coming, head on over to the event discussion at the Photowalking Utah Flickr Group.
I hope to see a good crowd on the 24th!
UPDATE
Paul Dennison will be heading a Photowalking Utah group to cover the Ogden MS Walk on the 10th. Here are the details:
Date: April 10th, 2010
When: 8:30 – Complete
Where: Lorin Farr Park 1691 Gramercy Avenue, Ogden, UT
Thanks for stepping up, Paul 🙂
March 31st, 2010 12:00 am | Comments Off on Save the Date: Photowalking Utah & Walk MS – 04.24.10
March 30, 2010
Here’s the recorded video stream from the talk on Success in Microstock Photography I gave earlier this month at PhotoCamp Utah. I covered a lot of material in a relatively short period of time (I get a bit rushed at the end), but hopefully the info I shared will give a bit of insight into me and the topic. Big kudos to the hard working video team that were able to stream and record several of this year’s presentations. To see the videos, visit the PhotoCamp Utah UStream channel.
March 30th, 2010 12:00 am | Comments Off on My Presentation at PhotoCamp Utah
March 27, 2010

Canon 5D Mark II, Canon 24-105 f/4L lens – 1/50 second, f/4.0, ISO 3200
March 27th, 2010 12:00 am | Comments Off on Parchman Farms Freedom Riders
March 24, 2010

Canon 5D Mark II, Canon 70-200 F/4L lens – 1/60 second, f/5.6, ISO 100
March 24th, 2010 12:00 am | Comments Off on It’s Good to Have Friends
March 23, 2010

Talk about getting your nickel’s worth, the Davis Hospital and Medical Center sure seems to like my image of Alyssa. This is the third different place I have seen it used by them. This is a great example of one of the advantages (and controversial?) of using Royalty Free Microstock images – the ability to use an image multiple times for a single purchase price.
March 23rd, 2010 12:00 am | Comments Off on Image in Use: Davis Hospital (again)
March 23, 2010
March 23rd, 2010 12:00 am | Comments Off on Happy Anniversary
March 22, 2010

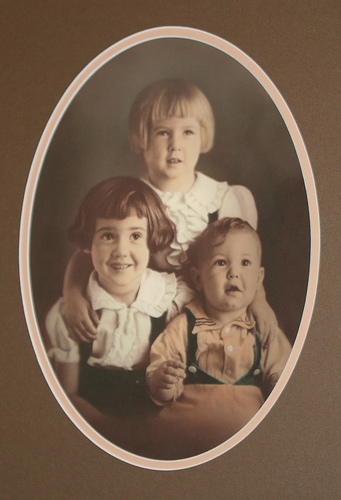
This past Saturday, shortly after I finished giving my talk on Microstock Photography at Photocamp Utah, I sold the 100,000th image from my portfolio at iStockphoto.com. While reaching this milestone doesn’t really change my life, it marks a major accomplishment for me personally. Tomorrow is my third anniversary of being accepted as an Exclusive Contributor at iStock. Back when I was accepted on 03.23.07, I had just reached 500 downloads. Now just three short years later it is amazing to realize I have sold over 100,000 downloads and that this has been my full-time career since 2008.
The 100,000th download is a fitting image for marking the achievement. Not only is it an older image (it was taken on March 24th, 2007 – just one day after going exclusive), it provides a nice visual for me to remember the journey that got me where I am. It was my faith in what I was doing that allowed me to put the Rubber to the Road and build what I have today.
Lastly, if it were not for the help of family and friends supporting me in what I do, I would not be doing it at all. From Michelle’s (and our daughters) early support and understanding of what I was building to the countless friends who have modeled and assisted over the years, I cannot say Thank You enough for the help and encouragement.
Now, enough of this sappy looking back stuff. On toward 200,000! 🙂
March 22nd, 2010 12:00 am | Comments Off on My 100,000th sale on iStockphoto
March 19, 2010
Note from Rich: Today’s blog post is a guest entry written by Utah photographer Jon Williams. This is Jon’s story of his experience of having his camera equipment stolen last year. I am sharing it here since I feel Jon is sharing important info for any photographer to hear.

By Jon Williams
I was one of the unlucky photographers that fell victim to the “Temple Square Thieves” last November. I lost a large Lowe Pro bag filled with Canon equipment. The loss was around $6000.00. The bag was stolen from my locked van which was parked at Crown Burger and/or Pictureline.
They had watched me shooting a wedding at Temple Square, and then watched where I stowed away my gear in the back of my full size Ford van (the van has my company name on the doors). They then just needed to follow me until I stopped somewhere. I went in Crown Burger to use the restroom. I was in there maybe four minutes. I then stopped at Pictureline for maybe ten minutes. I parked where I could watch the van, but they still got me.
They drilled out the key hole, unlocked the power door locks, opened the rear, took the large bag, and relocked the van. I didn’t even know I had been robbed until that evening when I was on my say to shoot the wedding reception. Whoops! No camera gear! My brides temple pictures were also taken.
I thought I was well insured through Hill and Usher/Hartford. It wasn’t too good as it turned out. I found the claims process to be slow and tedious. Also the coverage did not allow me to buy what I had lost. Did you know they deduct 15% depreciation for items that were supposedly covered for “full replacement value?” Also many small items were not covered because I had not individually listed the items on the insurance inventory. Examples: Flash bracket, PC cords, Diffusors for flash, back up flashes etc. This added up to around $300.00. (I have since listed a Misc. package of unspecified equipment of $ 450.00 on my insured listing)
Salt Lake City police tried their best to catch this “ring” but with no luck.
This theft really – set me back– in terms of lost time, lost work, and reparations to the bride. Even though I received about $4000.00 from insurance, I have been forced to sell some of my beloved Hasselblad equipment to pay for new digital gear. My insurance company would not pay for anything under “Errors and Omissions” because they determined that I did not make any errors (strange but true).
I have been paying about $700.00 per year for this Hill and Usher policy which is advertised as “Package Plus” for Professional Photographers and endorsed by WPPI. I think there must be a better way to go after my experience.
Professional photographers need to carry a wide variety of insurance and it may not be feasable to have one insurance provider. I plan to send out a carefully worded RFP to several insurance companies to see if I can obtain a comprehensive policy to cover camera equipment, facilities, buildings, liability, computer equipment, office equipment, etc. I’ve been told that Travelers Insurance is very good.
This is a good website and I appreciate the chance to share my story with other photographers.

Jon Williams
Professional Photographer
Ogden, Utah
JonWilliamsPhotographer.com
March 19th, 2010 12:00 am | Comments Off on Camera Equipment Theft: A True Story
March 18, 2010

I’m coming off a busy few days of photography having completed three fairly large stock shoots and two studio shoots in the past week. The largest of these was a doctor’s office shoot on Saturday night. Even though medical themed images are in an (over?)abundance on iStock, I have done quite well in the past with my healthcare series.
Saturday night’s outing gave me the opportunity to add to my existing collection with some fresh faces and shot ideas. Since we had over a dozen models, I had the chance to work on some larger shots. One of my main ideas was to recreate a ‘busy waiting room’ scene. Today’s image is a quick edit from that set.
Canon 5D Mark II, Canon 24-105 f/4L lens – 1/125 second, f/4.5, ISO 100
March 18th, 2010 12:00 am | Comments Off on Doctor’s Office Photo Shoot
March 16, 2010

Yesterday’s post comparing studio portraits taken with a Canon 5D Mark II and a G11 elicited a lot of comments. It was great to read everyone’s guess and their reasoning behind it.
The above image (the one on the right yesterday) is the version photographed with the 5D Mark II. A few of the commenters (Harley, Nicole, Eric…) touched on what I felt was the obvious “Tell” – the fact that the expression was better in the 5D version. There are a couple of reasons for this. The first is that I spent more time on the 5D image since it was to be the “Keeper” for Melinda. The second reason is that I found it a bit uncomfortable taking a studio portrait with the G11. Lining up the composition on the back of the LCD was a bit disconcerting. Even though the G11 has a viewfinder, the fact that it only has ~75% coverage means it cannot be used to properly line up the composition.
As I said yesterday (and the reader comments back this up), it is extremely difficult (impossible?) to discern the difference at this resolution. If I had shown these images at a size of around 1500+ pixels (long side) the difference in sharpness would become readily apparent.
Lastly, it wasn’t mentioned yesterday, but even though there was a $3,000 difference in camera cost we can’t forget something that was a major factor in the difficulty in telling the images apart – this was a studio shot using a couple thousand dollars worth of lighting equipment. The four light setup I used definitely helped to even the playing field between the cameras.
Thanks everyone for chiming in yesterday. It made for a fun afternoon reading the guesses as they came in through the comments and on Facebook. And thanks Melinda for allowing me to use her headshot session for this experiment.
March 16th, 2010 12:00 am | Comments Off on Canon 5D Mark II vs. Canon G11 – The Answer
March 14, 2010

Canon 5D Mark II, Canon 24-105 f/4L lens – 1/125 second, f/5.6, ISO 100
March 14th, 2010 12:00 am | Comments Off on A Visit to the Doctor
March 11, 2010

Canon 5D Mark II, Canon 70-200 f/4L lens – 1/160 second, f/4, ISO 100
March 11th, 2010 12:00 am | Comments Off on Moving Day
March 10, 2010

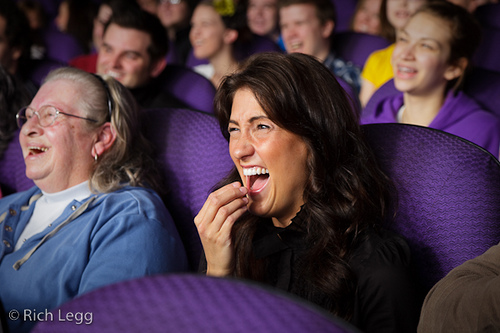
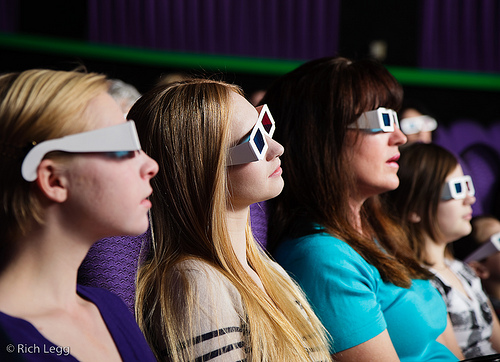
One of the challenges of doing last month’s movie theater audience stock photo shoot was keeping track of what models were in each particular shot. To help me do this I took several “Index Shots” once the models were in place. Each person was assigned a number which corresponded to their model release. They then held these numbers up for the index photo. When it came time to match the model releases to the individual images and put the index shots to work, I noticed that more than a few of the models added their own unique touch that made me smile.
It appears that the mugging mainly falls into three categories:
- The Model Face
- The Sad Clown
- The Grinning/Twisted/Open Mouth
oh, and then there’s Scott’s (#47) always changing take on number placement.
Now that the editing is done and the images are making their way through inspection, I want to say another THANKS to all the great folks that came out early on a Saturday morning to make the shoot happen. We had a great time! To see the images (as they become available), check out my “At the Movies” collection on iStockphoto by clicking here.
March 10th, 2010 12:00 am | Comments Off on Movie Theater Models: Standing Out in the Crowd
March 8, 2010

Here’s a quick panorama I stitched together from 5 G11 images of Friday night’s University of Utah gymnastics meet. Since my seat was nowhere near the caliber of Ann Torrence’s front row throne, this is about the only image I created at the outing (click the image for a larger view).
March 8th, 2010 12:00 am | Comments Off on Canon G11 Panorama: University of Utah Gymnastics
March 7, 2010

How about an “image in use” for this Sunday morning? Long time blog reader (and my good friend) Mark spotted this shot of Andrew and Katie while doing some morning reading. Thanks Mark!
March 7th, 2010 12:00 am | Comments Off on Image in Use: Shine from Yahoo
March 4, 2010

Canon 5D Mark II, Canon 24-105 f/4L lens – 1/125 second, f/4, ISO 100
March 4th, 2010 12:00 am | Comments Off on Showtime
March 3, 2010
This video of Judge Joe Brown has been making the rounds today on more than a few photography related websites. What is apparent to me in watching his honor berate the (so-called) professional wedding photographer for things such as using inexpensive equipment, poor exposure and inferior image quality is that the judge appears to have more than a passing knowledge of photography. I would go as far as guessing that Judge Joe Brown has spent a considerable amount of time behind his camera.
Be sure to watch until the very end to see what Judge Joe rules as the judgement. Wow!
March 3rd, 2010 12:00 am | Comments Off on Judge Joe Brown – My New Photographer Hero!
March 3, 2010
Canon 5D Mark II, Canon 24-105 f/4L lens – 1/160 second, f/7.1, ISO 100
March 3rd, 2010 12:00 am | Comments Off on Family Time
February 26, 2010

A couple of weeks ago I decided that my upcoming forced ‘downtime’ from photography (due to surgery) was a good time to send my main camera/lens combination back to Canon for some needed maintenance. The USB port on the 5D mark II had stopped working and the 24-105 f/4L had been in constant use for 4 years and was feeling its age.
The absence of this gear (while it was at Canon for a few weeks) left me at a loss when it came time to get back to work. This gave me the perfect opportunity to add a 50mm f/1.4 lens to pair with my backup 5D. I picked up the lens from my local Picureline store and spent some time playing around with it in the house. Using the lens I was immediately reminded of how great it felt back in the film days to have a ‘standard’ lens attached to a 35mm SLR. And since my normal day-to-day lens is a bit slow at f/4, it was fun to shoot with glass that was 3 f/stops faster.
Today’s image is one I took of Nicole as she was hanging out watching TV at the house. What is really cool about the shot it that it was taken handheld with the only light in the room coming from the TV. F/1.4 to the rescue!
I will be using this 5D/50mm combination in the studio tomorrow as I (finally) get back to doing to real photography work. I look forward to using the new glass in the future as an alternative to my 24-105.
Canon 5D, Canon 50 f/1.4 lens – 1/6 second, f/1.4, ISO 1600
February 26th, 2010 12:00 am | Comments Off on I added the Canon 50mm f/1.4 to my camera bag
February 25, 2010
Canon 5D Mark II, Canon 24-105 f/4L lens – 1/125 second, f/5.6, ISO 100
LeggNet’s Digital Capture
© Rich Legg, Inc. All rights reserved.
February 25th, 2010 12:00 am | Comments Off on Laughing Julie
February 23, 2010
After taking nearly a week off of work for a needed surgery (Yuk!), I’m back at it. Thankfully I will be able to spend the next few days taking it relatively easy by editing images. I purposely waited to do the processing of the photos from the Movie Theater Audience photo shoot earlier in the month knowing that I would have some “less than 100%” time this week to spend sitting and editing.
This past week has once again emphasized to me how blessed I am to have a job that offers me the freedom to do what I do. I was able to take the time off of work while still receiving income from my photo sales. God truly smiled on me when he led me into this career nearly five years ago.
Now if I can only get the post-surgery pain far enough behind me to get back to being behind the camera creating images.
Canon 5D Mark II, Canon 24-105 f/4L lens – 1/125 second, f/5, ISO 100
LeggNet’s Digital Capture
© Rich Legg, Inc. All rights reserved.
February 23rd, 2010 12:00 am | Comments Off on I’m back in the saddle again…
February 22, 2010
Jeremy Hall has put together a great behind-the-scenes video from last week’s Photowalking Utah Studio Lighting Event. This was the third year that we were able to host this event and I am pleased to say that each year it has gotten bigger & better. Thanks again to everyone who helped make the event a success!
LeggNet’s Digital Capture
© Rich Legg, Inc. All rights reserved.
February 22nd, 2010 12:00 am | Comments Off on 3rd Annual “Studio Lighting Photowalk” Behind-the-Scenes Video
February 19, 2010
Note from Rich: While I’m on the mend from surgery, Nicole Young will be cross posting her blogs from NicolesyBlog.com here. With the meds I’m on, we probably don’t want to see what I would post anyway 🙂

This year at Photocamp Utah we are going to do something new … if you are attending the event not only will you be able to participate in classes to learn about photography – you will also get to share your own photographs with everyone else! There will be a print gallery for all registered attendees to contribute to where we will be displaying your work.
If you are going to be at Photocamp and want to participate then the great news is that it’s free! You will, of course, have to print and matte your image on your own (no framing, btw, so it shouldn’t be too pricey).¬†I’m definitely going to bring something to the event. Since most of my work is created, shared and licensed through a computer and the internet then I rarely print my work and this is a great excuse to finally print something out.
Here are the requirements:
1. Print requirement: You can only bring one print … you are allowed to put more than one image on that one print (like a collage) or just select one print and make it big (up to 11×14). I would recommend picking only one of your very best images that really represents your style of photography to share.
2.
Size Requirement: The largest total size allowed will be 11″ x 14″. It’s highly recommended that you attach it to a piece of matte board no more than 1/16″ thick. No frames are allowed, btw … the display setup can only support a your photo attached to a matte board, so if you bring in a framed print then we won’t be able to display it for you.
3.
Networking is okay! You are also encouraged to put your name and website info somewhere on your work so we can find out more about you. Just try to keep it simple and classy … and try not to turn your image into an advertisement. 😉
4.
What NOT to do: I already mentioned a few of these, but they are worth repeating – no frames, image/matte no bigger than 11×14, and don’t use the image as an opportunity to advertise. We want to keep a “gallery” feel to the setup.
There is more information listed at the Photocamp Utah website, and if you have any questions please join in the discussion in the Flickr group here.
LeggNet’s Digital Capture
© Rich Legg, Inc. All rights reserved.
February 19th, 2010 12:00 am | Comments Off on Print Gallery at Photocamp Utah
February 19, 2010
Note from Rich: While I’m on the mend from surgery, Nicole Young will be cross posting her blogs from NicolesyBlog.com here. With the meds I’m on, we probably don’t want to see what I would post anyway 🙂

Last week I went to a local medical facility with Rich Legg to photograph portraits of health professionals. The setup was fairly simple – we had two lights, each with softboxes, on either side at approximately a 45-degree angle. The images were for their profiles on the medical facility’s website, but instead of shooting traditional head-shots of we went with more of a “stocky, lifestyle” setup and one of the other staff members was kind enough to pose as the patient.
I’m very happy with the final products and look forward to returning in a few weeks with Rich to do some more photography. (BTW … thanks, Rich, for the behind-the-scenes photo!)
LeggNet’s Digital Capture
© Rich Legg, Inc. All rights reserved.
February 19th, 2010 12:00 am | Comments Off on Behind-the-Scenes: Medical Facility Portraits
February 18, 2010
Note from Rich: While I’m on the mend from surgery, Nicole Young will be cross posting her blogs from NicolesyBlog.com here. With the meds I’m on, we probably don’t want to see what I would post anyway 🙂
 Image © Scott Jarvie (used with permission)
A friend of mine (and amazing Utah wedding photographer) Scott Jarvie came up with a really cool idea using a RayFlash and a fisheye lens that he is calling the “Jarvie Window”. He walked around a recent Photowalking Utah event and took a bunch of photos (click here to see several others on his Flickr stream).
Here’s another really cool image, same setup, from another photographer at the event (thanks Jeremy!). I have a feeling that there will be a lot more of these in the future. 😉
LeggNet’s Digital Capture
© Rich Legg, Inc. All rights reserved.
February 18th, 2010 12:00 am | Comments Off on Goofy Nicolesy
February 16, 2010

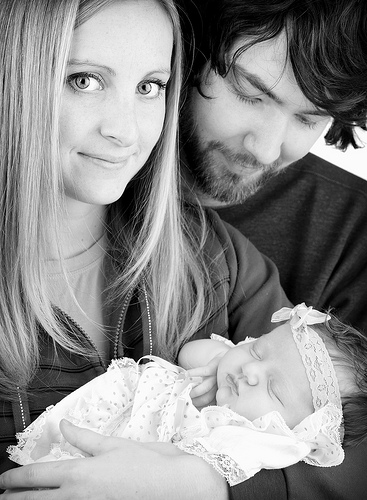
I had a special guest in the studio yesterday morning for her first ever photo session. In spite of the fact that baby Jael slept through the entire event, we were still able to create some very nice images.
On an unrelated note, since I began this blog in 2005 I have taken very few breaks. It is my goal to put up a post at least five days a week, and most weeks I accomplish this. With that being said, tomorrow I am having to take care of a little health issue so I will be taking a few days off from blogging.
See y’all next week 🙂
Canon 5D Mark II, Canon 24-105 f/4L lens – 1/160 second, f/8, ISO 100
February 16th, 2010 12:00 am | Comments Off on
Welcome to the World
February 16, 2010

I had a special guest in the studio yesterday morning for her first ever photo session. In spite of the fact that baby Jael slept through the entire event, we were still able to create some very nice images.
On an unrelated note, since I began this blog in 2005 I have taken very few breaks. It is my goal to put up a post at least five days a week, and most weeks I accomplish this. With that being said, tomorrow I am having to take care of a little health issue so I will be taking a few days off from blogging.
See y’all next week 🙂
Canon 5D Mark II, Canon 24-105 f/4L lens – 1/160 second, f/8, ISO 100
LeggNet’s Digital Capture
© Rich Legg, Inc. All rights reserved.
February 16th, 2010 12:00 am | Comments Off on Welcome to the World
February 15, 2010

Canon 5D Mark II, Canon 24-105 f/4L lens – 1/160 second, f/6.3, ISO 100
February 15th, 2010 12:00 am | Comments Off on
Shooting on the Fly
February 15, 2010
Canon 5D Mark II, Canon 24-105 f/4L lens – 1/160 second, f/6.3, ISO 100
LeggNet’s Digital Capture
© Rich Legg, Inc. All rights reserved.
February 15th, 2010 12:00 am | Comments Off on Shooting on the Fly
February 12, 2010

I just got back from spending some time setting up for tomorrow’s Photowalking Utah event. The event theme is studio lighting and will feature nine different lighting setups for the participants to try. The setup I am doing features a trampoline. Here is one of my test shots from tonight. Pretty cool, eh?
Canon 5D Mark II, Canon 24-105 f/4L lens – 1/160 second, f/6.3, ISO 100
February 12th, 2010 12:00 am | Comments Off on
R-O-C-K in the USA
February 12, 2010

Image courtesy of Jeremy Hall
Last night’s Photowalking Utah mini-clinic at the Salt Lake City Library was a huge success. I am constantly blown away by the popularity of these events and last night set a new high-water mark for attendance. Over 170 photographers attended the evening’s discussion about Studio Lighting.
The mid-winter studio lighting photowalk has constantly been one of the most popular events since the group’s beginning in 2007. I believe that it is the unfamiliarity that many amateur photographers have working with studio lighting that draws them to this event. Beginning in 2009, a mini-clinic with lighting/model instruction was held a few days before the Saturday photowalk to help familiarize the attendees with techniques that can be used when shooting with the lights.
Yesterday’s event featured myself and two other photographers demonstrating techniques of working with a model and lights. Huge thanks go out to Dav.d Daniels and David Terry. These guys shared their knowledge and techniques to the eager audience in ways that were both education and humorous.
Based on last night’s attendance, I believe it will be safe to say that there will be around 200 photographers at tomorrow’s outing photographing the dozen+ models in the nine studio setups. It promises to be an exciting day.
Lastly, more HUGE thanks to our friends at Pictureline (and especially Nick, Jacob & Amy at the Draper location). They were kind enough to loan us the ProFoto lighting kit that was used in last night’s demonstration. This same kit can be rented from the Draper location (801.572.2200) at a very reasonable day rate.
Have a great weekend. I can’t wait to see many of you at tomorrow’s photowalk. I’ll be the guy hanging out by the trampoline studio setup 🙂
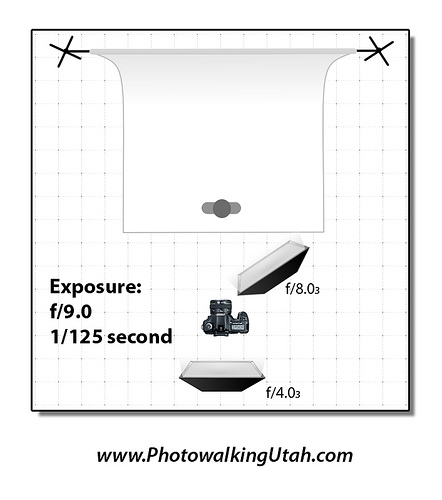
p.s. For those interested, here is the lighting setup that was used as a starting point for last night’s demonstration:

February 12th, 2010 12:00 am | Comments Off on
Last Night’s Studio Lighting Clinic: WOW!
February 12, 2010

I just got back from spending some time setting up for tomorrow’s Photowalking Utah event. The event theme is studio lighting and will feature nine different lighting setups for the participants to try. The setup I am doing features a trampoline. Here is one of my test shots from tonight. Pretty cool, eh?
Canon 5D Mark II, Canon 24-105 f/4L lens – 1/160 second, f/6.3, ISO 100
LeggNet’s Digital Capture
© Rich Legg, Inc. All rights reserved.
February 12th, 2010 12:00 am | Comments Off on R-O-C-K in the USA
February 12, 2010
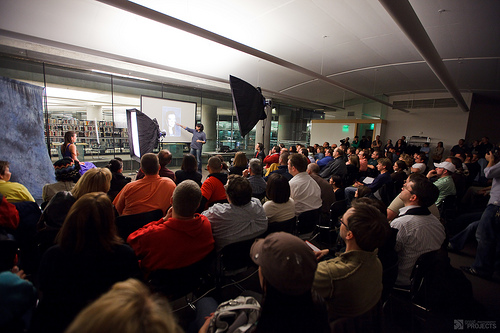
Image courtesy of Jeremy Hall
Last night’s Photowalking Utah mini-clinic at the Salt Lake City Library was a huge success. I am constantly blown away by the popularity of these events and last night set a new high-water mark for attendance. Over 170 photographers attended the evening’s discussion about Studio Lighting.
The mid-winter studio lighting photowalk has constantly been one of the most popular events since the group’s beginning in 2007. I believe that it is the unfamiliarity that many amateur photographers have working with studio lighting that draws them to this event. Beginning in 2009, a mini-clinic with lighting/model instruction was held a few days before the Saturday photowalk to help familiarize the attendees with techniques that can be used when shooting with the lights.
Yesterday’s event featured myself and two other photographers demonstrating techniques of working with a model and lights. Huge thanks go out to Dav.d Daniels and David Terry. These guys shared their knowledge and techniques to the eager audience in ways that were both education and humorous.
Based on last night’s attendance, I believe it will be safe to say that there will be around 200 photographers at tomorrow’s outing photographing the dozen+ models in the nine studio setups. It promises to be an exciting day.
Lastly, more HUGE thanks to our friends at Pictureline (and especially Nick, Jacob & Amy at the Draper location). They were kind enough to loan us the ProFoto lighting kit that was used in last night’s demonstration. This same kit can be rented from the Draper location (801.572.2200) at a very reasonable day rate.
Have a great weekend. I can’t wait to see many of you at tomorrow’s photowalk. I’ll be the guy hanging out by the trampoline studio setup 🙂
p.s. For those interested, here is the lighting setup that was used as a starting point for last night’s demonstration:
LeggNet’s Digital Capture
© Rich Legg, Inc. All rights reserved.
February 12th, 2010 12:00 am | Comments Off on Last Night’s Studio Lighting Clinic: WOW!
February 11, 2010

Julie’s mom spotted her lovely daughter selling chicken in a web ad recently. Nice find!
LeggNet’s Digital Capture
© Rich Legg, Inc. All rights reserved.
February 11th, 2010 12:00 am | Comments Off on Image in Use: Tyson Chicken
February 10, 2010
Canon 5D Mark II, Canon 70-200 f/4L with 1.4x extender – 1/2500 second, f/5.6, ISO 400
LeggNet’s Digital Capture
© Rich Legg, Inc. All rights reserved.
February 10th, 2010 12:00 am | Comments Off on Focus
February 9, 2010

Canon 5D Mark II, Canon 24-105 f/4L lens – 1/125 second, f/8, ISO 100
February 9th, 2010 12:00 am | Comments Off on
It’s a Riddle
February 9, 2010
Canon 5D Mark II, Canon 24-105 f/4L lens – 1/125 second, f/8, ISO 100
LeggNet’s Digital Capture
© Rich Legg, Inc. All rights reserved.
February 9th, 2010 12:00 am | Comments Off on It’s a Riddle
February 8, 2010

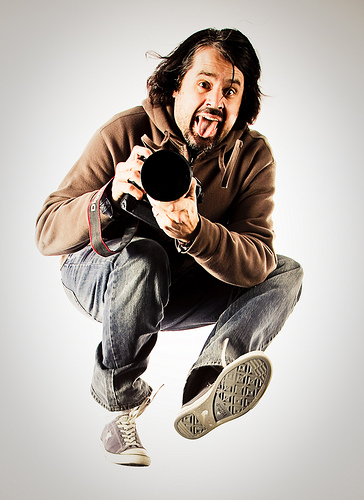
Here’s a behind-the-scenes shot taken by Nicole at Saturday’s movie theater shoot. The Movie Pirate image I was shooting was a great suggestion by Jeremy Hall to include in the set of audience pictures.
February 8th, 2010 12:00 am | Comments Off on
Behind the Scenes – The Movie Pirate
February 8, 2010

Here’s a behind-the-scenes shot taken by Nicole at Saturday’s movie theater shoot. The Movie Pirate image I was shooting was a great suggestion by Jeremy Hall to include in the set of audience pictures.
LeggNet’s Digital Capture
© Rich Legg, Inc. All rights reserved.
February 8th, 2010 12:00 am | Comments Off on Behind the Scenes – The Movie Pirate
February 6, 2010

I’m back in the office after a busy morning with the movie theater photo shoot in Salt Lake City. We had over 90 people participate in it and after a quick look at the images I can say I am extremely pleased with what we created.
I will write a more detailed blog post about the outing in the coming days but I wanted to make a quick one today to say a huge THANK YOU to everyone who participated. From the check-in team to the lighting guys to the prop team to the audience members and everyone else, you all went above and beyond in making today a success.
Please accept a sincere thank you. I absolutely could not do what I do without help from great people like you!
Now go and have a great weekend 🙂
LeggNet’s Digital Capture
© Rich Legg, Inc. All rights reserved.
February 6th, 2010 12:00 am | Comments Off on Theater Audience Photo Shoot: Thank You Everyone!


