August 1st, 2008
Creating a photo with a pure white background
Love it or hate it, a popular style of shooting in stock photography is the photographing of models or objects against a pure white background. By pure white I mean a background with absolutely NO detail, RBG values of 255,255,255 – Nothing!
There are an abundance of ways to create this look from simply cutting out the subject in Photoshop to doing it entirely ‘in camera’. I prefer to go for the latter method.
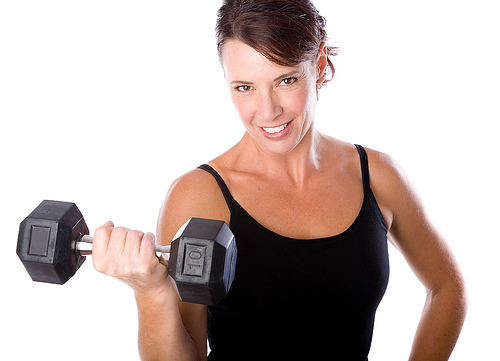
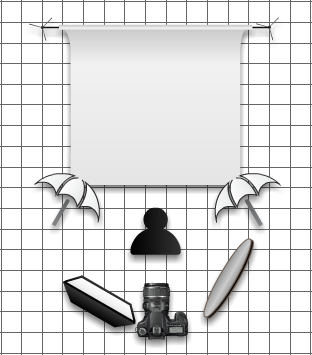
For today’s featured image of Michelle holding a weight, I relied on a studio setup to create the majority of the ‘pure white background’ in camera and then finished off the look in post-processing. To setup the shot, I placed two monolights shooting through white umbrellas onto the background of white seamless paper.
I set the monolights so that the exposure on the background was in the range between f/11 and f/16. For me, using lights of different power it took a small bit of adjustment to get it right.
The next step was to place Michelle in front of the white background at a distance that would give a nice rimlight from the background reflection but not overpower her. Since this photo was for a stock purpose I allowed the light to reflect a bit aggressively onto the left side of her face. Had this been for a portrait, I would have adjusted differently to eliminate this.
I lit Michelle with a combination of a large softbox and a reflector. The exposure metering for her was f/8. This is what I set my camera on. By doing so, I had a background that was sufficiently over-exposed but not so much that it caused excessive blow-back which can lead to problems like lens flare, blown edges and such.
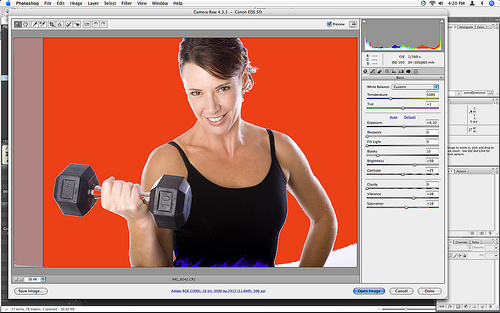
In post-processing, I shoot RAW so the first step is to convert the RAW file in AdobeCameraRaw (ACR). My default setting in ACR is to show pure white highlights as red and pure black lowlights as blue. As can be seen in the screenshot, my shot came close to having a pure white background with very little adjustment.
Now, with the majority of the work done, I open the image to complete editing in Photoshop. I know from what I saw in ACR that I will have a few areas to clean up to guarantee a pure white background.
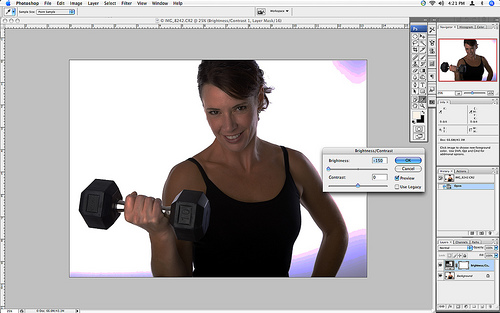
After opening the image in Photoshop, the first thing I do is create a temporary Brightness/Contrast adjustment layer and pull the brightness slider all the way to the left. What this does is show me the areas that I have to finish cleaning up to get the desired white background. Any area that is not absolute white (255,255,255) will be immediately apparent.
To clean up these areas, I will use one of a couple methods. If it is an easy spot in a corner or two, I will simply create a new layer and paint the area(s) white. If it requires a bit more finesse because it’s around the model (like this image), I will use a levels adjustment layer along with some vector masking. Once I get the background how I want it, I then delete the temporary Brightness/Contrast adjustment layer that I created.
After creating my white background, I then go on to complete my processing including other steps like facial retouching, whitening eyes and teeth, sharpening, etc.
As you can see by this example, the easiest way to create the background and my preferred method is to do as much as possible in camera. In doing so, the Photoshop work required for a series of images is minimized and this dramatically drops the time needed sitting in front of the Mac.
Canon 5D, Canon 24-105 f/4L lens – 1/160 second, f/8, ISO 100


