May 10th, 2007
Want Greater Photographic Flexibility? – Shoot RAW
One of the choices that face digital photographers is the format in which to save their images. Most advanced digital cameras offer several choices of format to choose from. A typical selection would be something like this:
– Small .JPG
– Medium .JPG
– Large .JPG
– RAW
Today I am going to talk a bit about the last selection on the list – RAW. A RAW image is essentially the unprocessed capture taken directly from the camera’s sensor. When the camera captures an image in the JPG format, the on-camera software processes the file before saving it. This processing includes such things as contrast, color saturation, sharpening, etc. The RAW image has had very little, if any, processing applied. Hence, the name RAW. It is essentially a digital negative, ready to be developed.
“Why would you not want the camera to improve the pictures you’ve taken?” I’ve been asked. The simple answer is that many photographers (myself included) prefer not to have the camera make the image enhancements. Instead, they opt to do it themselves on the computer. Also, the RAW format allows for much greater latitude in adjustment that can be applied.
For an example of this adjustment latitude, I walked into the field behind my home and purposely made a capture that was +2 f/stops overexposed. I set my camera to record both a JPG and a RAW image simultaneously. This would allow me the opportunity to edit two identical exposures, one RAW and one JPG, and compare the results.
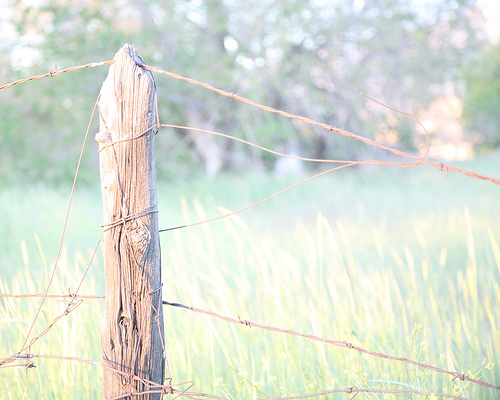
Here is the unedited (other than a small crop) JPG, straight from the camera:
As you can see, the image is pretty much blown out with a very bland look to it. The highlights are completely washed out. If you were to look at the histogram (more on this in another post) of the photo, it would look like a ski ramp.
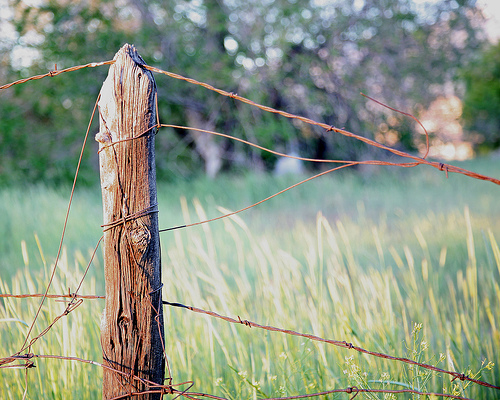
For my first go at salvaging this overexposed image, I used the JPG version. I used Photoshop’s BRIGHTNESS/CONTRAST tool along with the magical SHADOW/HIGHLIGHT tool to attempt to bring the levels into shape. I also worked on the color with a SATURATION layer and did a bit of sharpening. Here is the result I achieved with the JPG:
The result is not too bad. It could be used in a pinch, though it is not an image I would be pleased with.
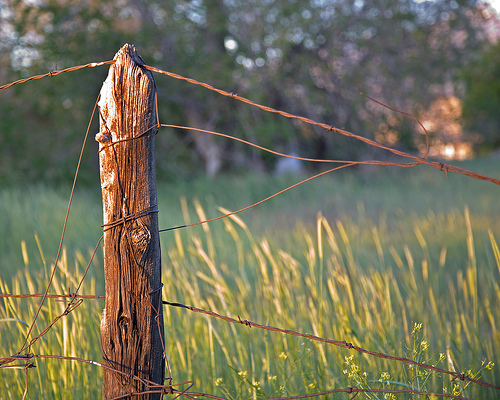
I then took the RAW version of the capture and began editing it. The first thing I did was to open it with Photoshop’s Adobe Camera RAW tool. This nifty interface allowed me to fine-tune the image’s color and exposure before opening it in Photoshop proper. Once in Photoshop, I adjusted the Curves, Saturation & Levels using adjustment layers. After a brief period of editing this is the result I achieved:
I feel that this image looks much better than the edited JPG version. Other than the section on the top/left of the wooden post, there is very little “blown out” area within the shot. This edited photo is much more pleasing. Also, it took much less effort in editing to achieve this.
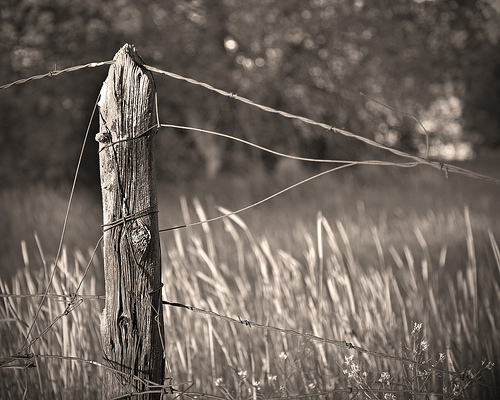
Finally, still not being satisfied with the capture, I went a bit further. To complete the editing, I converted the image to black & white and added a sepia tint to it along with a bit of vignetting. The final result is the capture at the top of the page.
For me, making the switch to RAW was a no-brainer. Once I got over the initial learning curve of the extra steps required in editing, I fell in love with the greater control I received in editing. Today, if I shoot in JPG I simply don’t feel comfortable. I would much rather have the control and latitude offered by Shooting RAW.
Looking for more information on the RAW file format? Here is a link to the entry on Wikipedia: RAW image format – Wikipedia
Canon 5D, Canon 24-105 f/4L IS lens – 1/25 second, f/4, ISO 320
LeggNet’s Digital Capture
© Rich Legg, Inc. All rights reserved.


