
November 25th, 2008
Photoshop Tip: Blend a B&W Layer to add Edginess
]]> 
Since the majority of my photo editing is for my stock portfolio, I tend to be rather vanilla with my editing. By that I mean that I keep my images pretty true to how they were shot. For uses outside of stock however, a friend of mine recently showed me a quick way to add edginess to an image by blending layers.
I will be the first person to tell you that I am no master of layer blending in Photoshop (I will defer that title to Ann Torrence, her knowledge on the subject is amazing!), but I really like the look that this effect creates.
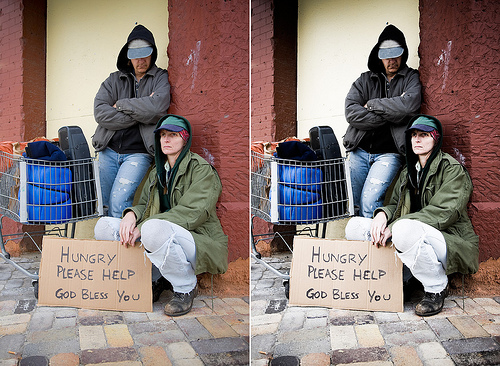
In today’s before/after image, I opened one of my shots from last weekend in Photoshop. The sample on the left is unedited other than the RAW conversion. On the other image (right side), I only added this simple process in Photoshop:
1. Create a copy of the original layer above itself
2. Desaturate the new layer (apple-shift-U on a Mac)
3. Set the blending of the new layer to ‘Overlay’
If you want to further tweak the settings, try different blending modes (soft light, hard light, etc.) and play around with opacity.
And that’s it. A quick and fairly easy way to add a more dramatic look to an image.
Canon 5D, Canon 24-105 f/4L lens – 1/50 second, f/4, ISO 100


