Outta My Kitchen!

]]>

Here’s an outtake image from the Woman Chef shoot Michelle and I did earlier this week. The actual purpose of the session was a series of images along a theme similar to this example:

Bounty

Not quite as exciting as the outtake, eh?

For those in the U.S., have a great Labor Day Weekend!

Canon 5D, Canon 24-105 f/4L lens – 1/100 second, f/7.1, ISO 100

Labels:

Outta My Kitchen!

]]>

Here’s an outtake image from the Woman Chef shoot Michelle and I did earlier this week. The actual purpose of the session was a series of images along a theme similar to this example:

Bounty

Not quite as exciting as the outtake, eh?

For those in the U.S., have a great Labor Day Weekend!

Canon 5D, Canon 24-105 f/4L lens – 1/100 second, f/7.1, ISO 100


LeggNet’s Digital Capture
© Rich Legg, Inc. All rights reserved.


Tips for the iStockphoto.com Buyer

]]>

A friend of mine (and not to mention the BIGGEST selling iStock contributor in the United States!), Sean Locke, has put together an extremely comprehensive buyer’s guide for iStockphoto.com. In blog form, Sean has covered everything from lightboxes to copyspace and he doesn’t show any signs of slowing down. His posts are extremely well written and very thorough.

For anyone who has ever wondered or had questions about purchasing quality stock imagery at iStockphoto, this new site is a great resource. In fact, iStock proper could learn a lot from what Sean has created and implement something similar (or just license Sean’s content) into the buyers portion of the site.

Check it out at seanlockedigitalimagery.wordpress.com”. Oh, and be sure to check out Sean’s impressive stock portfolio at istockphoto.com/sjlocke.

Labels:

My Father’s Cessna, circa 1982

]]>

I’ve been working with a private pilot friend recently setting up a stock photo shoot. In the process we’ve naturally talked quite a bit about airplanes. This has brought back memories of the plane our family had when I was a kid, so I thought I’d share it here.

In today’s capture you can see my dad taxiing the plane, a Cessna 172, before takeoff. To the best of my knowledge this was taken around 1982 from our boat in Big Lake Alaska. I will say that growing up in Alaska and having a floatplane in the family made for some great times.

Nikon FM2, Vivitar Series I 70-210 f/2.8 (if I recall correctly)


LeggNet’s Digital Capture
© Rich Legg, Inc. All rights reserved.


The 21st Century Office

]]>

Canon 5D, Canon 24-105 f/4L lens – 1/320 second, f/4, ISO 100

My Interview on the LightSource Podcast

]]>

I’ve been a semi-active listener of the LightSource photography podcast at StudioLighting.net for nearly two years, so imagine my shock earlier this month when I was contacted by one of the hosts, Bill Crawford, to be a guest on an upcoming episode. My initial thought was something along the lines of “These guys have interviewed the likes of Paul C. Buff, David Hobby and Chase Jarvis – and now they want to talk to me?!?”. Well I quickly got over the shock and we scheduled the chat.

We did the interview one evening over the telephone and I’ve got to say that it was really cool. Bill and Ed, the hosts, make their guests feel comfortable and they are genuinely excited to talk about photography. They wanted to learn about my stock photography business and how I have been able to create a full-time income from it in a relatively short period of time. We also chatted a bit about this blog and my involvement with Photowalking Utah.

The episode is now live on their site, so if you feel like listening to me ramble on for nearly an hour jump on over and give it a listen. More importantly though, I recommend that you check out their back episodes and subscribe to the podcast so you don’t miss the future ones.

Links

The LightSource Episode with Me
Back LightSource Episodes
Subscribe to LightSource in iTunes
www.StudioLighting.net

Labels:

Corner Canyon Fire, Draper Utah

]]>

I took a break from photographing Mabey Farm Fresh Corn in the studio this afternoon to head to a favorite overlook of Draper to capture some images of a nearby brush fire. Thankfully, as of this writing, the fire was able to be contained away from the nearby homes.

Canon 5D, Canon 24-105 f/4L lens – 1/125 second, f/8, ISO 100


LeggNet’s Digital Capture
© Rich Legg, Inc. All rights reserved.


A Drop of Golden Sun

]]>

Canon 5D, Canon 24-105 f/4L lens – 1/50 second, f/4, ISO 160

A Drop of Golden Sun

]]>

Canon 5D, Canon 24-105 f/4L lens – 1/50 second, f/4, ISO 160


LeggNet’s Digital Capture
© Rich Legg, Inc. All rights reserved.


Speed Week 2008

]]>

“What? You went to Speed Week at the Bonneville Salt Flats and the only picture you show doesn’t have any cars in it?!? Yeesh!”

Canon 5D, Canon 24-105 f/4L lens – 1/3200 second, f/4, ISO 100


LeggNet’s Digital Capture
© Rich Legg, Inc. All rights reserved.


Alyssa Returns!

]]>

Canon 5D, Canon 24-105 f/4L lens – 1/80 second, f/4, ISO 100


LeggNet’s Digital Capture
© Rich Legg, Inc. All rights reserved.


Photowalking: The People You Meet

]]>

One of the cool things about being involved in a Photowalking Utah event is the people you meet. When folks see a large group of photographers walking down the street they often ask us what we’re doing. I love to use this opportunity to get to chat with the people for a minute and then take their photo. Last Saturday’s event in Ogden was no exception.

During our walk through the historic downtown area we ran into Tony and his gang. Tony owns one of the soon-to-be-gone bars on 25th street and was more than willing to share his story. He was one of the friendliest people I’ve met while photographing and was a pleasure to shoot.

Tony

After the walk around the downtown area, a few of us stuck around at the Union Pacific depot for an impromptu strobist session. One of the photographers struck up some conversation with a pair of interesting young men and before we knew it they were modeling for us. They were waiting to hop a train (literally) to Idaho and thought it’d be cool to get their picture taken.

On the top image of Joseph, I purposely created a hard look with both the lighting and processing. I wanted to show the roughness of Joe’s character while still highlighting his striking blue eyes.

I used a similar though less edgy look for Joseph’s traveling companion Jake. As I photographed him he was holding onto his cigarette to get every last bit of goodness(?) out of it and I wanted to capture that in the image.

Jake

Both Joseph and Jake made great models. I would love to meet up with them again and pay them to do some stock modeling for me. I think that together we could create some dramatic images.

Joseph and Jake


LeggNet’s Digital Capture
© Rich Legg, Inc. All rights reserved.


Vision

]]>

Canon 5D, Canon 24-105 f/4L lens – 1/2000 second, f/5, ISO 100

Speed

]]>

Canon 5D, Canon 24-105 f/4L lens – 1/8 second, f/7.1, ISO 100

Photowalking Utah: Ogden – Tonight!

]]>

(this is a re-post of an earlier post as a reminder for tonight’s event)

The next Photowalking Utah event has been set. It will be an evening ‘walk around the downtown area of Ogden. Here are the details:

Date: Saturday, August 16, 2008
Time: 5:30 pm – ?
Where: Downtown Ogden

The group will be rendezvousing in the lobby of the Union Station located at 2501 Wall Avenue (map). For the photographers coming from the Salt Lake area, riding the UTA Frontrunner train is a great alternative to driving.

These events are open to photographers of ALL skill levels, from first time shooters to seasoned pros. This is a great way to meet other people that share your love of photography.

For more details (and to announce your participation), drop by the event discussion by clicking HERE.

Canon 5D, Canon 70-200 f/4L lens – 1/160 second, f/8, ISO 100

Labels:

Create Friendly Backgrounds with a Wide Aperture

]]>

One of the easiest tips I give beginning photographers that are looking to improve the look of their portrait shots is to shoot at the widest possible aperture. This means the lowest f/ number on the lens. In doing so, what could be a boring or distracting background translates into a nice smooth surface helping to accentuate the subject.

For today’s example image, I photographed Brenda on the streets of Seattle during last weekend’s shoot. I spotted a surface with a great blue reflection that would help enhance Brenda’s eyes. By shooting wide open (f/4 in this case), I was able to smooth the harsh circles in the background into an interesting design. Using a long focal length lens helped to further add to the effect.

When shooting outdoors using reflector lighting (like in today’s image), I set my camera on AV (Aperture Value) Auto mode and leave the lens aperture wide open. Doing this lets the camera determine the appropriate shutter speed and frees me up to concentrate on composition.

Canon 5D, Canon 70-200 f/4L lens – 1/100 second, f/4, ISO 200


LeggNet’s Digital Capture
© Rich Legg, Inc. All rights reserved.


UV Filter to the Rescue

]]>

There are a couple opinions on using UV or Skylight filters. Many photographers use them to protect their lenses, while an equal amount of shooters feel that it’s counterproductive to put a “cheap piece of glass” in front of their expensive optics. I fall into the “protect my lens” camp.

My decision to use UV filters on my lenses paid off big time while I was on the shoot in Seattle. I had just made a lens change when my 24-105 rolled off my camera bag onto the slate floor. The lens hit the hard surface on its front edge. I expected the worse when I picked it up, but the lens cap and UV filter took the fall for the lens. I did a quick check to verify that focus was still intact and moved on with the shoot.

In retrospect, the $35 I spent on the filter paid for itself many times over with this single event. If I hadn’t had the filter attached, the lens barrel would have taken the hit. At the very minimum I’d now be unable to attach filters, or worse the front element would’ve been damaged.

Now, off to pick up a replacement filter.

Canon 30D, Canon 50 f/1.8 lens – 1/60 second, f/1.8, ISO 400


LeggNet’s Digital Capture
© Rich Legg, Inc. All rights reserved.


Taking Care of Business

]]>

Canon 5D, Canon 24-105 f/4L lens – 1/40 second, f/4, ISO 200


LeggNet’s Digital Capture
© Rich Legg, Inc. All rights reserved.


Seattle Diamond’lypse Over – I’m Headed Home

]]>

I’m sitting in the Seattle airport waiting for my flight home. It’s been a fun but hectic weekend. Following on the heels of Friday’s City Lifestyle shoot, Saturday and Sunday’s plans were Creative Concept images at a local nightclub and Business Professional shots at Seattle’s city hall.

Today’s image is a quick edit of one of my captures from Saturday. We had a dozen plus models in very creative costumes to choose from. The setting was an old building that has been converted to a dance club. The predominantly retro clothing worked extremely well in the uniquely decorated club.

One of my sets featured the model Mr. Peter Big (yes, his legal name) so I created a series loosely borrowing from the movie The Wizard of Oz. Peter was a great sport with the concept and really got into his part. I don’t expect the series to be big sellers, but it was sure fun to shoot.

It was a great event and I’m flattered to have been able to attend. I’ve got a few days of sorting and editing ahead of me to prepare the selected images for sale. You can count on seeing many more samples from the weekend over the next few days here on the blog.

Canon 5D, Canon 24-105 f/4L lens – 1/100 second, f/6.3, ISO 100

Seattle Shoot – Day 1 Recap

]]>

Yesterday was a great, albeit very busy day. iStock provided us with several models as we broke into groups of 5-6 photographers (and a creative director) and headed out to separate shooting locations.

My group spent the first part of the day doing urban lifestyle shots on the streets of Seattle. This type of shooting came very natural to me since I do this style of work quite often. Our models Brenda, Mindy and Kaleb did a stellar job and kept their energy high in what had to be an exhausting day for them. Today’s image is a sample from this shoot. While the rest of the group was finishing their lunch, Brenda and I walked down an alleyway to create some shots. The lighting in the alley was perfect for the look I wanted. What you don’t see in this shot is yours truly shooting with his right hand while wedging a reflector between myself and the wall with my left.

After the city lifestyle shoot, we headed to a rooftop shoot for more lifestyle images including a final BBQ party scene with all 15 models.

It was a fulfilling yet tiring day. Shooting around 600 images can have that affect on me. And guess what, I get to do it all again beginning in a couple of hours.

p.s. Rasmus, where are you?!?

Canon 5D, Canon 24-105 f/4L lens – 1/250 second, f/4, ISO 160

Labels:

Checking In From Seattle

]]>

I arrived in Seattle yesterday afternoon and spent the evening hanging out with a couple dozen iStock Diamonds (contributors with 25,000+ sales). This image is a quick shot taken from my hotel window before calling it a night.

The agenda for today begins with a breakfast meeting at the Space Needle before heading out for 8+ hours of shooting over several locations. As always, it should be fun.

Canon 5D, Canon 70-200 f/4L with 1.4x extender – 8 seconds, f/7.1, ISO 100

Off to Seattle – iStockalypse

]]>

I’m off to Seattle for iStockphoto’s Diamond Exclusive iStockalypse. This is my first time attending an official iStock event and with this one being open only to Diamond/Exclusive photographers it promises to be extra special. The schedule is jammed with three days of shooting at some great locations with professional models. It should be a lot of fun.

Canon 5D, Canon 24-105 f/4L lens – 1/20 second, f/4, ISO 400

Labels:

My Photography Has Gone to the Dogs

]]>

I had nice surprise this week when a dog food bag featuring one of my images arrived in the mail. The designer went out of her way to supply me with a copy of the package she designed. Very cool!

Canon 5D, Canon 24-105 f/4L lens – 1/125 second, f/4, ISO 100

Two G’s

]]>

Canon 5D, Canon 24-105 f/4L lens – 1/125 second, f/6.3, ISO 100

Stocking the Flames

]]>

As the total amount of images I’ve sold through my stock portfolio channels increase, it becomes increasingly difficult to keep track of how individual shots perform. One thing iStock does is to place little Flame icons above an image’s thumbnail as they reach certain milestones (100 sales, 500 sales, etc.). To help me keep track of my All-Star Images that have reached this milestone, I have created a lightbox containing each shot that has sold a minimum of 100 times.

I like what another iStock photographer who I met through the ‘net, Rasmus Rasmussen, had to say about the iStock flames:

“…It’s like a videogame, where you can earn points (money from sales) and bonuses along the way, in the form of nifty little icons on your profile page. 100 sales gives my photo a little flame-icon for instance.” (read Rasmus’ full post here)

So far I have had 66 images (as of this writing) reach the 100 sales mark with another half dozen or so expected to hit it in the next week. There are numerous images in the set that I expected to do well, but there are definitely some sleepers that I never expected to make he set.

While having an image hit a milestone of 10, 100, 500 etc. sales is rewarding, I still like the very first sale of an image the most.

Labels:

Rock Climbing TV Shoot

]]>

My wife and daughter (not pictured) were invited to participate in a shoot for a local television news feature about women rock climbers. You could count on your fingers the number of hours of video I have shot in my lifetime, so it was interesting for me to watch the videographer at work. She told me that the Sony HD cam she was using is capable of recording about 30 minutes of video on an 8 gb CF card (the video geeks reading this can probably chime in and tell us exactly what camera she’s using). These cameras are fairly new to the station.

I spent most of my time belaying the climbers, but I was able to catch a few behind-the-scenes images with my G7 that I had in my pocket. In this image the videographer is perched on the same rock I used when I did a stock photo shoot at the same location.

Canon G7 – 1/100 second, f/3.2, ISO 100

Creating a photo with a pure white background

]]>

Love it or hate it, a popular style of shooting in stock photography is the photographing of models or objects against a pure white background. By pure white I mean a background with absolutely NO detail, RBG values of 255,255,255 – Nothing!

There are an abundance of ways to create this look from simply cutting out the subject in Photoshop to doing it entirely ‘in camera’. I prefer to go for the latter method.

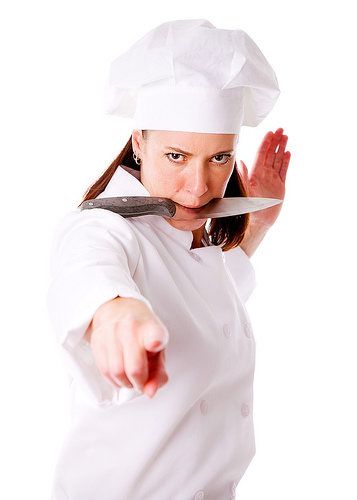
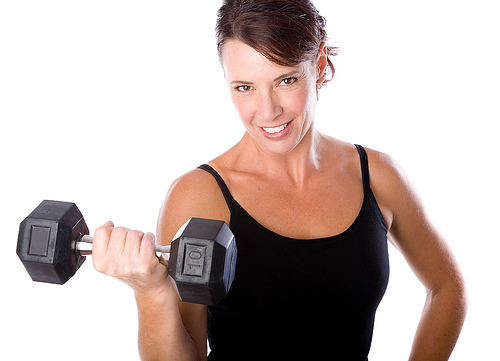
For today’s featured image of Michelle holding a weight, I relied on a studio setup to create the majority of the ‘pure white background’ in camera and then finished off the look in post-processing. To setup the shot, I placed two monolights shooting through white umbrellas onto the background of white seamless paper.

Picture 8

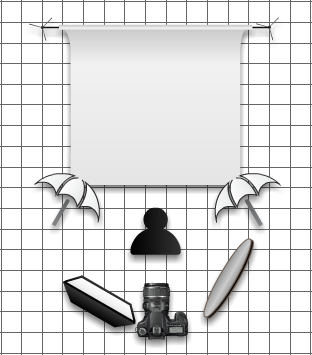
I set the monolights so that the exposure on the background was in the range between f/11 and f/16. For me, using lights of different power it took a small bit of adjustment to get it right.

The next step was to place Michelle in front of the white background at a distance that would give a nice rimlight from the background reflection but not overpower her. Since this photo was for a stock purpose I allowed the light to reflect a bit aggressively onto the left side of her face. Had this been for a portrait, I would have adjusted differently to eliminate this.

I lit Michelle with a combination of a large softbox and a reflector. The exposure metering for her was f/8. This is what I set my camera on. By doing so, I had a background that was sufficiently over-exposed but not so much that it caused excessive blow-back which can lead to problems like lens flare, blown edges and such.

In post-processing, I shoot RAW so the first step is to convert the RAW file in AdobeCameraRaw (ACR). My default setting in ACR is to show pure white highlights as red and pure black lowlights as blue. As can be seen in the screenshot, my shot came close to having a pure white background with very little adjustment.

Picture 4

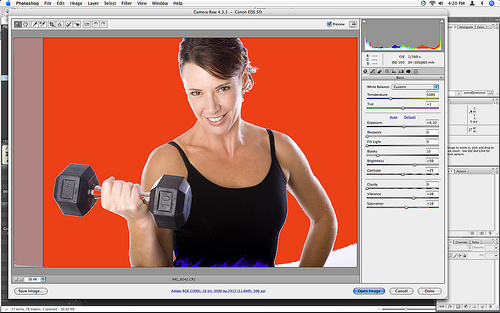
Now, with the majority of the work done, I open the image to complete editing in Photoshop. I know from what I saw in ACR that I will have a few areas to clean up to guarantee a pure white background.

After opening the image in Photoshop, the first thing I do is create a temporary Brightness/Contrast adjustment layer and pull the brightness slider all the way to the left. What this does is show me the areas that I have to finish cleaning up to get the desired white background. Any area that is not absolute white (255,255,255) will be immediately apparent.

Picture 6

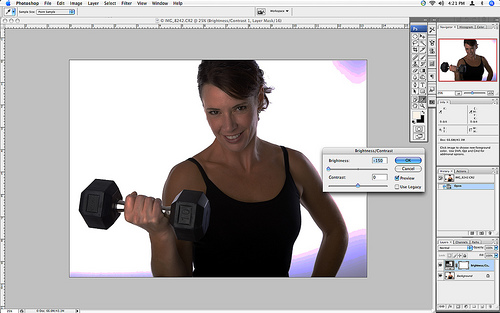
To clean up these areas, I will use one of a couple methods. If it is an easy spot in a corner or two, I will simply create a new layer and paint the area(s) white. If it requires a bit more finesse because it’s around the model (like this image), I will use a levels adjustment layer along with some vector masking. Once I get the background how I want it, I then delete the temporary Brightness/Contrast adjustment layer that I created.

After creating my white background, I then go on to complete my processing including other steps like facial retouching, whitening eyes and teeth, sharpening, etc.

As you can see by this example, the easiest way to create the background and my preferred method is to do as much as possible in camera. In doing so, the Photoshop work required for a series of images is minimized and this dramatically drops the time needed sitting in front of the Mac.

Canon 5D, Canon 24-105 f/4L lens – 1/160 second, f/8, ISO 100

Labels: ,