Remember When?

]]>

Can you remember gas for under a buck a gallon?

I was digging through a shoebox of old photos looking for one of me with a mullet to show my daughter (that’s another story), and I came across this one. Think about it – I could fill up my Saab for around $15.

Nikon FM2, Vivitar Series I 70-210 f/2.8 lens – Exposure unrecorded


LeggNet’s Digital Capture
© Rich Legg, Inc. All rights reserved.


I Hear the Ocean

]]>

Canon 5D, Canon 24-105 f/4L lens – 1/125 second, f/5.6, ISO 100

Calling Photoshoppers II – The Results

]]>

Last week I put out a second call for readers who would like to put their photo editing skills to work on one of my images (original post). Within an hour I received email from four volunteers wanting to take on the task.

I have since received the four edited images. In addition to doing a great job applying their editing chops to the image, they each wrote a narrative on what they did and why they did it. While the results are similar in many ways (no one cropped the shot?), they each added a little variation.

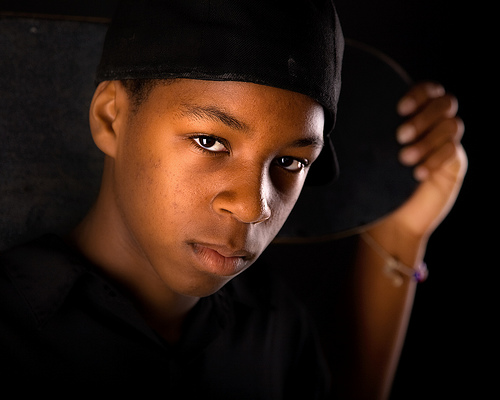
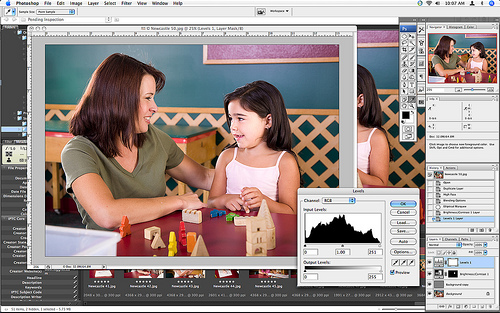
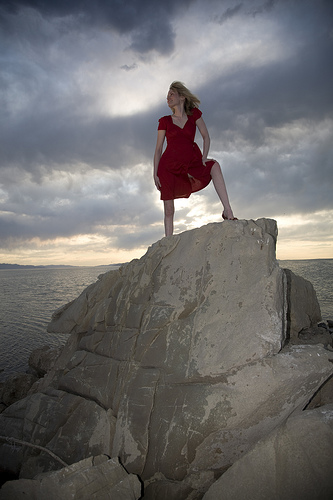
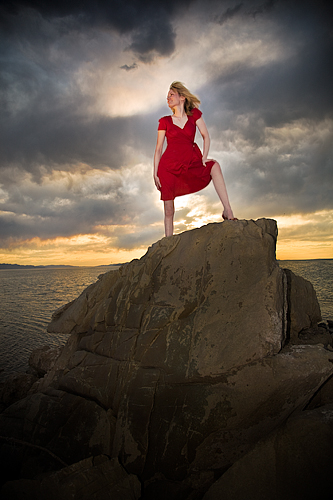
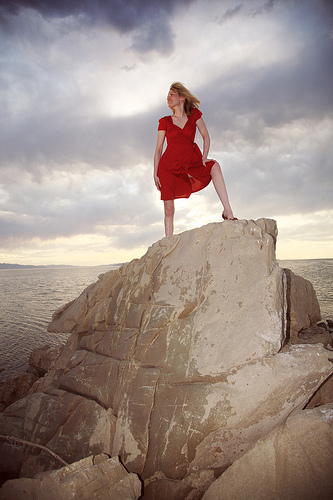
Each person was provided with an unedited JPG and RAW image (shown above) of the model standing on the rock at the Great Salt Lake. The only guideline given was that they could do whatever they wanted. Here are their results in no particular order.
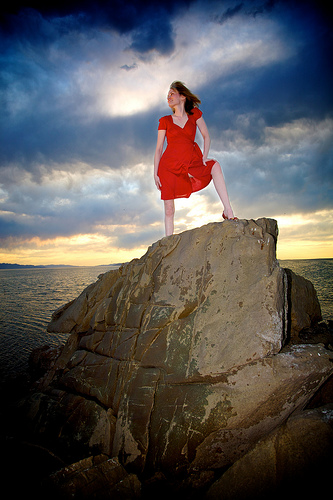
Jake Spurlock

Calling Photoshoppers 1

I was really excited when I saw that this was going to be the photo to work from, especially after I was unable attend the Photowalk at the Great Salt Lake a few weeks ago, and was further depressed when I saw the breathtaking images that came back to Flickr as a result. So, how cool is it then to get the chance to edit this image, and get to put a little bit of Jake Spurlock into it.

To Start:
I do all of my processing by starting with Apple Aperture. Beginning with the RAW 2.0 processing, I delved into the levels adjustments. I pulled black to black, crushing the blacks a little, created some highlights in white, and the made a nice midpoint. I did this on all three of the color channels respectively.

After levels, I moved into contrast, definitions, saturation, and vibrancy. When I take pictures, and then edit, reality isn’t at the top of my list of rules to follow. If I was going to make movies, 300, Batman Begins, and Speed Racer would be the inspiration. That being said, this photo evokes the idea of a warrior princess, standing guard over a kingdom. So, contrast is pushed, super saturation, and the image gains a lot of character.

One cool Aperture feature is the shadow recovery tool. Basically, it selectively adds some gain to the black areas of the photo. For video people, similar to setting the knee level for broadcasting equipment. Boosting this brought a lot of detail in from the rocks, and really shows off their awesome texture.

With these adjustments, I was really satisfied with the clouds, rocks and water. Yet, the warrior princess was a little dim, and lacking the glow that she deserved. So, I created a new version from the master, and went to work again creating the same look for her. When I was content with how she looked, I exported versions of both images, and brought them into photoshop for some blending.

This was a pretty simple, yet laborious process. I am sure that everyone reading this has had to do this before, so I won’t go into to much detail. I had my darker layer as the background, and then pasted the other on top. I went to work with the eraser/lasso/marquee tool getting rid of the excess. If you look at my image and contrast to the original, she is clearly a blond in the original, but I really like the look of her with dark hair and used the darker background source for that.

When all of the erasing was done, I used the dodge tool around her outline on the background layer to give her a little bit of an angelic glow. Followed up with spot healing brush for some legs, arm and face. I don’t bother too much, after all this is a warrior, not a cover model. 😉 After that, save as a .PSD, and reimport back into Aperture.

Once back in Aperture, I added another round of vignette. It created those dark and foreboding clouds, and added to the rock detail at the bottom. Part of the post process is to send revisions back and forth to my wife who has a great eye for detail. Wrote up a summary, and off to Rich for posting!

Thanks, what a fun process!

Visit Jake’s Flickr stream at flickr.com/photos/whyisjake/.

Jeremy Hall

Calling Photoshoppers 2

How I Did It:

1. Adjust the RAW image using Adobe RAW for white balance and contrast. Most of this was done in the basic panel of sliders. Some additional HSL panel adjustments for color, especially the skies. Opened in Adobe Photoshop CS3.

2. Placed a second copy of the same image as a layer with RAW exposure adjustments for the model (ignoring the background). Masked this layer to block everything but the model. Rasterized this layer.

3. Made a copy of the second layer and changed to “Screen” mode for even more lightening of the model. Adjusted opacity of this layer to 27%.

4. Added a layer for cloning and healing tools. Used the “sample all layers” option to adjust the models dress to hide the seam in the middle. Felt like the leg showing and uneven shadows of the dress were distracting. I also removed some of the brighter splotches of white on the rock for the same reason.

5. Added a “Dodge & Burn” layer, which is a new layer filled with 50% gray. Using a larger brush set at 8% brushed in white and black alternately in varying places for contrast and emphasis. This was mainly used to darken the rock base and even out the exposure on the rest of it. I also increased the cloud dramatic contrast.

6. Added another masked dodge & burn to give a glow around the model for a kind of other-worldly glow, like the heavenly lights are pouring down on her. Cheesy I know, but it seemed to fit.

7. Added a photo filer layer to warm up the image a bit overall. Default warm (85%) color with a little added density.

8. For the web resized image, I downsized, added some Smart Sharpen filter on a copied layer (72%, 0.3 radius). Masked the layer and brushed on where I wanted the selective sharpening applied.

Visit Jeremy’s blog at www.whatsgottastay.com.

Patrick Fata

Calling Photoshoppers 3

Thank you for the chance to work on this challenge. As a beginner, I appreciate the opportunity to concentrate on the post-processing only, while knowing that the result will be critiqued by a gifted and experienced photographer.

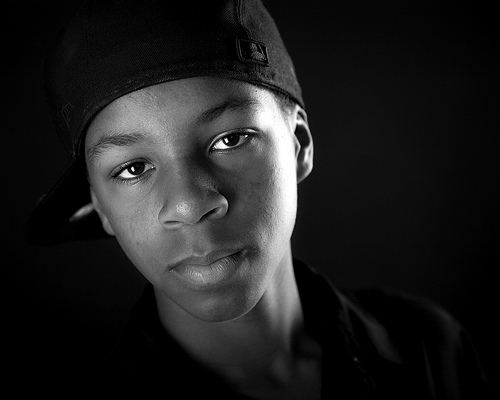
The picture has a very interesting composition and a lot of detail. This abundance of detail, especially in the rock, made me decide to go B&W. I also liked how the model’s dress stands out in the original, so I ended up going with selective desaturation.

To obtain the B&W, I output the red channel to gray using a channel mixer layer. I also added a Curves layer to darken the shadows a bit. Still wanting more contrast in the rock, I isolated it, copied it onto a new layer, and applied an overlay blend mode.

The red dress was isolated using a color range select, and then tweaking that selection with mostly the eraser. I then brightened the red a little by turning the cyan down in the red channel of a selective color adjustment layer.

I hope to have done justice to your great photo.

Visit Patrick’s blog at www.lestrodesigns.com/blog.

Seva Seetharaman

Calling Photoshoppers 4

The original image itself had a very nice contrast to it so I decided not to tamper with it too much. To me, this was one of those images that needed very little modifications to make it look the way it should. So below are some changes that I thought would make the image look better.

1. I started off by adjusting the color curves in GIMP to enhance the overall temperature of the image.

2. I then adjusted the color levels to enhance the contrast of the models bright red outfit to the cloudy background.

3. I sharpened it to make the image crisp.

Thanks for giving me this opportunity and would like to participate in another one if possible.

Visit Seva’s blog at picsnbytes.blogspot.com/.
___________________

And there you have it, the four edited images. If anyone else would like to take a shot at this image, grab the original from leggnet.com/images/blog/photoshop and post a link to your edited version in the comments.

Labels:

Raindrops

]]>

Save the Date! Photowalking Utah: Ogden

]]>

The next Photowalking Utah event has been set. It will be an evening ‘walk around the downtown area of Ogden. Here are the details:

Date: Saturday, August 16, 2008
Time: 5:30 pm – ?
Where: Downtown Ogden

The group will be rendezvousing in the lobby of the Union Station located at 2501 Wall Avenue (map). For the photographers coming from the Salt Lake area, riding the UTA Frontrunner train is a great alternative to driving.

These events are open to photographers of ALL skill levels, from first time shooters to seasoned pros. This is a great way to meet other people that share your love of photography.

For more details (and to announce your participation), drop by the event discussion by clicking HERE.

Canon 5D, Canon 70-200 f/4L lens – 1/160 second, f/8, ISO 100

Labels:

Photographing for stock with the end user in mind

]]>

When I plan a stock photo shoot, I always think about how designers/advertisers/editors can use the images I create in their work. Chances are, if I can’t think of multiple uses for an image then it won’t end up selling very well. This is sometimes hard to come to grips with. Early on in my stock shooting, I had some pretty artsy shots that I really liked and thought would be big sellers. To my surprise and disappointment, many of these images ended up not selling at all.

Today’s image is an example of shooting with the end use in mind. Since the passing and implementation of California’s new cellphone usage law on July 1st (link), I figured that there would be a need for fresh images portraying cellphone use while driving. With this in mind, I took one of my models to an empty parking lot earlier this month and photographed several scenes of her using a cellphone while driving.

In this case it worked. This morning I awoke to find one of my preset Google Alerts had located multiple uses of my image of a driver texting. The Christian Science Monitor provides content for television station websites throughout the country and for their story on texting-while-driving they purchased this image from my iStockphoto portfolio.

As John “Hannibal” Smith said, “I love it when a plan comes together”.

Labels: ,

If you could only use one lens, which one would it be?

]]>

If you could only use one lens on your camera, which one would it be?

We all tend to have our favorite lenses. Anyone that has read the exif data on my images can easily spot that my “go-to” lens is the Canon 24-105 f/4L IS. For my style of shooting, the range of focal length on this lens is ideal (especially on my full-frame 5D). I have wondered if a 24-70 f/2.8 would be equally as good for me though.

I’m curious which lens other photographers would choose. Would it be one with some reach like a 75-300? Or maybe something that can get really wide like a 17-40? Or are you a ‘Prime’ shooter like Thomas Hawk and want to stick with a 135mm?

Is the focal length more important to you or the speed? Do you stick with your camera manufacturers models or go third party?

Let’s hear what you have to say…

Canon 5D, Canon 50mm f/1.8 lens – 1/50 second, f/1.8, ISO 800


LeggNet’s Digital Capture
© Rich Legg, Inc. All rights reserved.


Skater

]]>

Today’s capture is another example of the cross-lighting setup detailed in yesterday’s post.

Canon 5D, Canon 24-105 f/4L lens – 1/160 second, f/4.5, ISO 100

Cross Lighting In Studio

]]>

I spent some time yesterday with a couple young men in the studio. My goal going in was to shoot them with serious expressions against a dark background.

In today’s image of Ryan taken during the session, I used a cross lighting type setup (diagram below). The arrangement consisted of a of a softbox camera left lighting the model’s right side and a second softbox on the opposite side of the model lighting his back and left side.

Picture 6

I like the results achieved. If I were to do the shoot again, I would lower the power on the back light a small amount. Even though the detail was retained on the side of Ryan’s face in the original image, I lost detail and blew out the highlights a bit in processing.

Canon 5D, Canon 24-105 f/4L lens – 1/160 second, f/4.5, ISO 100


LeggNet’s Digital Capture
© Rich Legg, Inc. All rights reserved.


Friends

]]>

friend (frěnd)
n.
1. A person whom one knows, likes, and trusts.
2. A person whom one knows; an acquaintance.
3. A person with whom one is allied in a struggle or cause; a comrade.

Canon 5D, Canon 24-105 f/4L lens – 1/126 second, f/5.6, ISO 100

Calling Photoshoppers, Take 2

]]>

Last January we had a bit of Photoshop fun here on the blog with the Calling Photoshoppers post. In it I invited a few photographers to give a shot at editing one of my images. I then posted the results for everyone to see. It was pretty cool to see the different take each photographer took in editing the image.

Well, it’s time to do it again.

I am looking for four blog readers that would like to put their photo editing chops (Photoshop, Gimp, Lightroom, Aperture, etc.) to work on an image that I supply. They will each have one week to do whatever they would like to the image. In the end, I will post all the edited images along with the photographer’s commentary on what they did and why.

If you are interested in participating, please email me at rich(at)leggnet.com with the subject of “COUNT ME IN!”. I will take the first four respondents (plus one alternate).

UPDATE: We’ve got our participants. Thanks for the speedy replies.


LeggNet’s Digital Capture
© Rich Legg, Inc. All rights reserved.


Portrait of a Student

]]>

Canon 5D, Canon 24-105 f/4L lens – 1/125 second, f/5, ISO 100

Happy Birthday Kenneth Linge!

]]>

Happy birthday, friend. www.KennethLinge.com.

Canon 5D, Canon 24-105 f/4L lens – 1/200, f/4, ISO 100


LeggNet’s Digital Capture
© Rich Legg, Inc. All rights reserved.


Preschool Photo Shoot

]]>

Whew, I am wiped out!

I spent this morning doing a stock photo shoot at a prestigious preschool in the area. The director/owner arranged for the models in exchange for photos for the school’s use. We had a pretty aggressive schedule to get the images both the school and I wanted. I photographed the nearly 20 models for the better part of three hours in numerous sets in the school.

Here’s a sample from the shoot to share before I dig into the sorting, editing, uploading and keywording of the 400+ images.

p.s. If you didn’t know, preschoolers have a LOT of energy.

Canon 5D, Canon 24-105 f/4L lens – 1/125 second, f/5, ISO 100


LeggNet’s Digital Capture
© Rich Legg, Inc. All rights reserved.


Where would a NASCAR Driver be without his Pit Crew?

This is not photography related, but I’m sharing it because it literally made me laugh-out-loud. My friend Aaron produced it with a few of his buddies for an upcoming talk on teamwork. Enjoy.

Where would a NASCAR Driver be without his Pit Crew?

This is not photography related, but I’m sharing it because it literally made me laugh-out-loud. My friend Aaron produced it with a few of his buddies for an upcoming talk on teamwork. Enjoy.


LeggNet’s Digital Capture
© Rich Legg, Inc. All rights reserved.


Why I’ve Changed My Mind About Camera Phones

]]>

I’ve changed my mind about camera phones. Being someone who makes my living as a photographer and having thousands of dollars of equipment, I used to dismiss camera phones as nothing more than a toy.

This all changed last month when a Photowalking Utah mishap forced me to upgrade my Blackberry. My new (non-soaked) Blackberry Curve has a 2 megapixel camera. The reason that I’ve altered my opinion is that I now find myself using my camera phone for taking quick notes. I will frequently see something that gives me an idea for a future photograph and in place of making a paper note I will take a photo with my Blackberry. I used to frequently carry my Canon G7 for this purpose, but now I have another option.

Any other photogs finding themselves using camera phones? How are you using yours?

RIM BlackBerry 8320 – exposure unrecorded

Teenage Driver Photo Shoot

]]>

Today’s post is a couple of samples from yesterday’s Teenage Driver photo shoot with one of my regular models, Kylee. The afternoon sun and an empty parking lot made a great location for the shoot. As always, Kylee was a lot of fun to work with and it shows in the images.

Sunroof Girl

Canon 5D, Canon 70-200 f/4L lens – 1/200 second, f/5.6, ISO 200
Canon 5D, Canon 70-200 f/4L lens – 1/400 second, f/4, ISO 100


LeggNet’s Digital Capture
© Rich Legg, Inc. All rights reserved.


iStock Milestones

]]>

Today was another day for a couple of milestones in my involvement as a contributor at iStockphoto.com. The first happened just after midnight as I sold the above photo of a young woman in a fitness club. This was my 30,000th image sold from my portfolio on the site.

The second milestone happened with the acceptance of the photo below. With this photo being added to my portfolio, my overall acceptance rate has surpassed 90%. When I first began submitting to the site in 2006 my acceptance rate began in the mid 50% range and has steadily climbed. I feel like I’ve been in the 80′s forever, so it’s great to crack the 90% number.

Yellow Balloon

Next month I will be attending the first ever Diamond’lypse in Seattle. This is an event where only Diamond/Exclusive contributors on iStock are invited to spend three days hanging out, shooting and learning together. It’s limited to 30 participants, so it should be pretty cool to attend.

As most people know, shooting and selling for iStock (and now Getty) has changed my life. It has allowed me to expand my photography in ways I never expected.

And it’s a lot of fun!

Now I promise, no more iStock updates until I sell my 50,000th image.


LeggNet’s Digital Capture
© Rich Legg, Inc. All rights reserved.


TV Time

]]>

Canon 5D, Canon 24-105 f/4L lens – 1/125 second, f/4, ISO 100


LeggNet’s Digital Capture
© Rich Legg, Inc. All rights reserved.


Photowalking Utah – 4th of July Balloon Launch Recap

]]>
The event offered a colorful assortment of subjects to shoot

Most of the people that know me for any amount of time probably come to learn that I’m not much of a morning person. Because of this I cringed a bit when I read the schedule for the latest Photowalking Utah event. The outing was an early morning session photographing hot air balloons at the America’s Freedom Festival in Provo on the Fourth of July. The balloons began inflating at 6:00 a.m. which necessitated a 5:00 a.m. wake-up call to make it to the field in time.

July 4th Photowalkers
As many of the photowalkers as we could get to hold still for a group shot

A total of about 20 photographers joined in on the ‘walk. Since the starting time was so early, we didn’t have one set location to meet. Instead, we were able to coordinate as the event took place to join together. Afterward, the majority of the group headed off to breakfast together.

Hot Times
The heat of the inflation

The partial cloud cover eliminated the chance for any “balloon against blue sky” shots, but it kept the temperatures in the manageable mid-eighties range.

Fill 'er Up!
Inside the envelope of a balloon being inflated

One of the pilots tapped me on my shoulder and asked “want to get a cool picture?”. I obviously answered yes. With that, he took me inside the envelope of his balloon as his crew inflated it. It was kind of surreal being inside the massive craft as it grew over my head.

Photowalking Utah - Balloon Launch 1
An “over-the-head” no look shot

Photowalking Utah - Balloon Launch 2
Nikon / Canon / Nikon

I must admit that I’m glad I got up before light to attend this event. I took as many pictures before 8:00 a.m. as I usually do on a full day of shooting. It’s always great to hang out with my photowalking friends and this outing was no different.

The next Photowalking Utah event is still being planned. Keep an eye on the announcement section of the group’s Flickr page at www.photowalkingutah.com.

Labels:

Another News Organization Lifted My Image

]]>

Another news organization lifted my image, but this time it was quite a bit closer to home.

Back in May I blogged about the Wall Street Journal illegally using my copyrighted image on their website (LINK). Well, last night I was tipped off by a friend and found the exact same image being used for a news story on the local ABC affiliate’s website.

I fired (pun intended) off an email to the webmaster about the smoking gun (pun again intended) I found on their website incriminating them in the illegal use of my image. Within the hour I was contacted by the Executive Producer of Online Media for the station. He apologized for the usage and removed the image. In discussing the situation with him, he told me that this image had made their way into their purchased image collection and he assumed it came from Getty.

This is becoming extremely frustrating. I have neither the time nor resources to go after these companies that illegally use my images. In both cases, the photos were low-res samples taken from Flickr. While I enjoy the exposure and community Flickr provides, I have to wonder if it is worthwhile. My other alternative is to blatantly watermark my images there, but I hate the look of it in addition to the effort that this would require to retro-fit my 3000+ image collection on the site.

Links:

The Wall Street Journal Lifted My Image
Smoking Gun on Flickr
Smoking Gun on iStockphoto

July 5th

]]>

My obligatory “the day after the fourth of July” fireworks photo.

Canon 5D, Canon 70-200 f/4L lens with 1.4x extender – 20 seconds, f/13, ISO 100

Looking Up

]]>

Canon 5D, Canon 24-105 f/4L lens – 1/160 second, f/9, ISO 100

Happy Birthday Dan

]]>

(Reprinted from the Arizona Republic newspaper, December 1, 1999)

Daniel K. Legg, 35, passed from this life in his Phoenix home on November 25, 1999 after a courageous 16 month battle with cancer.

Dan was born in Folsem, California on July 3, 1964. In 1970 he moved with his family to Chugiak, Alaska. He graduated in 1982 from Chugiak High School. During his high school career he was the Alaska state springboard diving champion in 1980, 1981 and 1982. He earned varsity letters in diving, music and drama.

After graduating high school, Dan moved to Tempe, Arizona to attend Arizona State University. During college Dan was a member of both the diving and bowling teams. He lettered while on the ASU diving team. He graduated from ASU with a Bachelor of Fine Arts degree. He was a member of the Arizona State University Alumni Association.

While attending college dan began his career with Discover Card. Starting in customer service, Dan moved up successfully within the company. At the time of his death, Dan held the position of Regional Training Manager.

Both an accomplished musician and athlete, Dan had competed on a national level in springboard diving, bowling and music. In 1996, Dan reached a high point in his bowling career with a perfect 300 game. He was locally a member of the Grand Canyon Men’s Chorale since 1991 and became the assistant director in 1994. He was the director of Voce Com Brio, a men’s singing group.

Dan was a fun-loving spontaneous man with a unique sense of humor. Dan loved the finer aspects of life and yet was equally at ease in a down-to-earth setting. He leaves behind a large circle of close longtime friends. The numerous friendships he had speak of the many lives he touched.

He is survived by his parents Patricia A. Legg and Richard H. Legg of Chugiak, Alaska; his Paternal Grandmother Lavilla Legg of Twin Falls Idaho; his sister Rebecca L. Legg-Merrell and husband Terry L. Merrell of Healy Alaska; his brother Rich H. Legg and wife Michelle P. Legg of Sandy City Utah; his close cousins Vickie M. Shipp of Twin Falls Idaho and Brenda R. Beckwith of Victoria British Columbia; his nephew Logan R. Merrell of Healy Alaska; his nephew Kristopher R. Legg of New Braunfels Texas; his nieces Elisabeth “Missy” and Sarah N. Legg of Sandy City Utah and countless other living relatives.

Dan was preceded in death by his brother Gerald R. Legg; his maternal grandparents Mildred and Victor Pratt and his paternal grandfather Charles R. Legg.

A memorial service will be held at 2 p.m. on Friday December 3rd at Happy Valley Baptist Church, 24220 N. 43rd Avenue, Glendale Arizona. Officiating will be Art Meirose.

Memorials in Dan’s memory may be sent to the Mayo Clinic Foundation or Birchwood Community Church Building Fund, 22208 Birchwood Loop Road, Chugiak Alaska 99567.

Mamiya M645, Mamiya 80mm f/2.8 lens – Exposure Unrecorded

Country Girl

]]>

Canon 5D, Canon 70-200 f/4L lens – 1/320 second, f/4, ISO 100


LeggNet’s Digital Capture
© Rich Legg, Inc. All rights reserved.