Rule of Thirds – Revisited

]]>

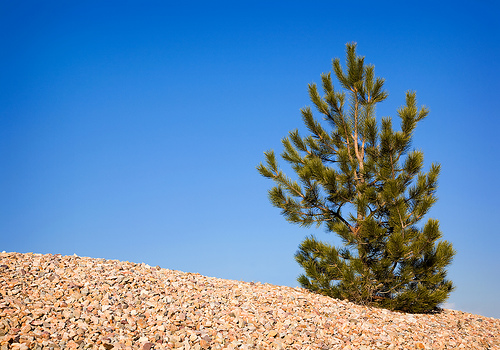
Today’s simple scenery image of a lone pine tree against a blue sky is a perfect chance to revisit a previous post from last year concerning the Rule of Thirds. Have a great weekend!

Canon 5D, Canon 24-105 f/4L lens – 1/200 second, f/8, ISO 100

from April 1, 2007:

One of the first things to get emphasized to novice photographers by those who claim to be more knowledgeable is to “Follow the rule of thirds”. While this is sound advice, the phrase can be confusing. Let’s take a few moments and simplify this “Rule” so that we all can use it when making captures regardless of our experience.

Simply put, the Rule of Thirds is a tool to use when composing a photograph. The way I like to instruct it is this: Place four evenly spaced imaginary lines on your image, 2 horizontal and 2 vertical. I have even further simplified it to some (mainly children) by suggesting that they imagine a “tic-tac-toe” board over the photo. Once you can picture the lines, place your subject very near a line and, if possible, arrange the main focal point of the subject where two of the lines intersect. In doing so, you increase the odds that you will create a photo that is visually appealing to how the human mind interprets the image.

Rule of Thirds

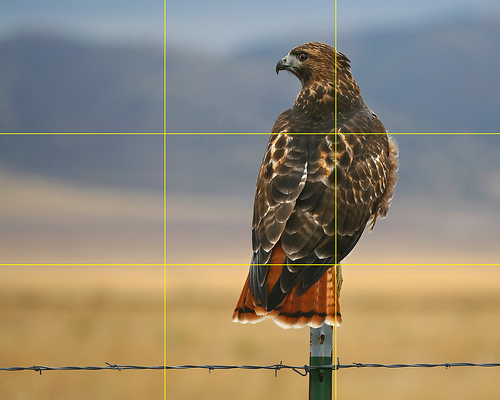
For today’s image (above) I took one of my favorite hawk photos and added yellow lines to help illustrate the process. When composing the photo I placed the bird on the right most vertical line. The main focal point of the bird is the eyes and beak, but I found that if I placed them on an intersection the photo was a bit bottom heavy. Instead, I placed the bird’s body where the two nearest lines meet. Doing so creates a pleasing composition since the birds head is close enough to an intersection to take advantage of the rule. Had I taken the same photo and composed it differently by placing the bird in the center of the image, the result would not be as pleasing.

Since I’m on the subject of image composition, the image above demonstrates another “Rule” that can be followed to make a shot more pleasing. In most situations it is desired to have the subject looking toward the center of the image. If the bird were looking to the right rather than the left, the photo would not be as pleasing to the viewer’s eye. In fact, to many people it would just “feel uncomfortable”. The same can be said for motion. If the photo is of a subject in motion, compose it so it is moving toward the image’s center.

Lastly, remember the old phrase “Rules are made to be broken”. There are plenty of times when a more pleasing image can be created by breaking the Rule of Thirds rather than following it. Try using this rule as a guideline and see if your work improves.


LeggNet’s Digital Capture
© Rich Legg, Inc. All rights reserved.


Life: Day 8

]]>

Canon 5D, Canon 24-105 f/4L lens – 1/125 second, f/8, ISO 100

A Father’s Touch

]]>

Canon 5D, Canon 24-105 f/4L lens – 1/125 second, f/8, ISO 100

Laboratory Photo Shoot

]]>
Ron mixing a scientific concoction.

One of the photo shoots I did last weekend was in a real honest-to-goodness laboratory. A friend offered access to the lab he works in and that was all the motivation I needed to put together a shoot.

With a team of three models and assistance from my friend Harley, we set out to create a series of images for my stock portfolio. My goal was to capture realistic looking images of lab technicians at work. The biggest challenge was setting up lights to create a natural looking scene in the limited space we had to work in. We ended up with a modified cross-lighting arrangement and with the camera position shooting through a narrow opening.

In the Lab
Michelle putting her newly acquired pipetting skills to work.

I must really offer my heartfelt thanks to my friend Bryan for opening up the lab, Harley for helping with the lighting and models Michelle (my wife), Ron and Julie. Without these great folks, we could never have pulled this shoot off.

Dr. Jones, I Presume
Julie, Bryan (our host), Ron and Michelle

Labels:

Published: Two Magazine Covers

]]>

They’re not Time or Newsweek, but they are magazine covers nonetheless. Two of my images are gracing the covers of current magazines.

I took the above image of my good friend (and fellow photographer) Dale for a feature on him in GlobalHRNews, a magazine aimed at human resource professionals. In addition to the cover, they also used an image of mine inside the magazine to accompany the article.

The next image (below) is a stock shot which turned up on the cover of Techniques, a magazine aimed at soon-to-be graduates. While not my favorite from the series of images of this young man, it does work well with the cover layout.

Published Cover - Techniques

Rock Star

]]>

Canon 5D, Canon 24-105 f/4L lens – 1/200 second, f/4.5, ISO 100

Photoshop Tip: An Alternative to Brightness/Contrast

]]>

When editing my images in Photoshop, I always begin with a couple simple adjustment steps before venturing into the more advanced edits. Since I shoot most of my shots around 1/3 f/stop underexposed (to preserve highlights), the first simple editing step I do is an adjustment to the brightness/contrast of the image. But guess what? I don’t use the brightness/contrast adjustment to do this. I use LEVELS.

By using the LEVELS adjustment, I am able to fine tune the brightness of the image while causing very little damage. This is extremely important in my stock images since they have to go through a rigorous inspection process to be included in my portfolio. Here are the simple steps I use:

1. Create a new LEVELS adjust layer.

2. Slide the upper clipping adjustment (red circle below) down until it is just above the upper end of the histogram.

3. Slide the lower clipping adjustment (blue circle below) up until it is just below the lower end of the histogram.

4. Inspect image and fine tune the adjustments as needed

Levels 2

As you can see in today’s featured image, the sample on the right ‘pops’ quite a bit more than the original on the left. This was done strictly using the levels adjustment. Once I complete this step, I then go on and finish my editing of the image.

If you haven’t tried adjusting brightness/contrast this way, give it a shot and see how well it works for you.

Canon 5D, Canon 24-105 f/4L lens – 1/160 second, f/4.5, ISO 50

Labels: ,

Rock Climber

]]>

Canon 5D, Canon 24-105 f/4L lens – 1/30 second, f/4.5, ISO 1000

Real People

]]>

One of the challenges of doing the Liftestyle type of stock images I do is coming up with models to use. I prefer to use everyday people, since they provide the authentic look I want in my images. I have been extremely blessed to have several people to work with on a regular basis (thank you Jenna, Alyssa, Andrew, etc.), but I am always on the lookout for more.

Today’s image of Jonathan is from last weekend’s Fitness series I shot at a local gym. This was Jonathan’s first time modeling. Since he is someone who is committed to keeping fit by regularly working out, this was a natural shoot for him.

Most of my models work TFCD or TFP in exchange for signing a model release. TFCD is an acronym for Time for CD and TCP is an acronym for Time for Print. This means that the model will receive digital copies of the images in exchange for their time. They are then free to use the images for personal use and portfolio purposes. If I see the results are favorable and begin to use a model on a regular basis, I may then also pay an hourly rate.

I have recently set up an account on ModelMayhem.com to expand my pool of models. I have been in contact with a few models from there, but haven’t put a shoot together yet. Many of the models on the site are more focussed on fashion modeling rather than lifestyle.

And of course, when a model isn’t available there are always family members 🙂

Canon 5D, Canon 24-105 f/4L lens – 1/50 second, f/7.1, ISO 100

Note: If you or someone you know is interested in modeling in one of my stock photo shoots (and is in the Northern Utah area), please contact me via email at rich [at] leggnet.com.

Labels:

Put Your Hand In The Air

]]>

Canon 5D, Canon 24-105 f/4L lens – 1/160 second, f/6.3, ISO 100

[Insert Witty Title Here]

]]>

Today’s shot is an overlap between two different stock photo shoots last week. After photographing various clocks, I planned to move into capturing some medical instrument images. Since I had the props together, I thought I’d put together an image combining the two themes.

The problem is that this shot deserves a witty caption, which I haven’t been able to come up with. So, how about a little help? If you can think of a title and/or caption for this image, please share it in the comments.

Canon 5D, Canon 24-105 f/4L lens – 1/160 second, f/9, ISO 100

UPDATE

Thanks to everyone who contributed in the comments. Here are the suggestions so far:

  • Time After Time
  • Bum Ticker
  • It was just his time
  • Time’s Expired
  • Dr.’s are a waste of time
  • Hearing Time Repeat Itself
  • Need A Little Down Time?
  • His ticker’s not tocking.
  • Listen to your ticker

Man in Black

]]>

Canon 5D, Canon 24-105 f/4L lens – 1/125 second, f/7.1, ISO 100

Beyond First Class

]]>

Canon 5D, Canon 24-105 f/4L lens – 1/160 second, f/7.1, ISO 100

50mm f/1.8 lens – Put One In Your Bag

]]>

I frequently receive email questions from photographers that have upgraded to a digital SLR camera. One of the most often asked questions is about additional lenses they should add to their kit. The lens I recommend more than any other is the 50mm f/1.8. This lens can be had for under $100 (Canon) and is a great addition to any photographer’s gear bag. The inexpensive little lens offers numerous advantages including:

– One to two f/stops faster than a standard ‘kit’ lens
– Very narrow depth-of-field for a great blurred background
– Extremely compact and lightweight

The Canon version of the lens feels very cheap light due to its plastic build. Don’t let this deter you. The optics are very good, especially considering the low price.

Today’s image of Kenneth during a video presentation at one of his classes was taken with this lens. The combination of the fast lens speed and a high ISO made the shot possible.

Here are links to the lens for Canon & Nikon:

Canon 50mm f/1.8
Nikon 50mm f/1.8

Of course, if price is no object you can do what my scientist friend did (you know who you are) and cough up some real cash for a Canon 50mm f/1.2 🙂

Canon 5D, Canon 50mm f/1.8 lens – 1/20 second, f/1.8, ISO 800

Labels:

Save the Date: Photowalk #6, February 23, 2008

]]>

The next Photowalking Utah event is fast approaching. The event will be held at the University of Utah’s Moran Eye Center located at 65 Medical Drive in Salt Lake City. Here are the details:

Our sixth Photowalk will be February 23rd at the Moran Eye Center from 9:00 am until 1:00 pm. We’ve got a two-part indoor event: a Photoshop tutorial by Ann Torrence and photographing the new Moran Eye Center (architecture, scientific labs, microscopes small and large, glassware, computers, etc.). We will start capturing photos at 9 am, Photoshopping at 11. You can attend either, part or both.

These event are open to anyone who wishes to attend, regardless of skill level. We typically have participants who vary in ability from beginners with point-and-shoot cameras to seasoned professionals with their high-end gear. The main emphasis is a sharing of knowledge and building of friendships.

For more information visit the entry on Jones Blog and/or drop by the Photowalking Utah discussion group at www.photowalkingutah.com.

Canon PowerShot G7 – 1/500 second, f/4, ISO 400

Labels:

iStock Portfolio Image # 2,000

]]>

Cheers!

With the acceptance of this photo into my portfolio, I now have 2,000 images available on iStockphoto.com. Now I just have to begin building my new Getty Images portfolio.

Canon 5D, Canon 24-105 f/4L lens – 1/160 second, f/6.3, ISO 50

Labels:

Snowy Samantha

]]>

It just wouldn’t seem like a Monday without a blog post highlighting one of my photo shoots from the previous weekend.

Today’s image is of a young Australian girl who is living in Utah for a couple of years. Since winter play is a new experience for her, the plan for the shoot was to capture some outdoor sledding images. Before heading out to the sledding hill we spent some time in studio. With her mom and little brother throwing synthetic snowflakes, our impromptu blizzard created a nice winter scene for the portrait.

And as an added bonus – the studio was MUCH warmer!

Canon 5D, Canon 70-200 f/4L lens – 1/160 second, f/9, ISO 100

Labels:

Blue & Gold

]]>

After what seemed like weeks of overcast skies, blue sky and sunshine finally made an appearance yesterday in Northern Utah. I took the opportunity to slap on the circular polarizing filter and grab some colorful architecture shots.

Canon 5D, Canon 24-105 f/4L lens – 1/200 second, f/8, ISO 100

Winter Morning

]]>

Canon 5D, Canon 24-105 f/4L lens – 1/250 second, f/4, ISO 100

More Studio Space!

]]>

To quote Col. John “Hannibal” Smith, “I love it when a plan comes together”.

Last Saturday we (myself and two photographer friends Dale and Benjamin) removed two walls in my studio and doubled the shooting space. In addition to two seamless backdrops, I now have a sitting area that can double as a set. In total, the studio is just under 600 square feet.

As Michelle and I now make the majority of our income from photography, we continue to look forward to where this journey will take us.

Canon 5D, Canon 24-105 f/4L lens – 2/5 second, f/4, ISO 100

Labels:

Portrait of an Artist

]]>

Canon 5D, Canon 24-105 f/4L lens – 1/100 second, f/9, ISO 100

Election Day

]]>

Today is the Super Tuesday primary election day in the states. In honor of this, I thought I’d put together a mock-up of my good friend Dale looking, shall we say, presidential.

Enough blogging, I’m off to vote!


LeggNet’s Digital Capture
© Rich Legg, Inc. All rights reserved.


Private Jet Photo Shoot

]]>
(Rock Star models Andrew and Alyssa)

I spent this past Saturday afternoon doing a stock photo shoot in a private jet. Through a friend, I made contact with a pilot last month and he was able to get me access to one of the corporate jets he flies. I must say, it was pretty cool.

I got word on the Thursday prior that we would have use of the jet on Saturday, so I had to scramble to assemble the models and props for the shoot. Normally I like to schedule shoots a few weeks in advance, but due to the irregular schedule of the plane’s use this was not possible.

When planning the shoot, the three scenes I sought to capture were corporate executives, young rock stars and wealthy jet-setters. Doing the multiple scenes required several different models. Ultimately, six were available (on the short notice) for the shoot.

Private Jet Photo Shoot
(The lighting setup on the outside of the Cessna Citation)

The lighting for the scene was pretty straightforward. I wanted to create a look that made it appear that the plane was flying. To do so, very bright windows were the key. I placed large softboxes on both sides of the plane to light the windows, then used a small softbox above and behind my camera position for fill light. All of the lights were synced with Pocketwizard radios.

The final result of this lighting setup worked well. The images portray a natural looking directional light similar to what you would see in an airplane at altitude.

Executive
(Corporate executive model Ron)

The biggest hurdle in doing the shoot was the cold weather and wind. The hangar that we used as a staging area was un-heated. Thankfully, Kevin from the airport provided a space heater to keep the models warm between shots. The plane itself was also not heated (it was powered down) and the door had to stay open for the light’s power cables.

Private Jet Photo Shoot
(Yours truly on the job)

All in all, it was a successful and fun shoot which will yield a few dozen images for my stock portfolio. Big time thanks go out to all of the models (Michelle, Dale, Ron, Andrew, Jenna & Alyssa) and especially to my new pilot friend Matt. Thank you all! Without people like you I could not do what I do.


LeggNet’s Digital Capture
© Rich Legg, Inc. All rights reserved.


Boys Will Be Boys

]]>

Meet Lewis.

In addition to being a second grader, Lewis is an accomplished Easter Egg Crusher. He took time out of his busy academic schedule yesterday to model in some Easter shots for an upcoming stock series.

After we completed shooting, he asked if I would take “just one more shot” – and here it is. I promised him I’d post this image on the blog so the world could see his awesome skill in action.

Here’s to you, Lewis. You did a great job!

Canon 5D, Canon 24-105 f/4L lens – 1/125 second, f/8, ISO 100


LeggNet’s Digital Capture
© Rich Legg, Inc. All rights reserved.


Destination: Wildnerness

]]>

I have been shooting so much studio stock work lately that I decided to take a trip back through the 2007 archives in search of something different.

This image of a Piper Super Cub lifting off was captured last summer in Fairbanks, Alaska. The owner of this plane keeps it tied-up at his waterfront home. in less time than it takes me to drive from my house to downtown Salt Lake City this pilot can be trying his luck at a wilderness fishing hole.

But there are two sides to each coin, especially in Alaska. Right now it is -9º Fahrenheit in Fairbanks and they will have less than 7 hours of daylight today. I think I’ll stick with Utah.

Canon 5D, Canon 70-200 f/4L lens – 1/1600 second, f/5.6, ISO 160