November 30, 2007
Little Cowboy
]]> 
Canon 5D, Canon 24-105 f/4L lens – 1/125 second, f/9, ISO 100
]]> 
Canon 5D, Canon 24-105 f/4L lens – 1/125 second, f/9, ISO 100
LeggNet’s Digital Capture
© Rich Legg, Inc. All rights reserved.
]]> 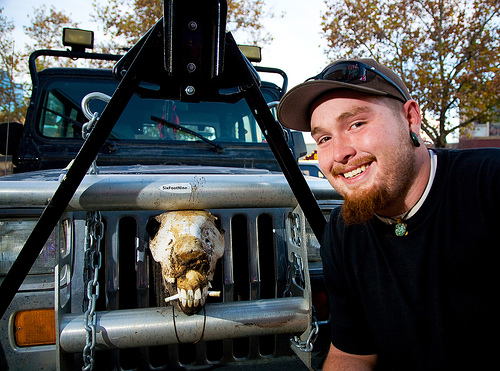
During the Provo Photowalking event earlier this month, the group came across this cigarette smoking donkey skull mounted on the front of a Jeep. While we were checking it out by alternating between photographing it and laughing about it, the jeep’s owner emerged from the tavern it was parked in front of (yes, there are taverns in Provo). After getting over the initial shock of seeing 10+ photographers around his vehicle, he posed for a portrait.
To light this shot, I had my friend Dale hold a Pocketwizard triggered 430EX to the left of camera. I then quickly balanced the strobe’s power to about 2/3 f/stop above the ambient light. This gave the subjects face (and the skull) a bit of pop to separate them from the background.
The next photowalk event will be a December visit to the Christmas lights at Temple Square. Details will be posted here as well as the Flickr group.
Canon 5D, Canon 24-105 f/4L lens – 1/30 second, f/5.6, ISO 200
Labels: photowalking
]]> 
OBJECTIVE: Photograph an attorney and paralegal for an article in a trade magazine
LOCATION: The attorney’s office
CHALLENGE: The office space was small and the attorney had very little time for the shoot
The limited space was the largest hurdle in capturing this portrait. I was actually standing outside the room shooting through the doorway. The size challenge also limited the amount of lighting which could be used.
For lighting, a single softbox was placed to the right of the camera to give a strong directional shape. This also served to create a pseudo-window light effect in the windowless office. A large silver reflector was placed in the corner left of camera for fill.
All said, I was in-and-out in 15 minutes and the attorney was quickly back to work.
Canon 5D, Canon 24-105 f/4L lens – 1/125 second, f/8, ISO 100
]]> 
“I bought this expensive camera, but my pictures look Blah!” I have heard a variation of this expression many times. It usually comes from people who have recently upgraded to a digital SLR camera. With Christmas coming and many more photographers hoping to find a box of Digital SLR goodness under a tree, let me state my opinion on this subject as a cold, hard fact:
If you use a digital SLR camera, your images WILL require editing!
Unlike their inexpensive point-and-shoot cousins, digital SLR cameras are aimed at the more experienced photographer. These shooters are the type that don’t want the camera to do all the thinking for them. The camera’s job is to record the scene accurately at a high level of quality. It is essentially creating a digital negative which then needs to be developed.
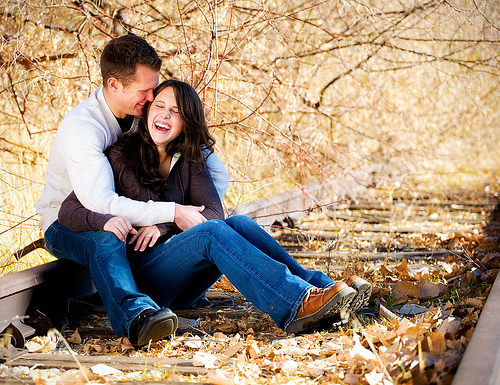
Here is the unedited file* straight from the camera of today’s photo of a newlywed couple on railroad tracks.
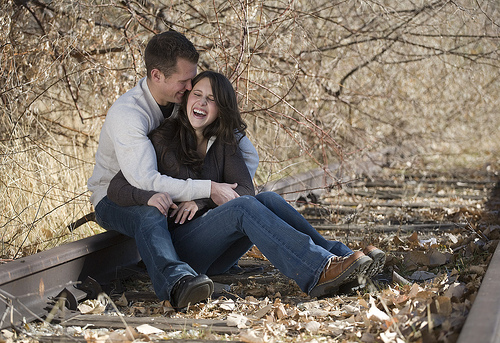
Notice how blah the file is. The colors are drab, the contrast is low, the whole scene is rather dark and unsharp. In keeping with the film vernacular, this file is my “digital negative”. Like any negative, it needs developing. Today, we do this in our digital darkroom – photo editing software.
For my stock portfolio images, I do the bare minimum of editing. This is done intentionally to leave the final editing to the buyer, usually a graphic designer. But even my bare minimum consists of several steps.
– Cropping (if necessary)
– Adjusting exposure (I shoot at -1/3 f/stop to preserve highlights)
– Tightening Levels
– Adjusting Vibrance and Saturation
– Sharpening (using the High Pass Filter method)
For portrait and client work, I do much more editing. This includes:
– re-touching
– softening
– saturation
– color adjustment
– dodging & burning
– vignetting
and so on…
Some of this work is done with Photoshop actions (it is no secret that I am a big fan of Kenneth Linge’s actions). I would never want a client to receive an image that I have not edited – period.
If you are shooting a digital SLR, think of it this way: You capture the image with the camera, you develop the image with the software. A little bit of work with an editing program goes a long way in removing the BLAH.
Canon 5D, Canon 70-200 f/4L lens – 1/1000 second, f/4, ISO 160
* – This image was shot in RAW mode and converted to JPG with Adobe Camera Raw (added 11/29/07)
Labels: tutorial
“I bought this expensive camera, but my pictures look Blah!” I have heard a variation of this expression many times. It usually comes from people who have recently upgraded to a digital SLR camera. With Christmas coming and many more photographers hoping to find a box of Digital SLR goodness under a tree, let me state my opinion on this subject as a cold, hard fact:
If you use a digital SLR camera, your images WILL require editing!
Unlike their inexpensive point-and-shoot cousins, digital SLR cameras are aimed at the more experienced photographer. These shooters are the type that don’t want the camera to do all the thinking for them. The camera’s job is to record the scene accurately at a high level of quality. It is essentially creating a digital negative which then needs to be developed.
Here is the unedited file* straight from the camera of today’s photo of a newlywed couple on railroad tracks.

Notice how blah the file is. The colors are drab, the contrast is low, the whole scene is rather dark and unsharp. In keeping with the film vernacular, this file is my “digital negative”. Like any negative, it needs developing. Today, we do this in our digital darkroom – photo editing software.
For my stock portfolio images, I do the bare minimum of editing. This is done intentionally to leave the final editing to the buyer, usually a graphic designer. But even my bare minimum consists of several steps.
– Cropping (if necessary)
– Adjusting exposure (I shoot at -1/3 f/stop to preserve highlights)
– Tightening Levels
– Adjusting Vibrance and Saturation
– Sharpening (using the High Pass Filter method)
For portrait and client work, I do much more editing. This includes:
– re-touching
– softening
– saturation
– color adjustment
– dodging & burning
– vignetting
and so on…
Some of this work is done with Photoshop actions (it is no secret that I am a big fan of Kenneth Linge’s actions). I would never want a client to receive an image that I have not edited – period.
If you are shooting a digital SLR, think of it this way: You capture the image with the camera, you develop the image with the software. A little bit of work with an editing program goes a long way in removing the BLAH.
Canon 5D, Canon 70-200 f/4L lens – 1/1000 second, f/4, ISO 160
* – This image was shot in RAW mode and converted to JPG with Adobe Camera Raw (added 11/29/07)
LeggNet’s Digital Capture
© Rich Legg, Inc. All rights reserved.
]]> 
Canon 5D, Canon 70-200 f/4L lens with 1.4x extender – 1/400 second, f/5.6, ISO 160
]]>
Canon 5D, Canon 70-200 f/4L lens – 1/125 second, f/11, ISO 100
]]> 
What’s a Thanksgiving blog post without a cheesy list of things we are thankful about. Here is a quick list of ten things in digital photography that I am thankful for:
1. Flash memory and hard drive space is cheap
2. Nikon and Canon are neck-and-neck competitors
3. Internet Distribution
4. Photoshop CS3 on a Mac
5. Pictureline and Wasatch Photographic being local
6. Great models always willing to help
7. iStockphoto
8. Knowing Kenneth Linge
9. Mpix’s $9.75 overnight shipping
10. The wonderful people that take time to read this blog
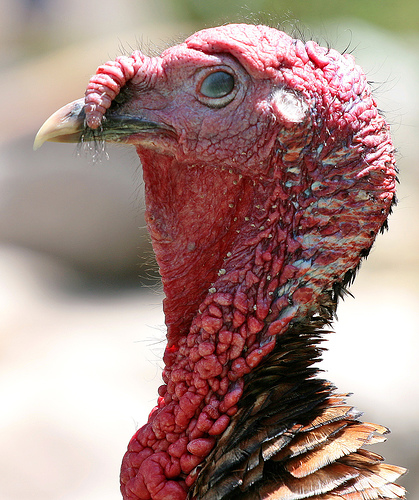
As for today’s image, I’m thankful that turkeys taste better than they look. Please enjoy a safe and happy Thanksgiving Holiday.
Canon 30D, Canon 70-200 f/4L lens – 1/250 second, f/5, ISO 100
]]> 
I have had a Facebook account for a year or so but have rarely used it. Recently though I started to add friends and use the site as it is intended, and guess what? I’m enjoying it.
If you are on Facebook (or willing to sign up) and would like to add me as a friend, please do so. Just do a lookup for “Rich Legg”. I shouldn’t be too hard to find, I’m the one with the camera.
p.s. Obviously today’s image has nothing to do with this post.
Canon 5D, Canon 24-105 f/4L lens – 1/125 second, f/7.1, ISO 100
]]> 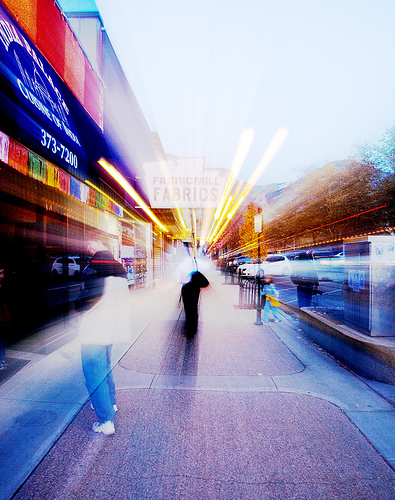
The photowalking event this past Saturday evening was great. We had a group of 15 photographers (and friends) join in as we walked the historic downtown district of Provo.
In addition to capturing images of my fellow photowalkers, I got into a Zoom-Blur mode on several shots – as evidenced by today’s photo. As I was following the group up the street, I made this shot. If you look closely, you can spot six of the photowalk participants in the scene. The blur effect was created with a quick twist of the of the zoom ring on the lens at the end of the half second exposure.
To see more images taken by the photowalk participants, visit the Flickr group at flickr.com/groups/photowalkslc.
The next photowalking event will be in December as we set out to capture the Christmas lights at Temple Square. I will post details on the Flickr group in addition to this site when they become available.
Canon 5D, Canon 24-105 f/4L lens – .5 second, f/13, ISO 200
Labels: photowalking
]]> 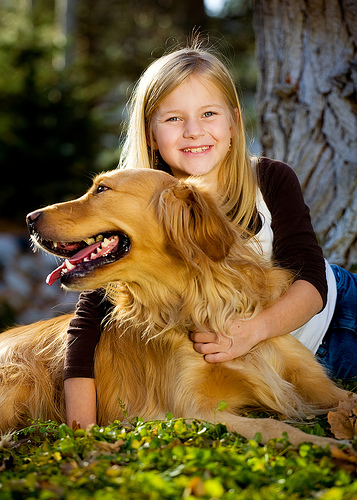
Today’s image of a beautiful young woman and her dog is from an outdoor photoshoot I did yesterday afternoon of three siblings and their pet. While the children were excellent subjects, the extremely excited golden retriever added a bit of a challenge. He was so interested in everything going on it was difficult to get him to stay in the frame – let alone look at the camera.
With Michelle’s assistance, I used a single silver reflector to light the scene combined with the afternoon sun as a hairlight. In addition to nicely lighting the subject’s blonde hair, the sunshine created a great rimlight giving separation between the dog’s face and the background.
This shot is one of my favorites from the set. I enjoy the informal feeling created by the retriever looking away from the scene combined with the young lady’s wonderful smile.
Canon 5D, Canon 70-200 f/4L lens – 1/160 second, f/4.5, ISO 100
LeggNet’s Digital Capture
© Rich Legg, Inc. All rights reserved.
]]> 
(Instructor Kenneth Linge teaching students on the streets of Salt Lake City – 11/03/2007)
Years ago I sat in a training seminar where the facilitator stated that we are either “Green and Growing or Brown and Dying”. He was not talking about photography, but I believe this statement easily carries into this discipline. One common thing I have heard from many great photographers over the years is that they are constantly looking for ways to improve their work. These might be classes, books, magazines, seminars, or whatever works for them – but the common thread I hear is that these photogs all want to remain Green and Growing.
One way I do this is to read a lot on the Internet. I thought that I followed a fairly large amount of RSS feeds on photography until I read Brian Auer’s post this week listing the 87 Photography Feeds (of which I am humbled to have been included) that he follows on a daily basis. This got me wondering if I am doing enough to remain growing in my craft.
There is obviously a pent up demand for good photography training. One just has to see the growth of David Hobby’s immensely popular Strobist website or live training events such as those taught by my friend Kenneth Linge (pictured above) to verify this. With the Internet there seems to be an immense amount of training resources (mostly free) out there equaled only by the demand for it.
My question for you photographers reading this:
Where do you go to learn how to improve your photography?
I would love to hear what resources (websites, books, speakers, etc.) you use to improve your game. Please take a moment and speak up in the comments about your faves. After reading Brian’s list of 87 feeds, I feel like I should be adding a few more to my reader.
Canon 5D, Canon 24-105 f/4L lens – 1/200 second, f/4, ISO 100
Labels: tutorial
]]> 
Canon 5D, Canon 24-105 f/4L lens – 1/125 second, f/8, ISO 100
]]> 
If you are in the Northern Utah area this weekend, please consider joining us for the Photowalking Event on Saturday. Here are the details from my earlier post:
________________________________________
It’s Photowalking time again, and even though we are based in Salt Lake City this walk will be in Provo. The third photowalk is scheduled for Saturday November 17th. We will be walking around the historic downtown district in Provo. Interesting sites include:
– Provo Tabernacle
– Utah County Courthouse (pictured above)
– Pioneer Park
– Countless sidewalk shops and such
The group will be meeting in the Southeast corner of the Albertson’s parking lot located at 560 W Center Street (Provo) at 4:00 pm (click HERE for a map). We will then head Eastward toward the courthouse area. If you have a tripod, it will be helpful. We will have about an hour of light before darkness sets in.
Again, these events are very non-competitive and ANY photographer is welcome to attend regardless of their skill level or camera equipment. This is a great way to introduce a friend to photography – so please invite one!
In recap, here are the details:
What: Photowalk #3
When: Saturday November 17th. 4:00 – 6:00(ish) pm
Where: Downtown Provo. Meet at 560 W. Center Street.
Who: Anyone!
For more information, visit the our Flickr group at www.flickr.com/groups/photowalkslc. Please feel free to contact me at rich(at)leggnet.com with any questions.
Canon 5D, Canon 24-105 f/4L lens – 1/60 second, f/4, ISO 100
Labels: photowalking
]]> 
I had a nice surprise over the weekend. A family who attends our church called to say that they saw a photo of Elisabeth in a magazine they subscribe to. They figured that I knew about it, but I didn’t. Since my images are sold through iStockphoto.com I don’t have direct contact with the buyers. I don’t get to know what the final use will be. When I see an image in use it is either because the designer contacted me or I come across it “in the wild”.
Of the thousands of images I have sold on the site, the number that I have seen in use is less than 1/10 of 1%.
LeggNet’s Digital Capture
© Rich Legg, Inc. All rights reserved.
]]> 
Saturday’s stock photo shoot of a simulated classroom was great. This was the most models that I have used in a single session and everyone did an awesome job.
The location of the shoot was a local private school. One of my friends (and regular reader) was able to put together the use of the facility (thanks Ricci!). The room we used wasn’t a normal classroom, but a common area in the school. By using this room, we had extra space around the perimeter to place lights, equipment and such.

In lighting the scene, my goal was to have natural looking classroom light. I wanted one side of the room to be much brighter to simulate light that would normally come in through windows. To achieve this, I placed two softboxes down the side for the mainlights and then brought in fill light from the back and opposite sides of the room. Here is an overview photo (taken by our teacher’s husband):
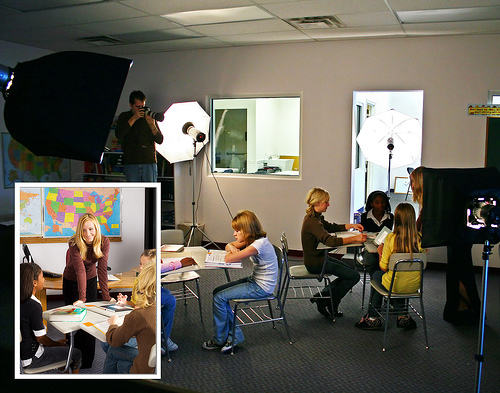
Once the lighting was put in place and adjusted for exposure, I pretty much left it sit except for the occasional fine-tuning to add or subtract light from part of the scene.
For models we had 9 children and a teacher. Michelle arranged having the children at the shoot and we ended up with a majority of 6th and 7th grade girls to go along with our teacher, Jenna. The kids were great. They were extremely patient as we set up different shots and even suggested a few things to add or take away.
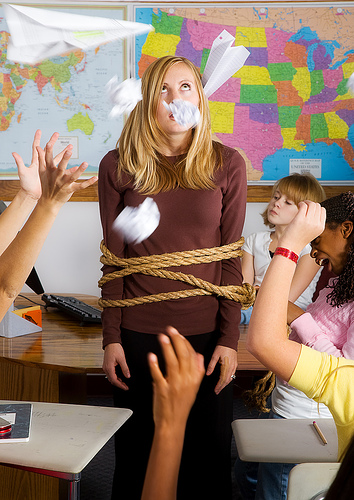
Today’s featured image (on the top of the page) was one of the funnest shots for everyone to do. For some reason, this group of above average students got a kick out of tying up their teacher and going nuts. Jenna was a great sport, but of course this wasn’t the first time we tied her up for a shot (see here).
All in all, I classify the day a success. The photos are very close to what I sought to capture. I now have the task of weeding through the 250+ images to select and edit the keepers for a set on iStock.
Canon 5D, Canon 70-200 f/4L lens – 1/125 second, f/10, ISO 100
LeggNet’s Digital Capture
© Rich Legg, Inc. All rights reserved.
]]> 
Canon 5D, Canon 70-200 f/4L lens – 1/10 second, f/4, ISO 800
LeggNet’s Digital Capture
© Rich Legg, Inc. All rights reserved.
]]> 
Note from Rich: Today’s post is written by my good friend and fellow blogger Bryan Catherman. Bryan is a very talented writer and a fun guy to hang out with. Be sure to check out his blog, The Hopeless Writer.
Into the Most Secret Place On Earth
by Bryan Catherman
I’ve witnessed many spectacular things—NORAD, secret detainee holding camps, and other highly classified places—but nothing compares to where I went, and what I saw last month with my good friend, Rich Legg.
About six months ago, Rich Legg was contacted about doing a photo shoot. That in itself was nothing out of the ordinary given the popularity of his website and the broad range of his work. However, the subject matter and the stipulations were nothing he’d ever dealt with before. He was allowed to select one assistant, and after considering my background, he selected me over many of his talented photographer friends.
From there, we completed the necessary paperwork, provided blood samples, and underwent a detailed background check. Rich’s immunization record wasn’t as up to date as mine, so Rich also received a Polio vaccination, as well as the six-shot series for Anthrax. Then we waited. We were on the short list, being reviewed for the job.
Rich didn’t let himself get too excited. He’d been through this before when he was being considered to photograph Suri Cruise. “Don’t get your hopes up,” he’d say, “that way you won’t feel let down when we don’t get it. Trust me; I learned my lesson when I didn’t get the Cruise gig.”
But I couldn’t stop thinking about Ralph Plaisted. Plaisted was the last American to visit the most secret place on earth with his unauthorized entry on April 19, 1968; a day that changed is life.
On October 7th, we were selected for the job and on October 19th, we arrived at the private jet terminal of the Salt Lake City International Airport. Before us was a small, overpowered jet painted stark white. The windows were limo tinted and the aircraft was free of any other markings. No tail number, no warning or caution markers near the engines, nothing.
A brutish man with a stock face took our gear. He informed us that from this point, we were allowed no photography equipment, no recording devices, no GPS tracking systems, no paper, and no writing instruments. He confiscated our cell phones and for some reason, he took the electric keyfob from my key ring. “You’ll be given back your camera at the photo shoot,” he said to Rich. Something in his voice intimated me. I’ve looked into the faces of some evil men, terrorists and killers, but this man—a man who couldn’t possibly stand taller than five feet—scared the hell out of me.
I quickly realized that the terrifying little man that took our stuff was also our flight attendant. He served us a plate of cookie snacks. I had coffee and Rich had milk, and then the man disappeared. We never saw the pilots and the area of the plane where we were seated had no windows. As I listened to the engines roar, I started to wonder what I had let Rich get me into.

When the door of the jet opened, the cold blast instantly snapped at my face. It must have been 50 degrees below zero.
Then two young girls boarded the plane. Or I thought they were young girls; my mind was hazy at this point. They each carried a parka, a hat, and sun goggles. “You’ll need this stuff if you’re de-boarding the aircraft,” one of them said to me.
Stepping off the jet, I looked to the right and left. In all directions was nothing but snow and ice like a great white ocean. Looking behind me, I could barely see the plane except for the tinted windows.
Moments later, a toboggan being pulled by two caribou arrived. “Welcome to the North Pole,” said its driver, a three and a half foot cheerful man. He explained that we’d have to wear blindfolds until we entered the compound and we agreed.
As the sled came to a stop, I could hear signing and laughing. The sounds were confirmed when the man removed our blindfolds. Neither Rich or I could form words, but the reflection in our eyes said it all.
Before us was the biggest, brightest factory I’ve ever seen. Little people moved about like bees in a hive. Large gears turned and steam spewed from tall pipes. Conveyer belts moved toy after toy past us. The factory that surrounded us was alive.
“Come this way,” said the driver. “He wants the photos taken in his private residence.”
“This is amazing,” said Rich.
“Oh, this, right,” said the man. “I guess working here day in and day out you tend to forget. We don’t get many guests up here. Come on. This way, please.”
I had no idea how to address the big man, but when he firmly shook my hand, he said, “Hi, I’m Santa Clause, but some people call me Kris Kringle or St. Nicholas. What ever you’re comfortable with is fine by me.” He nodded. “This is my wife, Mrs. Clause.” His voice was like warm syrup and his smile like a child’s innocent giggle.
Handcrafted furniture filled his living room as the wood-burning stove packed the space with warmth. On a desk in the corner were little flags—the flags of the entire world. A large King James Bible rested on his coffee table. One end of the couch was near a small end table, and on the table were a candle lamp, some knitting needles, yarn, and a Beverly Lewis book with a red bookmark. I think it was The Brethren, but I couldn’t be sure. Three books sat on the other end table: Blue Like Jazz, The Kite Runner, and a title written in French.
Rich and Santa chatted about the photo shoot for a moment and then Rich instructed me to unpack the gear. (The equipment arrived unnoticed while I was meeting Santa and his wife.) We didn’t know what the photos were for and nobody ever told us, but for the next twenty minutes, Rich snapped photo after photo. I held a big disk and reflected light. At one point I held two flash mechanisms and pointed them as Rich showed me. Snap, flash, snap. I think Rich must have captured 400 photos.
Then, as we were packing up, Mrs. Clause served us sweet sugar cookies and hot chocolate. Santa retreated into his study and emerged with two wrapped gifts and a copy of Letters From the Front Lines. “Bryan,” he said to me, “war is the devil’s play and I’m sorry you had to visit his playground. Please thank every veteran you know, for me.” Then he handed me the book. “If it’s not too much trouble, would you mind signing it for me?”
“Brave Rifles, Santa. Brave Rifles!”
And as fast as we had arrived, we were escorted out. I don’t remember the flight home, other than the time I spent staring at the small Christmas gift Santa gave me. The box was wrapped in gold paper and a small hand-tied bow stuck up from the top. “Don’t open this until Christmas Morn’,” he said. At one point, I looked to Rich, who was staring at his gift, larger than the one Santa gave to me.
“Rich,” I asked, “how will anybody believe we were really there?”
His reply: “Don’t worry, I’ve got the photos to prove it.”
]]> 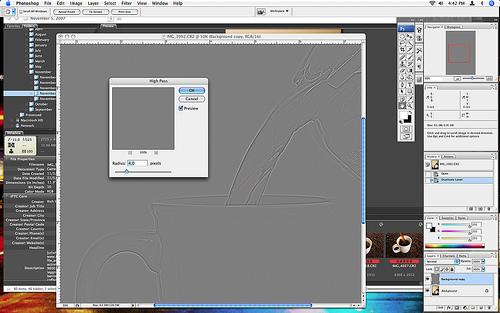
Earlier this week, I mentioned my recipe for having a high percentage of my photographs accepted into my portfolio on istockphoto.com. One of the key ingredients to my system is NOT using the popular UNSHARP MASK filter in Photoshop for sharpening. While this filter does a nice job for sharpening images to be printed, I find that it can be detrimental to the quality of stock photos which get inspected with a fine-tooth-comb before begin accepted.
The alternative method I use for sharpening is the HIGH PASS FILTER method. This method provides good sharpening while minimizing image degradation. Here are the steps:
1. Create a COPY of the layer you wish to sharpen
2. Select FILTER, OTHER, HIGH PASS
3. Set the radius to 4 PIXELS (then click okay)
4. Change the blending options of the new layer (by double-clicking on the layer) to SOFT LIGHT for mild sharpening or OVERLAY for stronger sharpening
It’s a very simple method for clean sharpening of photos. To make it even easier, I have recorded the steps as an action that I can run with the press of one function key.
If you haven’t tried sharpening this way, give it a shot and see how well it works for you.
Additional Note (Added on 15 November)
In response to a comment about this method causing an undesired “HALO” effect, let me add a clarification (that I should have included originally). This method is intended to be used on FULL RESOLUTION images of 8+ megapixels. Using it without tweaking the ‘RADIUS’ on smaller images will give an undesired result.
LeggNet’s Digital Capture
© Rich Legg, Inc. All rights reserved.
]]> 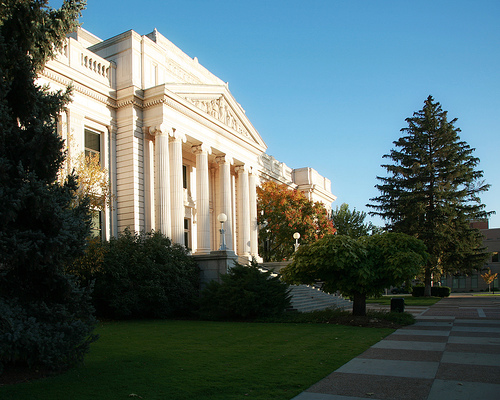
It’s Photowalking time again, and even though we are based in Salt Lake City this walk will be in Provo. The third photowalk is scheduled for Saturday November 17th. We will be walking around the historic downtown district in Provo. Interesting sites include:
– Provo Tabernacle
– Utah County Courthouse (pictured above)
– Pioneer Park
– Countless sidewalk shops and such
The group will be meeting in the Southeast corner of the Albertson’s parking lot located at 560 W Center Street (Provo) at 4:00 pm (click HERE for a map). We will then head Eastward toward the courthouse area. If you have a tripod, it will be helpful. We will have about an hour of light before darkness sets in.
Again, these events are very non-competitive and ANY photographer is welcome to attend regardless of their skill level or camera equipment. This is a great way to introduce a friend to photography – so please invite one!
In recap, here are the details:
What: Photowalk #3
When: Saturday November 17th. 4:00 – 6:00(ish) pm
Where: Downtown Provo. Meet at 560 W. Center Street.
Who: Anyone!
For more information, visit the our Flickr group at www.flickr.com/groups/photowalkslc. Please feel free to contact me at rich(at)leggnet.com with any questions.
Today’s image is of the Historic Utah County Courthouse which is one of the stops on the photowalk.
Canon 5D, Canon 24-105 f/4L lens – 1/100 second, f/8, ISO 100
LeggNet’s Digital Capture
© Rich Legg, Inc. All rights reserved.
]]> 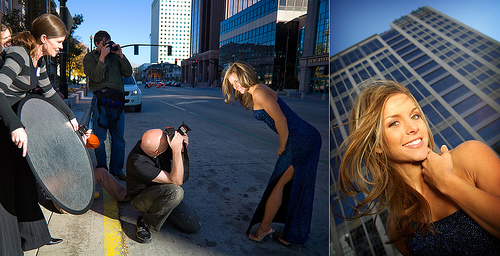
I was invited to attend Kenneth Linge’s latest seminar, Photographing People Part I, this past Saturday in Salt Lake City. Kenneth wanted to have some overview photographs taken as he was teaching and demonstrating his photography methods and asked me to provide them.
Today’s image is one of the example shots from the class. The purpose of the photo is to show both the setup of a shot and the final portrait. In the left frame you can see Kenneth photographing Kathleen (the model) from a very low angle with her bending over at the waist to create a specific look. The lighting is provided by Kenneth’s wife MaryLyn using a single reflector. The right frame shows the stunning final result of this technique. It is simply incredible to see the results that can be obtained with the lighting and posing techniques that Kenneth teaches. I am obviously a fan of Kenneth’s photography and his teaching. I have learned so much from him and look forward to learning even more in the future.
For more information on Kenneth’s photography and seminars, visit his website at www.kennethlinge.com or his blog at kennethlinge.squarespace.com. He will be teaching at least one more session of Photographing People Part I before he moves into Part 2 in March (a class I will be attending).
LeggNet’s Digital Capture
© Rich Legg, Inc. All rights reserved.
]]> 
I reached a small milestone on Saturday, I had my 1,000th image accepted into my portfolio on the popular stock photography website istockphoto.com.
What makes this a bit of an achievement (at least for me) is that before an image is added to a photographer’s portfolio it has to be personally inspected by one of the company’s 40 inspectors to ensure that the image meets the site’s stringent requirements. I have heard from many a frustrated photographer over the past year who was having difficulty getting their images accepted. After a bit of a learning curve, I believe that I have hit on a good recipe for editing my photos in an acceptable manner for the site. I am now averaging over an 80% approval ratio all-time (and over 90% in recent months).
Image #1,000 is a studio shot of a cup filled with coffee beans. It is part of a small set I shot last week (click here to see the set). My next goal is to increase the portfolio size to 2,000 by March 31st of next year. You can view my iStock portfolio by clicking here.
Canon 5D, Canon 70-200 f/4L lens – 1/125 second, f/8, ISO 100
LeggNet’s Digital Capture
© Rich Legg, Inc. All rights reserved.
]]> 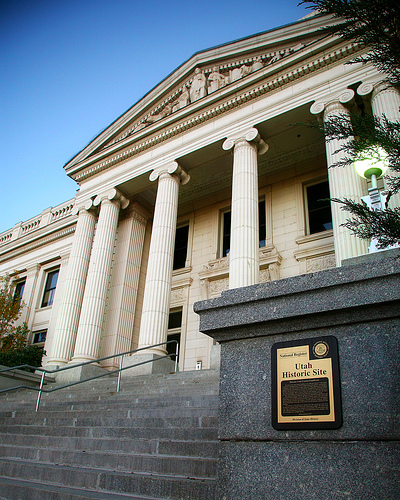
The Historic Utah County Courthouse in Provo is a fantastic old building that serves many purposes from office space to wedding receptions. I captured this image of the entry and plaque before shooting a wedding reception last month. The plaque reads:
The Provo City and County Building, now called the Historic Utah County Courthouse, was built between 1920-26. Joseph Nelson, the architect, traveled with a committee to the West Coast to gather ideas from other administration buildings, prepared sketches, and submitted a plan that was accepted by the committee in 1919. Rudine and Chytraus were the contractors for this two-and-one-half story Neoclassical building. Built of oolitic limestone from Sanpete County, the lower portions of the building is faced with granite from Little Cottonwood Canyon.
The sculpture grouping within the pediment was designed by Joseph Nelson and executed by sculptor Joseph Conradi. The figure of justice stands in the center with female figures on each side representing Utah County of Provo City. Horticulture, dairying, mining, livestock, and farming on the left, and music, sculpture, industry, letters, and painting on the right, are the various arts and industries symbolized in this grouping.
The interior is also elaborately ornamented. The central two-story foyer incorporates a painted arched ceiling and a stained glass skylight. The stairs at the rear of the central pavilion curve upward to the mezzanine. Two long narrow atria with coffered ceilings are accented with stained glass panels below skylights. The floors throughout are of Alaskan marble.
I have it on good authority that those Alaskan marble stairs can wreak havoc when a Canon 430EX strobe tumbles down them. Ouch!
Canon 5D, Canon 24-105 f/4L lens – 1/6 second, f/8, ISO 400
LeggNet’s Digital Capture
© Rich Legg, Inc. All rights reserved.
]]> 
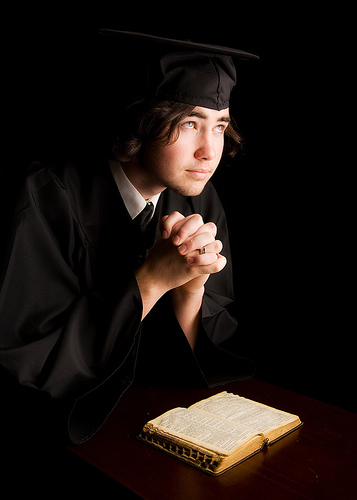
Even though this shot doesn’t scream CHRISTMAS, that is a Christmas tree in the background.
Canon 5D, Canon 24-105 f/4L lens – 1/125 second, f/4.5, ISO 100
LeggNet’s Digital Capture
© Rich Legg, Inc. All rights reserved.
]]>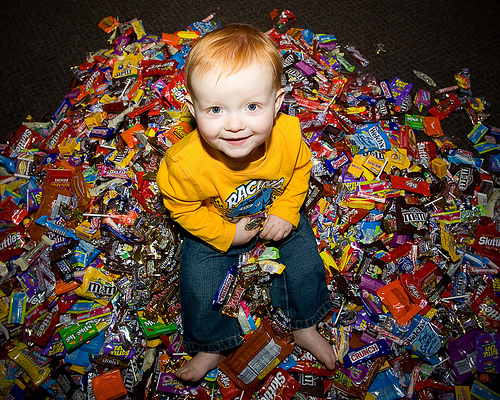
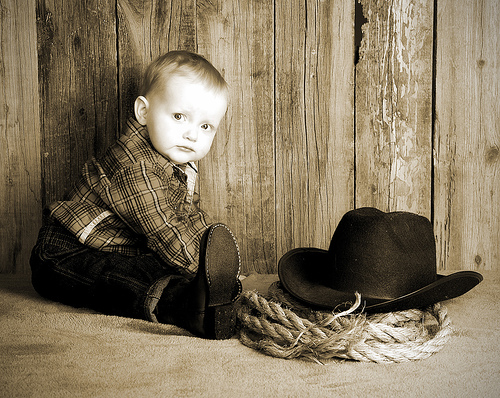
Truth be told, this was actually taken just before rigging up a 100+ pound candy drop at a Harvest Festival on Halloween night. There’s nothing exceptionally great about the photography, but the scene was too cute to pass up capturing.
Canon 5D, Canon 24-105 f/4L lens – 1/80 second, f/6.3, ISO 100


Unless otherwise noted, all photographs and text copyright 2005-2024 © Rich Legg, Inc. All rights reserved.
Reproduction or redistribution in any form without prior written permission is strictly prohibited.