June 30, 2007
Rapture
]]>
Canon 5D, Canon 24-105 f/4L – 1/1250, f/4, ISO 100
LeggNet’s Digital Capture
© Rich Legg, Inc. All rights reserved.
]]>
Canon 5D, Canon 24-105 f/4L – 1/1250, f/4, ISO 100
LeggNet’s Digital Capture
© Rich Legg, Inc. All rights reserved.
]]> 
Utah’s capitol building lit with the golden hue of sunset.
Canon 5D, Canon 24-105 f/4L lens – .4 second, f/22, ISO 100
LeggNet’s Digital Capture
© Rich Legg, Inc. All rights reserved.
]]> 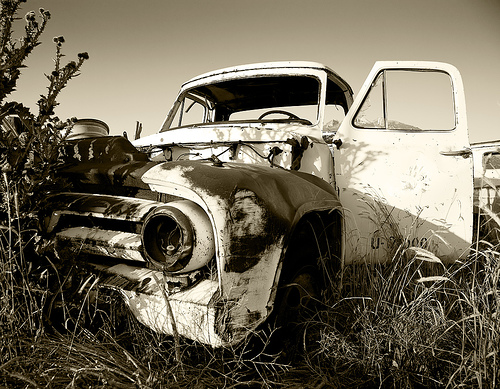
I photographed this old truck on an abandoned farm in Draper, Utah. Shooting it just before sunset captured the wonderful gradient tone in the sky. I used a strobe to fill in the shadows a bit.
Thanks to fellow photographer Dale for giving me a heads up on the location of this old farm.
Canon 5D, Canon 24-105 f/4L lens – 1/100 second, f/8, ISO 100
LeggNet’s Digital Capture
© Rich Legg, Inc. All rights reserved.
]]> 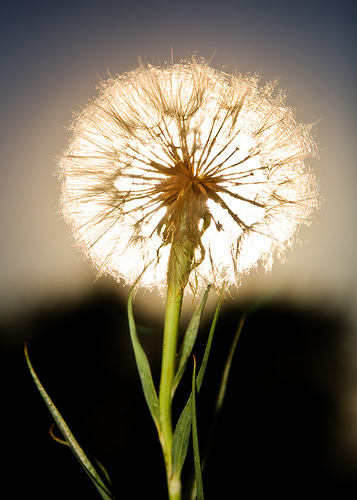
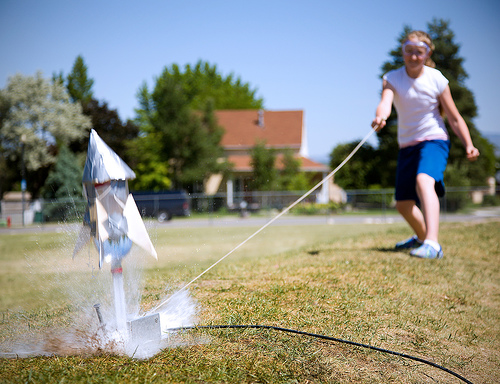
Today’s capture is an example of using fill light to add to a photo. While photographing at an abandoned farm, I came across this interesting weed and shot it against the setting sun. If I had taken the shot without the fill light, the picture would just be a black silhouette. The addition of the flash allowed much more of the weed’s detail to be seen.
My typical exposure settings for using a fill flash in daylight is to adjust my strobe (a Canon 430EX) to an exposure setting of negative 2/3 f-stop. This allows shadow areas to be illuminated without making the shot look like a flash was used.
Canon 5D, Canon 24-105 f/4L lens – 1/8000 second, f/4, ISO 100
LeggNet’s Digital Capture
© Rich Legg, Inc. All rights reserved.
]]> 
Shooting with a digital SLR camera provides a lot of benefits over non SLR models, but the increased functionality comes at a price – sensor dust. Since an SLR camera is an open system (one that allows users to change lenses) the probability of dust entering the camera is nearly unavoidable. Learning to deal with dust is a part of owning a digital SLR.
After I made the move from film to digital, the discovery of dust on my camera’s sensor was a major shock. But now after a couple years of shooting digital and dozens of sensor cleans, I now look at it as just a minor annoyance.
There are two types of digital SLR shooters – those that have dust on their sensor and those that will have dust on their sensor. I believe that every photographer should learn how to handle it. Here are the steps I take with my cameras.
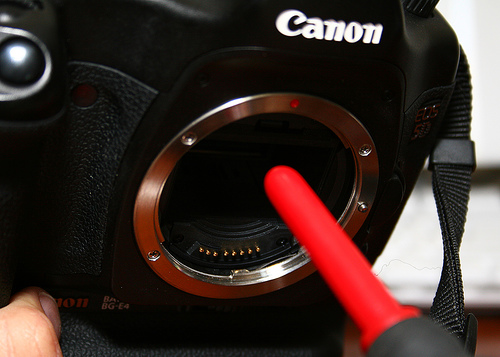
To see if you have dust, stop your camera down to its smallest aperture (usually f/22-32) and take a shot against a blank scene (blue sky works well). The dust will show up as dark blotches. The photo above shows numerous dust spots that I recently had on my Canon 5D. Keep in mind that these spots will only show up on photos taken with smaller apertures and they can easily be removed in post-processing, so you don’t have to obsess over cleaning them daily.
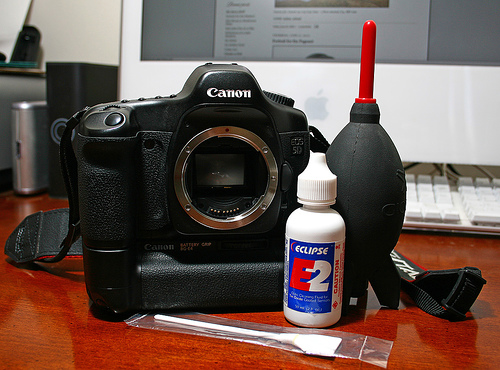
I use a few different items to clean my camera sensors. My kit consists of a manual bulb type blower along with sensor cleaning swabs & fluid.
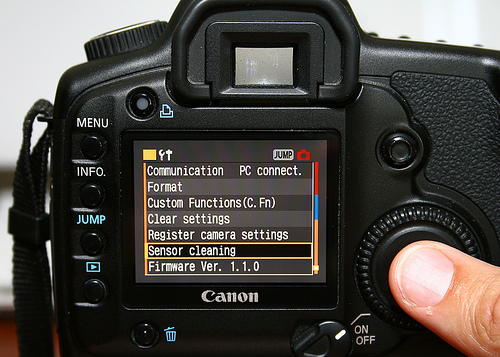
The first step I take in cleaning is to set my camera into “SENSOR CLEANING” mode. This is a menu function that opens the shutter and locks the mirror up allowing access to the sensor. Since moving these out of the way uses power, be sure to have a sufficiently charged battery before starting.

Once I have the camera in cleaning mode, I remove the lens and blow off the sensor with the bulb blower. I do this with the lens opening aiming down to allow the dust to exit. Take care to not touch anything inside the camera with the tip of the blower. If I only have a few dust spots, this will frequently be the only step necessary since the blowing air will dislodge the dust.

To remove stubborn dust spots, I use the sensor cleaning solution with a swab. This is the most effective method for me. I put a few drops of solution on the swab and make two passes across the sensor – once in each direction. I use very little pressure on the swab. It is very imperative to only use a swab once on each side to avoid re-contaminating the sensor with previously removed dust.

Note that most camera manufacturers state in their user manual that you are to never touch the sensor with anything and using this method can risk voiding your warranty. However, if you took your camera in to be professionally cleaned this is probably the method they will use.
Sensor dust is part of the price we pay for shooting with the great digital SLRs that are available today. The internet is full of stories of photographers obsessing about every little speck of dust. Don’t be like these shooters and let it consume you. Learn how to clean your own sensor when needed and spend your time worrying about the next great photo instead of a microscopic piece of dirt.
(Was this helpful? If so, please DIGG it.)
Labels: tutorial
]]> 
Shooting with a digital SLR camera provides a lot of benefits over non SLR models, but the increased functionality comes at a price – sensor dust. Since an SLR camera is an open system (one that allows users to change lenses) the probability of dust entering the camera is nearly unavoidable. Learning to deal with dust is a part of owning a digital SLR.
After I made the move from film to digital, the discovery of dust on my camera’s sensor was a major shock. But now after a couple years of shooting digital and dozens of sensor cleans, I now look at it as just a minor annoyance.
There are two types of digital SLR shooters – those that have dust on their sensor and those that will have dust on their sensor. I believe that every photographer should learn how to handle it. Here are the steps I take with my cameras.
To see if you have dust, stop your camera down to its smallest aperture (usually f/22-32) and take a shot against a blank scene (blue sky works well). The dust will show up as dark blotches. The photo above shows numerous dust spots that I recently had on my Canon 5D. Keep in mind that these spots will only show up on photos taken with smaller apertures and they can easily be removed in post-processing, so you don’t have to obsess over cleaning them daily.
I use a few different items to clean my camera sensors. My kit consists of a manual bulb type blower along with sensor cleaning swabs & fluid.

The first step I take in cleaning is to set my camera into “SENSOR CLEANING” mode. This is a menu function that opens the shutter and locks the mirror up allowing access to the sensor. Since moving these out of the way uses power, be sure to have a sufficiently charged battery before starting.
Once I have the camera in cleaning mode, I remove the lens and blow off the sensor with the bulb blower. I do this with the lens opening aiming down to allow the dust to exit. Take care to not touch anything inside the camera with the tip of the blower. If I only have a few dust spots, this will frequently be the only step necessary since the blowing air will dislodge the dust.
To remove stubborn dust spots, I use the sensor cleaning solution with a swab. This is the most effective method for me. I put a few drops of solution on the swab and make two passes across the sensor – once in each direction. I use very little pressure on the swab. It is very imperative to only use a swab once on each side to avoid re-contaminating the sensor with previously removed dust.
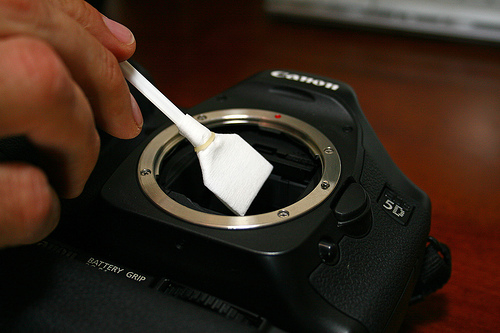
Note that most camera manufacturers state in their user manual that you are to never touch the sensor with anything and using this method can risk voiding your warranty. However, if you took your camera in to be professionally cleaned this is probably the method they will use.
Sensor dust is part of the price we pay for shooting with the great digital SLRs that are available today. The internet is full of stories of photographers obsessing about every little speck of dust. Don’t be like these shooters and let it consume you. Learn how to clean your own sensor when needed and spend your time worrying about the next great photo instead of a microscopic piece of dirt.
(Was this helpful? If so, please DIGG it.)
LeggNet’s Digital Capture
© Rich Legg, Inc. All rights reserved.
]]> 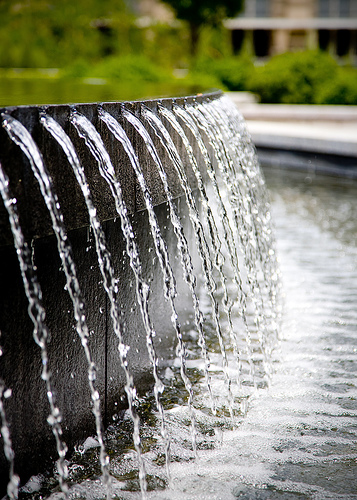
Capitol Fountain, taken at the Utah State Capitol building in Salt Lake City.
Canon 5D, Canon 24-105 f/4L lens – 1/640 second, f/4, ISO 100
LeggNet’s Digital Capture
© Rich Legg, Inc. All rights reserved.
]]> 
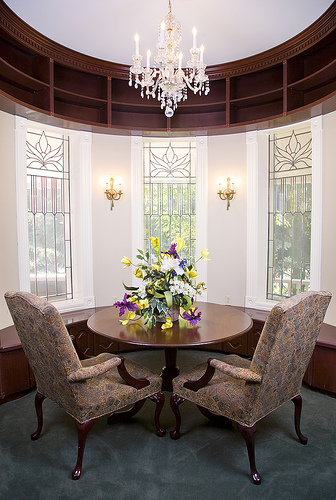
Today’s image is another room from the SugarHouse mansion that I recently photographed. The purpose of the shoot was to assist an organization in documenting the historic building.
My goal in lighting this room was to show outside detail in the windows while evenly lighting the interior. To accomplish this I placed a Canon 430EX speedlite behind the floral arrangement aimed toward the back wall. The speedlite was diffused with a Lightsphere and set to 1/2 power. I then used two monolights diffused with white umbrellas in the corners to the left and right of the camera.
While the lighting setup was fairly simple on this shot, the tricky part was eliminating reflections in the three windows. Since the windows are each at different angles, the placement of the lights left little room for error. Nearly every reflection was avoided, save for a slight one on the right window.
Another challenge with this room was the bookcases above the windows. I wanted to provide enough light to show depth in the openings but still leaving them somewhat dark. The placement of the monolights in the corners achieved this. I had to raise the lights a bit higher than I initially wanted (creating more noticeable shadows), but the trade off was worth it.
Of all the rooms I shot that day, this one was my favorite. I love the curved wall and the custom woodwork.
Canon 5D, Canon 24-105 f/4L lens – 1/15 second, f/6.3, ISO 100
Labels: buildings, photography, tutorial
]]> 
Today’s image is another room from the SugarHouse mansion that I recently photographed. The purpose of the shoot was to assist an organization in documenting the historic building.
My goal in lighting this room was to show outside detail in the windows while evenly lighting the interior. To accomplish this I placed a Canon 430EX speedlite behind the floral arrangement aimed toward the back wall. The speedlite was diffused with a Lightsphere and set to 1/2 power. I then used two monolights diffused with white umbrellas in the corners to the left and right of the camera.
While the lighting setup was fairly simple on this shot, the tricky part was eliminating reflections in the three windows. Since the windows are each at different angles, the placement of the lights left little room for error. Nearly every reflection was avoided, save for a slight one on the right window.
Another challenge with this room was the bookcases above the windows. I wanted to provide enough light to show depth in the openings but still leaving them somewhat dark. The placement of the monolights in the corners achieved this. I had to raise the lights a bit higher than I initially wanted (creating more noticeable shadows), but the trade off was worth it.
Of all the rooms I shot that day, this one was my favorite. I love the curved wall and the custom woodwork.
Canon 5D, Canon 24-105 f/4L lens – 1/15 second, f/6.3, ISO 100
LeggNet’s Digital Capture
© Rich Legg, Inc. All rights reserved.
]]> 
Today is one of the rare times that I post a photo that I did not take. This incredible capture of our planet is in response to the comment PSpotter left on yesterday’s entry. Have a great weekend.
____________
NASA’s latest hi-res image of Earth. Download more of this at: visibleearth.nasa.gov/view_rec.php?id=2429
This spectacular “blue marble” image is the most detailed true-color image of the entire Earth to date. Using a collection of satellite-based observations, scientists and visualizers stitched together months of observations of the land surface, oceans, sea ice, and clouds into a seamless, true-color mosaic of every square kilometer (.386 square mile) of our planet. These images are freely available to educators, scientists, museums, and the public. This record includes preview images and links to full resolution versions up to 21,600 pixels across.
Much of the information contained in this image came from a single remote-sensing device-NASA’s Moderate Resolution Imaging Spectroradiometer, or MODIS. Flying over 700 km above the Earth onboard the Terra satellite, MODIS provides an integrated tool for observing a variety of terrestrial, oceanic, and atmospheric features of the Earth. The land and coastal ocean portions of these images are based on surface observations collected from June through September 2001 and combined, or composited, every eight days to compensate for clouds that might block the sensor’s view of the surface on any single day. Two different types of ocean data were used in these images: shallow water true color data, and global ocean color (or chlorophyll) data. Topographic shading is based on the GTOPO 30 elevation dataset compiled by the U.S. Geological Survey’s EROS Data Center. MODIS observations of polar sea ice were combined with observations of Antarctica made by the National Oceanic and Atmospheric Administration’s AVHRR sensor—the Advanced Very High Resolution Radiometer. The cloud image is a composite of two days of imagery collected in visible light wavelengths and a third day of thermal infra-red imagery over the poles. Global city lights, derived from 9 months of observations from the Defense Meteorological Satellite Program, are superimposed on a darkened land surface map.
Credit
NASA Goddard Space Flight Center Image by Reto Stöckli (land surface, shallow water, clouds). Enhancements by Robert Simmon (ocean color, compositing, 3D globes, animation). Data and technical support: MODIS Land Group; MODIS Science Data Support Team; MODIS Atmosphere Group; MODIS Ocean Group Additional data: USGS EROS Data Center (topography); USGS Terrestrial Remote Sensing Flagstaff Field Center (Antarctica); Defense Meteorological Satellite Program (city lights).
LeggNet’s Digital Capture
© Rich Legg, Inc. All rights reserved.
]]> 
Canon 5D, Canon 24-105 f/4L lens – 1/800 second, f/4, ISO 100
LeggNet’s Digital Capture
© Rich Legg, Inc. All rights reserved.
]]> 
My two daughters are participating in a scholarship pageant this summer. One of the requirements of the event is that the entrants provide a black & white photo for the pageant publication. The girls requested that we have a special photo-shoot for these photos.
Today’s photo is Elisabeth’s favorite from the shoot. This hair adjustment pose was not planned, I just happened to catch her as she rearranged her bangs. The left hand in the hair along with the serious expression combine for a rather dramatic shot.
The lighting setup consisted of a softbox above the camera with an umbrella providing fill to one side. A third light was used to wash out the white background.
Canon 5D, Canon 24-105 f/4L lens – 1/60 second, f/9, ISO 100
LeggNet’s Digital Capture
© Rich Legg, Inc. All rights reserved.
]]> 
Canon 5D, Canon 24-105 f/4L IS lens – 1/60 second, f/8, ISO 50
LeggNet’s Digital Capture
© Rich Legg, Inc. All rights reserved.
]]> 
This capture of Salt Lake City is the current background image on my iMac’s desktop. I tend to change backgrounds quite often, but this one with its generous amount of blue sky (perfect for icons) might stay awhile.
Canon 5D, Canon 50 f/1.8 lens – 1/200 second, f/8, ISO 100
Labels: salt lake city
]]> 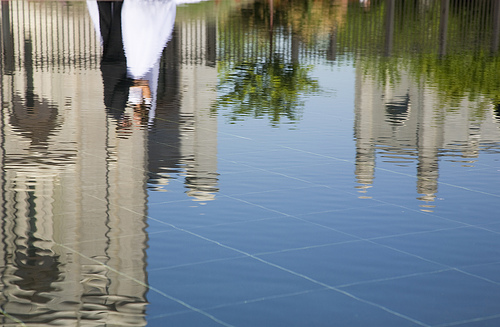
I assisted a photographer friend with a wedding last week at Temple Square in Salt Lake City. Even though I have shot over 100 weddings (mostly in the 80’s), this was my first time at Temple Square. I offered to assist so I could get a feel for the differences in shooting a wedding at this popular location.
Aside from the fact that there were no less than 8 other weddings being photographed on the grounds while we were there, it was a very beautiful setting. The grounds provide many, many settings for beautiful bride & groom shots. But with so many couples being photographed at this location, the biggest challenge I see is making a shot unique.
However, working in the real estate industry I see a lot of Utah wedding photos (hanging on the walls of client’s homes). Judging by these photos I think a lot of newlyweds don’t want a unique photograph – they just want a beautiful capture of themselves in front of the temple.
Canon 5D, Canon 24-105 f/4L IS lens – 1/200 second, f/10, ISO 100
Labels: salt lake city, wedding
]]> 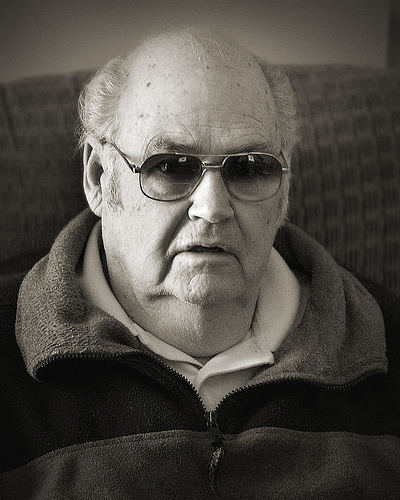
Happy Father’s Day, Dad!
Canon 30D, Canon 24-105 f/4L IS lens – 1/15 second, f/4.5, ISO 400
LeggNet’s Digital Capture
© Rich Legg, Inc. All rights reserved.
]]> 
Here’s a fun activity that will kill a few minutes today. Head over to www.sp-studio.de and create your own cartoon character in the style of South Park (which I must admit I have never seen).
Thanks to my Flickr friend Jodi Tripp for pointing this fun website out.
]]> 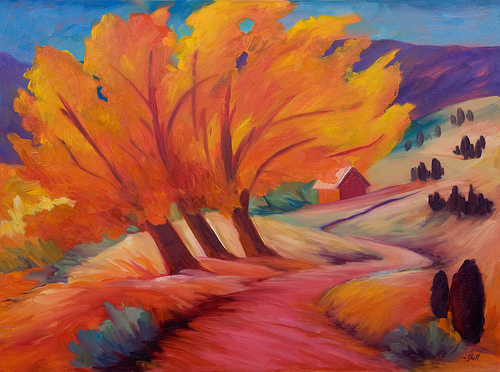
I’ve recently been working with April Shell, a Salt Lake City artist, to photograph her portfolio of oil paintings. This type of photography is a little different than my normal day-to-day shooting, but is still quite enjoyable.
The challenge in photographing artwork is to provide balanced lighting with no reflections and to accurately represent the colors. To achieve this, I used multiple diffused monolights. Since I know the color temperature of the lighting, I was able to set the white balance to show the true colors of the paintings.
To view the complete set, visit www.legacyonephotography.com/april.
Canon 5D, Canon 24-105 f/4L IS lens – 1/40 second, f/10, ISO 160
LeggNet’s Digital Capture
© Rich Legg, Inc. All rights reserved.
]]> 
I took a walk around Sugar House on Saturday afternoon. Sugar House is a rather liberal pocket within Salt Lake Valley that many outsiders wouldn’t believe exists in this conservative community. For more details on the area, check out Bryan Catherman’s post on his Hopeless Writer blog.
I usually find when I am walking around taking pictures that it is easy to strike up conversations with, and ultimately photograph, interesting people. I don’t know if it is the professional looking camera gear that makes people want to talk, but a lot of them do.
Today’s capture of Robert is an example of this. While photographing the bulletin board behind him, I asked how we was doing. We then chatted for a bit about some of the happenings in the area. After our conversation I asked if I could take his picture – he readily agreed.
Do you prefer to sneak your street photos of people or do you like the bolder “How you ‘doin?” approach?
Canon 5D, Canon 24-105 f/4L IS lens – 1/30, f/4, ISO 100
Labels: bw, salt lake city
]]> 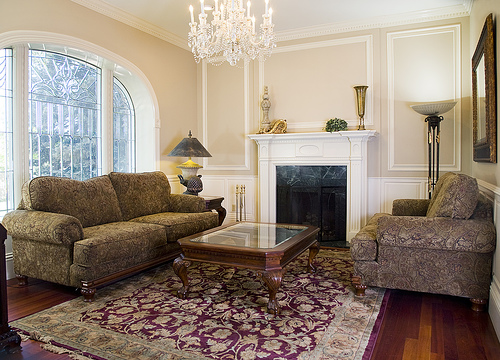
I was asked recently to assist in documenting a historic home in Sugar House, Utah through photography. The large home is over 120 years old and was originally built by a gold miner from Park City. Even though the home is currently used as an office, the decor is very reminiscent of an early 20th century home.
When capturing the interior, my goal was to light the rooms in a way to show the detail and accentuate the features without making it appear that strobes were used. With my friend Harley’s assistance, we used multiple lights to create the look.
This formal sitting room was lit with four lights. We placed a radio triggered strobe in the lamp on the right to make it appear like the lamp was lighting the room. There is a second radio triggered strobe in the back-left corner. To light the foreground we placed two lights with umbrella diffusers in the near corners.
I am fairly pleased with the result. There are a couple of shadows I would have liked to remove, but overall the lighting is fairly even and natural looking.
Canon 5D, Canon 24-105 f/4L IS lens – 1/15 second, f/5.6, ISO 100
Labels: buildings, photography, tutorial
]]> 
You might be a photo geek if . . .
You make a special trip back to the car for your camera so you can capture the vanishing point arrangement of shopping carts in front of the local Costco.
Canon 5D, Canon 24-105 f/4L IS lens, Canon 430EX strobe – 1/100 second, f/5, ISO 160
]]> 
Earlier this year I was contacted by a publisher that is working on a book for the State of Utah to use for recruiting companies to relocate to Utah. The publisher was in need of photographs to place alongside the written copy about the state’s economic advantages. This served as another example of the power of the Internet for today’s photographer. The publisher’s photo editor found my work on Flickr and contacted me directly about the freelance job. While not a huge windfall, the job does pay fairly well (about 100x better than microstock).
This is a reason that I am a proponent of the “Only Show Your Best school of thought, especially if you ever desire to sell your work. I didn’t adhere to this at first (as evident from some of my early images on Flickr), but over the past year I have worked on keeping this in mind when uploading. On a public forum, you never know who might be browsing the images and what impact they can have on future earnings.
Today’s image is a collage of some of the photos they have selected for use in the book. I like the diversity of the images, I think they have chosen well.
Labels: photography
]]> 
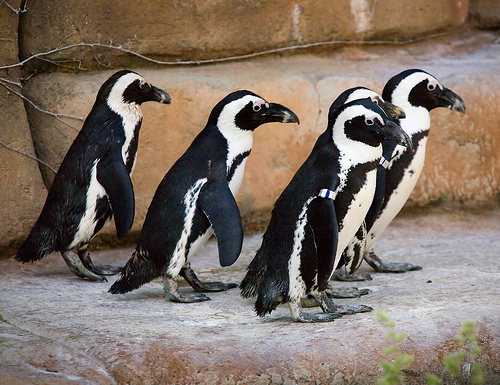
Canon 5D, Canon 70-200 f//4L lens with 1.4x extender – 1/40 second, f/5.6, ISO 160
Labels: animal
]]> 
I follow a lot of blogs on a daily basis. Like many of you, I use an RSS feed reader in place of visiting each individual blog. Lately, my favorite reader has been Google Reader. I like the interface and find that it does a good job.
Here are most of the photography links that are currently in my reader (along with a link to the feed):
Black Star Rising
Change, Culture, Creativity, Communication
Dan Heller’s Photography Business Blog
Digital Inspiration
Digital Photography Review
Digital Photography School
Digital Photography Tips From The Top Floor
DIYPhotography.net – Photography and Studio Lighting – Do It Yourself
fotagrafaiocht
jackandchet.com
New West Images
Photo News Today
Photography Bay
Photography for Real Estate
Scott Hargis’ Photos
Shorpy – The 100 Year-Old Photo Blog
Strobist
The Digital Story
The Thing of the Moment
Thomas Hawk’s Digital Connection
and, of course, my own feed:
Please share any good photography related feeds you follow. I’ve always got more room in my feed reader….
LeggNet’s Digital Capture
© Rich Legg, Inc. All rights reserved.
]]> 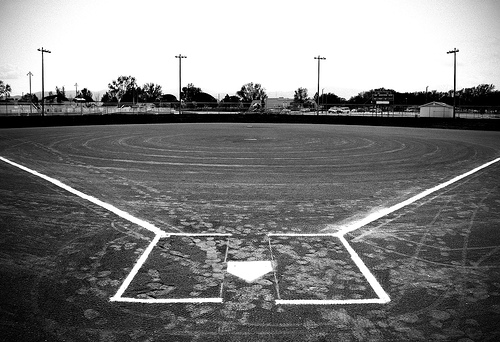
For this capture of an empty baseball diamond, I used some fairly aggressive settings in Photoshop CS2′s CHANNEL MIXER tool to convert the shot to black & white. I pushed the BLUE slider to the 200% level and then used a negative 100% setting on the GREEN slider to even out the levels. This technique resulted in the very dark dirt and the washed out sky.
Soon though, I won’t be using the CHANNEL MIXER adjustment layer for my black & white conversions. My upgrade to Photoshop CS3 should arrive this week and I will begin using the new BLACK & WHITE adjustment layer feature. This is just one of the (many) reasons I opted for the upgrade.
Canon 5D, Canon 24-105 f/4L IS lens – 1/40 second, f/16, ISO 50
LeggNet’s Digital Capture
© Rich Legg, Inc. All rights reserved.
]]>
Canon 5D, Canon 24-105 f/4L IS lens – 1/80 second, f/4, ISO 100
]]> 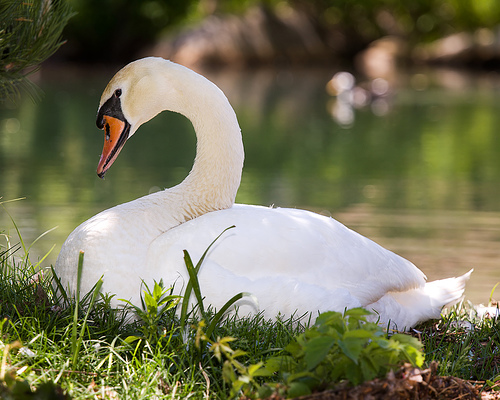
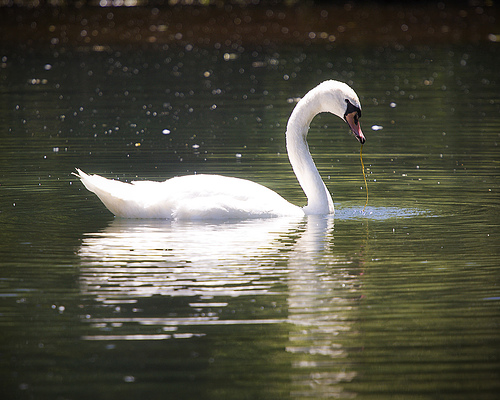
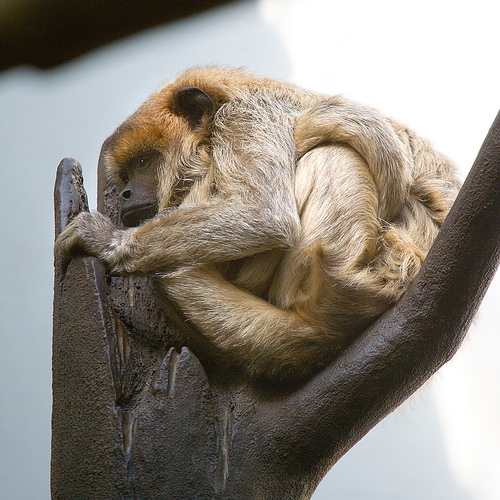
One thing I do to make my daytime captures pop a bit is use a strobe. When I do this, my goal is to add to the presentation of the subject while avoiding an unnatural appearance.
Today’s featured photo of a resting swan is an example of this technique. I came across this swan recently while driving to a client’s home. It was just after lunch and the sun was directly overhead creating harsh shadows. The bird was relaxing in the shade of a tree with spots of sun peaking through while the pond in the background was in full sunlight.
To get the shot I put on the longest lens I had with me (70-200 w/ 1.4x extender) and attached a strobe (Canon 430EX) to my camera. My purpose in using the strobe was threefold:
1. Fill in the shadows to create more even lighting
2. Create a Catchlight in the bird’s eye
3. Add separation between the subject and the background.
To achieve these effects without making the shot seem unnaturally lit, I dialed the strobe’s power setting to -1/3 f-stop from the camera’s metered exposure. Doing this allowed the natural light to combine with the strobe’s artificial light, creating a natural appearance to the subject while accomplishing the three objectives. The setting of -1/3 worked on this scene, but I sometimes use more or less power from the strobe on other scenes depending on the light.
Using a strobe in daylight, especially bright sunny days, can greatly enhance your shots. Play around with your flash’s power settings and see what works for you.
Canon 5D, Canon 70-200 f/4L with 1.4x extender – 1/100 second, f/5.6, ISO 100
Labels: animal, birds, photography, tutorial


Unless otherwise noted, all photographs and text copyright 2005-2024 © Rich Legg, Inc. All rights reserved.
Reproduction or redistribution in any form without prior written permission is strictly prohibited.