
December 13th, 2005
Depth of Field
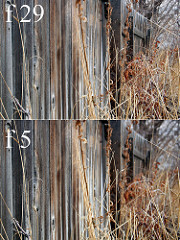
Depth of Field Example
Originally uploaded by LeggNet. With the popularity of fully automatic cameras, many people have missed out on the experience of using different settings on their camera to create the feel they desire in the photograph. They can visualize what they want to achieve in their mind’s eye, but are unable to transfer it into the captured image.
Depth of field is an example of something you can control with a simple camera setting that can dramatically change the final photo. Put simply, the less amount of light that is allowed to enter the camera lens, the greater the area of the photograph which will be in focus. This is controlled by adjusting the aperture setting (the ‘f’ numbers). In the example photographs included in this post, you can see that though they are both of the same subject the amount of background area in focus (the right side, down the fence line) changes substantially.
The top photograph (click on it to enlarge) has the camera lens set ‘stopped down’ to f29, or set to allow the least amount of light in. This setting ensures that the foreground and background area will be in focus.
The bottom photograph has the camera lens set ‘wide open’ at f5, or set to allow the most amount of light in. This setting causes the foreground, and more notably the background area to go out of focus.
Many automatic digital cameras have setting which allows the user to manually control the aperture and depth of field. Play around with yours and see what results you can achieve.
For more information on depth of field, do a google search. Here’s a good example.


